Showing posts with label Music Note Wheel. Show all posts

Sunday, 30 March 2014

Creating Backgrounds - Sponging and Spritzing

Hi everyone, this is the second technique that I promised to post.  I call it the Sponging and Spritzing technique (I am sure there is a more technical term for it).


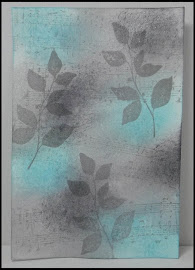
I have used a colour scheme of Basic Gray, Smoky Slate, Tempting Turquoise and Whisper White.  This is a card that I posted several months ago, but I have been asked numerous times on how I created the background, so here goes.


I randomly sponged Tempting Turquoise over a piece of Whisper White cardstock measuring 9cm x 13.3cm.
Photo

I then randomly sponged on Basic Gray.
Photo
I then sponged on Smoky Slate.
Photo
I then lightly spritz this piece with water to blend the colours together.  You can leave this step, however the colours will not be blended together as well, It also mutes the colour of the ink slightly.  Dry this off with the heat gun to speed up the process.

Once the piece is dry you can stamp your images.  I used Smoky Slate to do my stamping using the solid leaf stamp from the Summer Silhouettes stamp set and the Music Note Wheel.  I off stamped the Music Note Wheel to get a lighter colour of ink. 
Photo
The next step is to spritz the piece with Vanilla Shimmer Smooch Spritz to give it a lovely shimmery finish.  It does not show up very well in the photo, but the finished effect is beautiful, it also lightens the Smoky Slate stamped images.  I then stamped each corner with the small splodge stamp (not sure how to describe this stamp) from the Clockworks stamp set in each corner with  Tempting Turquoise ink. This piece will now be slightly wonky, but do not panic as when you stick it down to the base card it flattens out.
Photo

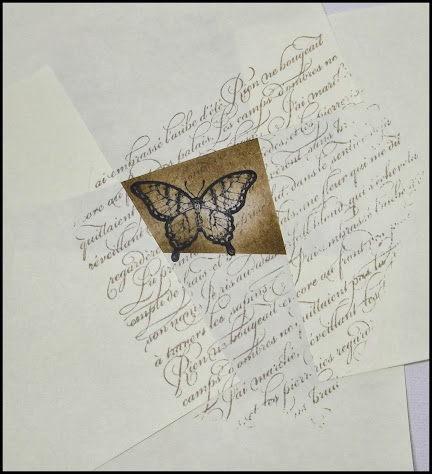
You are now ready to make your card.  I used a Smoky Slate mat 9.5cm x 13.8cm, a Whisper White mat 10cm x 14.3cm and a Basic Gray card base (a piece of A4 cut in half lengthwise).  The inside of the card is a Whisper White piece 10cm x 14.3cm with a White embossed butterfly on Smoky Slate adhered to the bottom right corner.

On my card I have used a doily (cut down to 3/4), a piece of Smoky Slate DSP 2.5cm x 9cm with the sentiment from the Teeny Tiny Sentiments stamp set stamped in Basic Gray, a piece of Tempting Turquoise cardstock punched with the Scallop Trim Border punch, Basic Gray Stitched Grosgrain, frame from the Chalk Talk stamp set (stamped with Smoky Slate on Whisper White) and cut out with the matching Framelit, a 1 1/4" circle of the same background I made with the sponging and spritzing technique, White embossed butterfly from the Backyard Basic stamp set and the matching Framelit (this is on Smoky Slate).  The frame piece is lifted slightly with dimensionals.
Photo


Creating Backgrounds - Retiform Technique

At a recent get together of the Stampin' Up group that I belong to, I was asked to demonstrate some backgrounds created by using various techniques.  As promised to the Stampin' Up ladies at our get together I will be posting over the next week instructions and photos of the backgrounds that I demonstrated.


The first background is the Retiform Technique which I found on Splitcoast Stampers with a great tutorial .  This is a great technique using post-it notes and cardstock scraps to create the masks for the sponging and stamping.


I started with a piece of Naturals White cardstock and using a scrap of Naturals White to create the mask, I sponged on Baked Brown Sugar ink for my first line.  There is no correct pattern to this, just create your gridlines where you want then to go.  Below are a pictures of the first steps, sponging on Baked Brown Sugar to create the divisions where you will be stamping.  I sponged so that the ink is on the inside of the lines, however you can sponge so that ink is on the outside of the lines.  It just depends upon what effect you want to create, experiment to see which method you like best, just be consistent otherwise the technique will not work.


The next step is to sponge a light base colour over the entire piece.  I have used Crumb Cake, this is done randomly, leaving some light patches (just make sure that you have inked over the entire piece so that no Naturals White is showing through).

You are now ready to start stamping.  Mask off the centre piece with Post-it Notes to stamp the first image.  It does not matter if you off stamp over the edge of the mask, it does look better if some of the images are stamped off centre or partially off the masked piece.  Build up each section using a variety of stamps and inks to create the effect that you want.
You continue to mask off the various sections and continue stamping until you have built up the piece and all the sections have been stamped.  I used Jet Black Staz-on, Baked Brown Sugar and Crumb Cake for the stamping along with stamps from the En Francais, Backyard Basics, Flowering Flourishes, Papillon Potpourri and Everything Eleanor stamp sets, along with the Music Note Stampin' Wheel.  (Tip:  I take the stamp off the Stampin' Wheel and fix it to a piece of Perspex to create a stamp which I find much easier to use than the Stampin' Wheel).  The sentiment is from the Peaceful Petals stamp set.


Once the background piece is finished you can now make your card.  I have used a Basic Black card base, along with some Victoria Crochet Trim and the Scallop Oval and Large Oval punches for the sentiment.
Inside of the card - I try and finish the inside of my cards to match the front.  It just gives a nice finishing touch instead of a blank card inside.
This is a very basic technique but you can get some terrific effects with it by using different grid patterns and ink colours.


The card below is one that I cased from Gina K designs, I just loved the colours (I used Always Artichoke, Crumb Cake and Early Espresso on Naturals White and Early Espresso cardstock.)  I used the same gridlines and design for my card above.


Saturday, 4 January 2014

Shades of Gray with a Touch of Blue

Was I ever out of my comfort zone today when I made my card for the Color Throwdown Challenge, using the colours of Basic Gray, Tempting Turquoise, Smoky Slate and Whisper White.  I am really pleased with my finished card (it has a beautiful shimmer that does not show up in the photo), and I will certainly be using these colours together in the future.

 
I made the background by sponging Tempting Turquoise, Smoky Slate and Basic Gray ink on Whisper White cardstock, spritzing with water to blend the colours.  Once this was dry I stamped on images from the Secret Garden, Clockworks stamp sets and the Music Notes Stampin' Wheel using Smoky Slate.  I then misted this with Vanilla Shimmer Smooch Spritz to give a lovely shimmer to the finish. 
 
The butterfly is from the Backyard Basics stamp set, embossed in White on Smoky Slate cardstock.  I created a small circle the same as the main background for underneath the butterfly on the tag from the Chalk Talk stamp set.


Wednesday, 1 January 2014

Six Sided Sampler

Happy New Year everyone.
 
I had a quiet New Years Day at home with my family and I had some time to play this afternoon.
I made 3 cards using the "Six Sided Sampler" stamp set and matching punch.  The colour scheme is Basic Black and Baked Brown Sugar.  I wanted to have a masculine feel to my cards and I just adore these two colours together.
 
These are the cards.
 

Card 1
 
I used the Stripes embossing folder to create the black gingham background piece.  The sentiment is from the Itty Bitty Banners stamp set, black button and Linen Thread to finish.  Other tools used were the Hexagon Punch with the matching stamp set "Six Sided Sampler".


Card 2
 
The tools I used are the Honeycomb embossing folder, Dotted Scallop Ribbon Border punch, Hexagon punch, small circle from the Itty Bitty Shapes Punch Pack, 1/2" Circle punch, Word Window punch, Modern Label punch,  along with stamps "Six Sided Sampler", "Music Notes" Wheel, "Simply Serif Mini Alphabet" and "Fabulous Phrases", a piece of
Basic Black Taffeta Ribbon was added to finish off the card.

 
Card 3
 
The background was made by stamping and punching out the shapes using the "Six Sided Sampler" stamp set and matching Hexagon punch, then sticking them down on a piece of card cut to size.  Other tools used are Chevron Border punch, embossing folder from the new Sale-a-bration catalogue, Ticket Duo Builder punch and matching stamp set "That's the Ticket", with finishing touches Burlap Ribbon.


Sunday, 9 June 2013

Some Sneak Peaks ...

It was like Christmas in my house on Friday, my Stampin' Up pre-order arrived.  Naturally I had to play and I created my first card using one of the new 2013-15 In-colours, Baked Brown Sugar.  I used the Music Note Stampin' Wheel and die cut the word birthday in Basic Black.  The background piece was embossed using the Perfect Polka Dots embossing folder and the edging was made using the Dotted Scallop Ribbon Border punch.


Having made my first card, this got me to thinking about the rest of the 2013-15 In-colours and designing some cards for a Catalogue Launch workshop.  So I made another card using the other In-colours of Coastal Cabana, Crisp Cantaloupe, Pistachio Pudding, Strawberry Slush and Baked Brown Sugar.


My final card is also for the new Catalogue Launch Workshop, using all the 2013-15 In-colours as well as the new "Mosaic Madness" stamp set with the matching Mosaic punch.  The other stamp sets used are "Fabulous Phrases" and "Simply Serif Alphabet". 


Thursday, 6 June 2013

Sahara Sand ...

In a recent edition of Australian Cardmaking Stamping & Papercraft there were a series of 10 Quick Cards made by Julie Dudley show casing the Stampin' Up Decorative Labels Punch.

Julie's cards were made with non Stampin' Up DSP and cardstock, however I really liked what Julie had done with the Decorative Label punch in the design of her cards so I put my spin on it and created these three cards.


On two of the cards I stamped the Very Vintage and Music Notes Stampin' Wheel using Sahara Sand ink on Naturals White cardstock.  For the other card I stamped the Music Notes Stampin' Wheel and the Leaf/Branch stamp from the Summer Silhouettes stamp set using Sahara Sand ink on Naturals White cardstock.  I did stamp off some of the ink to give the stamped image a muted tone.

The DSP is Sahara Sand from the Neutrals Paper Stack with the little flowers made using the 7/8" scallop punch.  I punched out 5 scallop circles, misted them with water, layered them together and put a hole through the centre and using a brad joined together.  The layers were then lightly scrunched up towards the middle and then teased out until you are happy with the shape of your flower.

Once dry the flowers are used to create the posy on the Decorative Labels punched out piece.  The leaves were made using Old Olive ink and the Stippled Blossoms stamp set.  Sentiments are from the Itty Bitty Banners Stamp Set and the matching Bitty Banners Framelits.  A linen thread with a neutrals button added to finish the card.  All the edges of the cardstock and DSP have been inked with Sahara Sand.


Tuesday, 16 October 2012

Vintage Christmas Cards

On Sunday I had a little time to play and decided to make some vintage style Christmas cards.

Colour scheme is Basic Black, Cherry Cobbler, Naturals Ivory and Soft Suede.  Stamp sets used are "Christmas Wishes", "Petite Pairs" and "Christmas Lodge".

I used the Stampin' Up Music Note Wheel to create some DSP which I have used throughout the cards.  The tickets were made using the Take a Ticket Wheel, I inked the edges of the Ticket on the Wheel with a Soft Suede Stampin' Write Marker, created the ticket then stamped Merry Christmas in the middle of the ticket to finish. DSP is Festival of Prints.  Finishing touch of Brushed Bronze designer buttons from the Holiday Catalogue with some Cherry Cobbler Bakers Twine. 


Wednesday, 27 June 2012

Pals Paper Arts #PPA137 Sketch Challenge - Mr & Mrs

The flowers that can be made with the Floral Fusion Sizzlit Die are numerous.  I have been playing today to see what other flowers I could make and I really liked the flowers I have used on this card.  They were made by cutting 2 layers of each size of the Floral Fusion Die, spritzing with Vanilla Shimmer Smooch Spritz, let dry a little and then scrunch them up individually and then flatten them out slightly  Layer them up 2 large, 2 medium and 2 small, off setting the petals as you go, and put a small brad in the middle to hold them together.  Form the flower up around the brad until you are happy with the shape of your flower.  Just a tip to be careful when you are forming the flower up as the cardstock is still damp and can tear easily.

The sketch challenge at Pals Paper Arts this week is based on the following sketch

PPA137

The colour scheme is Basic Black, Very Vanilla and Cherry Cobbler.   Stamp sets used are "Happiness Shared", "Tiny Tags" and Music Note Wheel.


A close up of the flowers showing the glimmer created from the Vanilla Shimmer Smooch Spritz.


Thursday, 24 May 2012

Elements of Style

Lately I just keep on using the Elements of Style stamp from Stampin' Up on my cards.  I love the image when it has been coloured with the Stampin' Write Markers.  I made this card just for the fun of it, to see what I could create using the Music Wheel on the DSP and the Elements of Style stamp set.

I have used a piece of First Edition Specialty DSP and put the music notes diagonally across the top and bottom of the card.  All the other embelishments have been made using Stampin' Up products, the little Black Bird has been embossed but it does not show up very well in the photo.

The colours used are Bravo Burgundy, Basic Black, Very Vanilla, Old Olive and Always Artichoke. 

Friday, 6 April 2012

JAI #112 Colour Challenge

The challenge this week at Just Add Ink is a colour challenge:

Pinks and browns go so well together and make such a pretty combination.

Stamps - Fabulous Florets, Teeny Tiny Sentiments, Music Note Wheel
Paper/Cardstock - Very Vanilla & Crumb Cake Neutrals DSP, PInk Pirouette, Chocolate Chip,
Very Vanilla and Crumb Cake Cardstock
Ink - Chocolate Chip & Crumb Cake
Other - Basic Jewels Pearls, Word Window Punch, Crumb Cake Seam Binding Ribbon


Sunday, 25 March 2012

U Rock


For our next Stampin' Up Card Club challenge we have to design a card based on the Razzleberry Card on page 14 of the new Autumn-Winter Mini Catalogue.  I made this card yesterday in trying out my designs for the challenge.  I have used all Stampin' Up products.  The base card is basic black with crumb cake and natural ivory being the other two colours I have used, with black ink for all stamping.

I stamped the music on the card using the Music Notes standard wheel. I then used the big ink splot (that is how I describe it) from the Extreme Elements stamp set to stamp the background underneath the record.  The record was made by punching from basic black cardstock a 2 1/5" circle and a small circle using the circle punch from the Itty Bitty Shapes Punch Pack, and from the natural ivory a 1 1/4" circle.  The natural ivory circle was put through the Square Lattice emobssing folder to give it some texture.   The circles were then layered to create the record (I thought it looked a bit like a target, but it is supposed to be a record to go with the music theme).

The ticket tags were made by cutting natural ivory cardstock 1" x 2" stamping the sentiment and then punching the corners using the 2mm handheld punch.  The lines around the ticket tags were free drawn.  I used the U Rock wording from the Perfect Words stamp set, however I only inked part of the same to use the words that I wanted, the actual stamp is U Rock My World.  The guitar is from the Grunge Rock stamp set, stamped on crumb cake cardstock and cut out.  The ticket tags have been tucked under the edge of the record and the guitar layered up with dimensionals.