Showing posts with label Challenge. Show all posts

Wednesday, 14 November 2018

Just Add Ink #433 - "Colour"

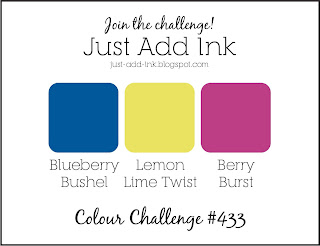
I am playing along this week with the Just Add Ink Colour challenge.  The challenge is to use the colours of Blueberry Bushel, Lemon Lime Twist and Berry Burst.


I have used colour blocking for the background and coloured the image for my card using a blender pen and Classic Stampin' Pads in the colours of the challenge.


The image is from the Amazing Life stamp set (this is the set that those who attended OnStage last weekend received, so it is a little sneak peak) and was perfect for this challenge as I was able to colour the word 'Cake' and the cake to match the background colours.


Don't forget the inside of your card.  I have stamped the 'Happy Birthday' image and then the "YAY!" which I then coloured with the blender pen and the Classic Stampin' Pads.

I will admit that these colours were right out of my comfort zone, but I am happy with how the finished card turned out.

Thank you for visiting.
Carolyn

Friday, 30 November 2012

WOOHOO Top 3 & A Cut Above


WOOHOO, my card was selected in the Top 3 at the Create with Connie and Mary Challenge 227 this week and also selected for A Cut Above at The Paper Players Challenge 122.


Tuesday, 20 November 2012

It's Christmas in the Heart

It is Flag It time at the  Merry Monday Challenge this week based on this sketch.

Using the Heart of Christmas stamp set and the Candlelight Christmas Specialty DSP with a colour scheme of Early Espresso, Real Red and Very Vanilla this is the card I have created. 

The snowflake is made using the Snow Flurry Bigz Die and Champagne Glimmer Paper with the sentiment cut out using the Apothecary Accents Framelits.

The Very Vanilla was embossed using the Perfect Polka Dots embossing folder.  This sketch is great as you can make a christmas card in no time at all.  The sketch is easy to adapt for whatever type of card that you are wishing to make.


I received an Honourable Mention for my card which I am quite chuffed with.


Monday, 19 November 2012

Pretty In Pink

PPA147 Nov 15 2012
The challenge this week at Pals Paper Arts is based on this sketch.

Pink and white are so pretty together.  I have team them up with the Stippled Blossoms stamp set and created this pretty card for the challenge.

DSP is the Pink Pirouette from the Subtles Designer Series Paper Stack.  Cardstock is Pink Pirouette and Whisper White and the ink is from the Classic Stampin' Ink Pads Pink Pirouette, Pretty in Pink, Old Olive and Basic Black.

The sentiment is from the Petite Pairs stamp set, which was stamped on  a doily from the Delicate Doilies Sizzlits.  Embossing folders used are Perfect Polka Dots and Fancy Fan with Whisper White Organza ribbon as a finishing touch.

Come to Bethlehem

Using the Framelits Window Frames Collection I have made an easel card of a different shape.  This idea I got from Narelle Farrugia whose work I absolutely adore, with all the layers and elements on her cards.

2012 Create Thursday-007At Create with Connie & Mary this week, the challenge is to make a shaped card using framelits or dies and also to use this sketch.

The colour scheme I have used is Basic Black, Whisper White and Champagne Glimmer Paper as the challenge at The Paper Players this week is to add some glam and glitz by featuring gold or silver on our creations, so I have combined the two challenges to make my card.


The Champagne Glimmer Paper is the gold and the glam is a Rhinestone added to the star.

The stamp sets used are Come to Bethlehem, Christmas Wishes and Teeny Tiny Sentiments.

The colour scheme is not the norm for Christmas, but a liked the finished result.


Sunday, 18 November 2012

Just Add Music

The challenge this week at Just Add Ink is to Just Add Music.

The inspiration for this Post-it Note & Calendar holder came from a post by Carolyn Lindenmayer where Carolyn made an easel card with the Calender on the top of the card and the Post-It Notes on the bottom of the card.  I really liked the idea and I have adapted it and made a Post-It Note holder.  I tried to make the front look like a satchel, but had a bit of trouble rounding the corners of the tiny pieces for the straps (I will have to work on this one).

The Music part of the challenge is incorporated in Natural Composition Specialty DSP, which has the music notes printed on it.  I love this DSP with the glossy raised pattern on the heavy weight Natural paper. 

I made the title using the Simply Serif Mini Alphabet and the 1/2" circle punch and small circle punch from the Itty Bitty Shapes Punch Pack.

I put instructions on how I made it at the end of this post.


Materials

Crumb Cake Cardstock
Scraps of Early Espresso & Naturals Ivory Cardstock
Natural Composition Specialty DSP – Music Note Sheet
Neutrals DSP – Striped Crumb Cake piece
Early Espresso Core’dinations Cardstock
Designer Sanding Blocks
Soft Suede Stampin’ Write Marker
Crumb Cake Classic Stampin’ Pad
Early Espresso Classic Stampin’ Pad
Stamping Sponge
Simply Serif Mini Alphabet Stamp Set
½” Circle Punch
Small Punch from the Itty Bitty Shapes Punch Pack
Post-It Notes
Small Calendar
Buttons #5 Sizzlits
Sticky Strip
Multipurpose Liquid Glue

Instructions

1.         Cut a piece of Crumb Cake cardstock 6 ½” x 3”.  Score this on the long side at 3” and 3 ½”.  Fold on crease lines.  This creates the base Post-It Note cover.

2.         Cut a piece of Music Note paper 3” x 3”
            Cut a piece of Crumb Cake  CS 3” x 1 ¼” – Round corners on one long edge
            Cut a piece of Music Note paper 2 7/8 x 1 1/8” – Round corners on one long edge
            Cut 2 pieces of Crumb Cake CS  5/8” x 2” – Round edges on one end
            Cut 2 pieces of Music Note paper ½” x 1 7/8” – Round edges on one end
            Cut a piece of Striped Crumb Cake DSP 2 7/8” x 2 7/8”

3.         Ink the edges of all pieces by sponging Crumb Cake on edges.

4.         Adhere the 3” x 3” piece of Music Note paper to front of the Post-It Note cover.

5.         Adhere the  2 7/8” x 1 1/8” piece of Music Note paper to the 3” x 1 ¼” Crumb Cake cardstock, making sure that the top straight edges are flush so the border is only around the short sides and along the bottom of the piece with the rounded corners. This is the flap for the satchel.

6.         Adhere the ½” x 1 7/8” piece of Music Note paper to the 5/8” x 2” Crumb Cake cardstock, making sure that the straight edges at the top are flush so the border is only around the long sides and along the bottom of the piece with the rounded corners.  This creates the straps for the satchel.

7.         Using the Soft Suede Stampin’ Write Marker, create Faux Stitching around the cover piece, flap and straps. 

8.         Adhere the flap to the top of the Post-In Note cover then adhere the straps.

9.         Create the buttons on the satchel straps by cutting 2 small buttons using the Buttons Sizzlit Die and the Early Espresso Core’dinations cardstock.  Lightly sand these with the sanding blocks to give them a distressed look.  Adhere these to the straps on the satchel.

10.       Create the Notes title by stamping NOTES on Naturals Ivory cardstock with the Early Espresso and the Simply Serif Mini Alphabet stamp set.  Punch the letters out using the small circle punch from the Itty Bitty Shape Punch Pack.  Punch out small circles from Early Espresso cardstock using the ½” Circle Punch.  Ink the letters lightly with Crumb Cake and adhere to the Early Espresso circles.  Adhere to the bottom of the Post-It Note cover.

11.       Adhere the piece of striped Crumb Cake DSP to the inside of the Post-It Note cover, making sure that you put it on the top cover and not the bottom.  Adhere the calendar to the centre of this piece.

12.       Adhere the Post-It Notes to the inside bottom cover and you now have your completed Satchel Post-It Note cover.

Tuesday, 16 October 2012

Create Our Own Paper

The challenge this week at Simply Stampin' Challenge is DIY DSP (to create our own paper).

I made my DIY DSP by stamping the "Netting" stamp using Crumb Cake on a piece of Naturals Ivory cardstock and then stamping over this with the stamps in the "The Open Sea" stamp set using Early Espresso, Crumb Cake and Midnight Muse (this is a favourite colour scheme).  The edges were then inked with Early Espresso.


Friday, 5 October 2012

Mojo Monday #261

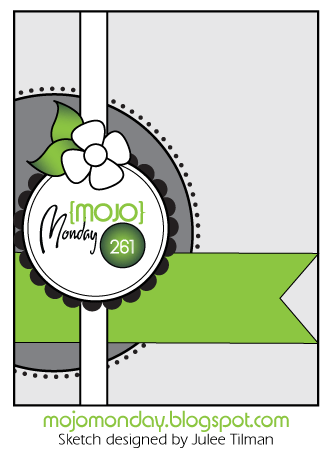
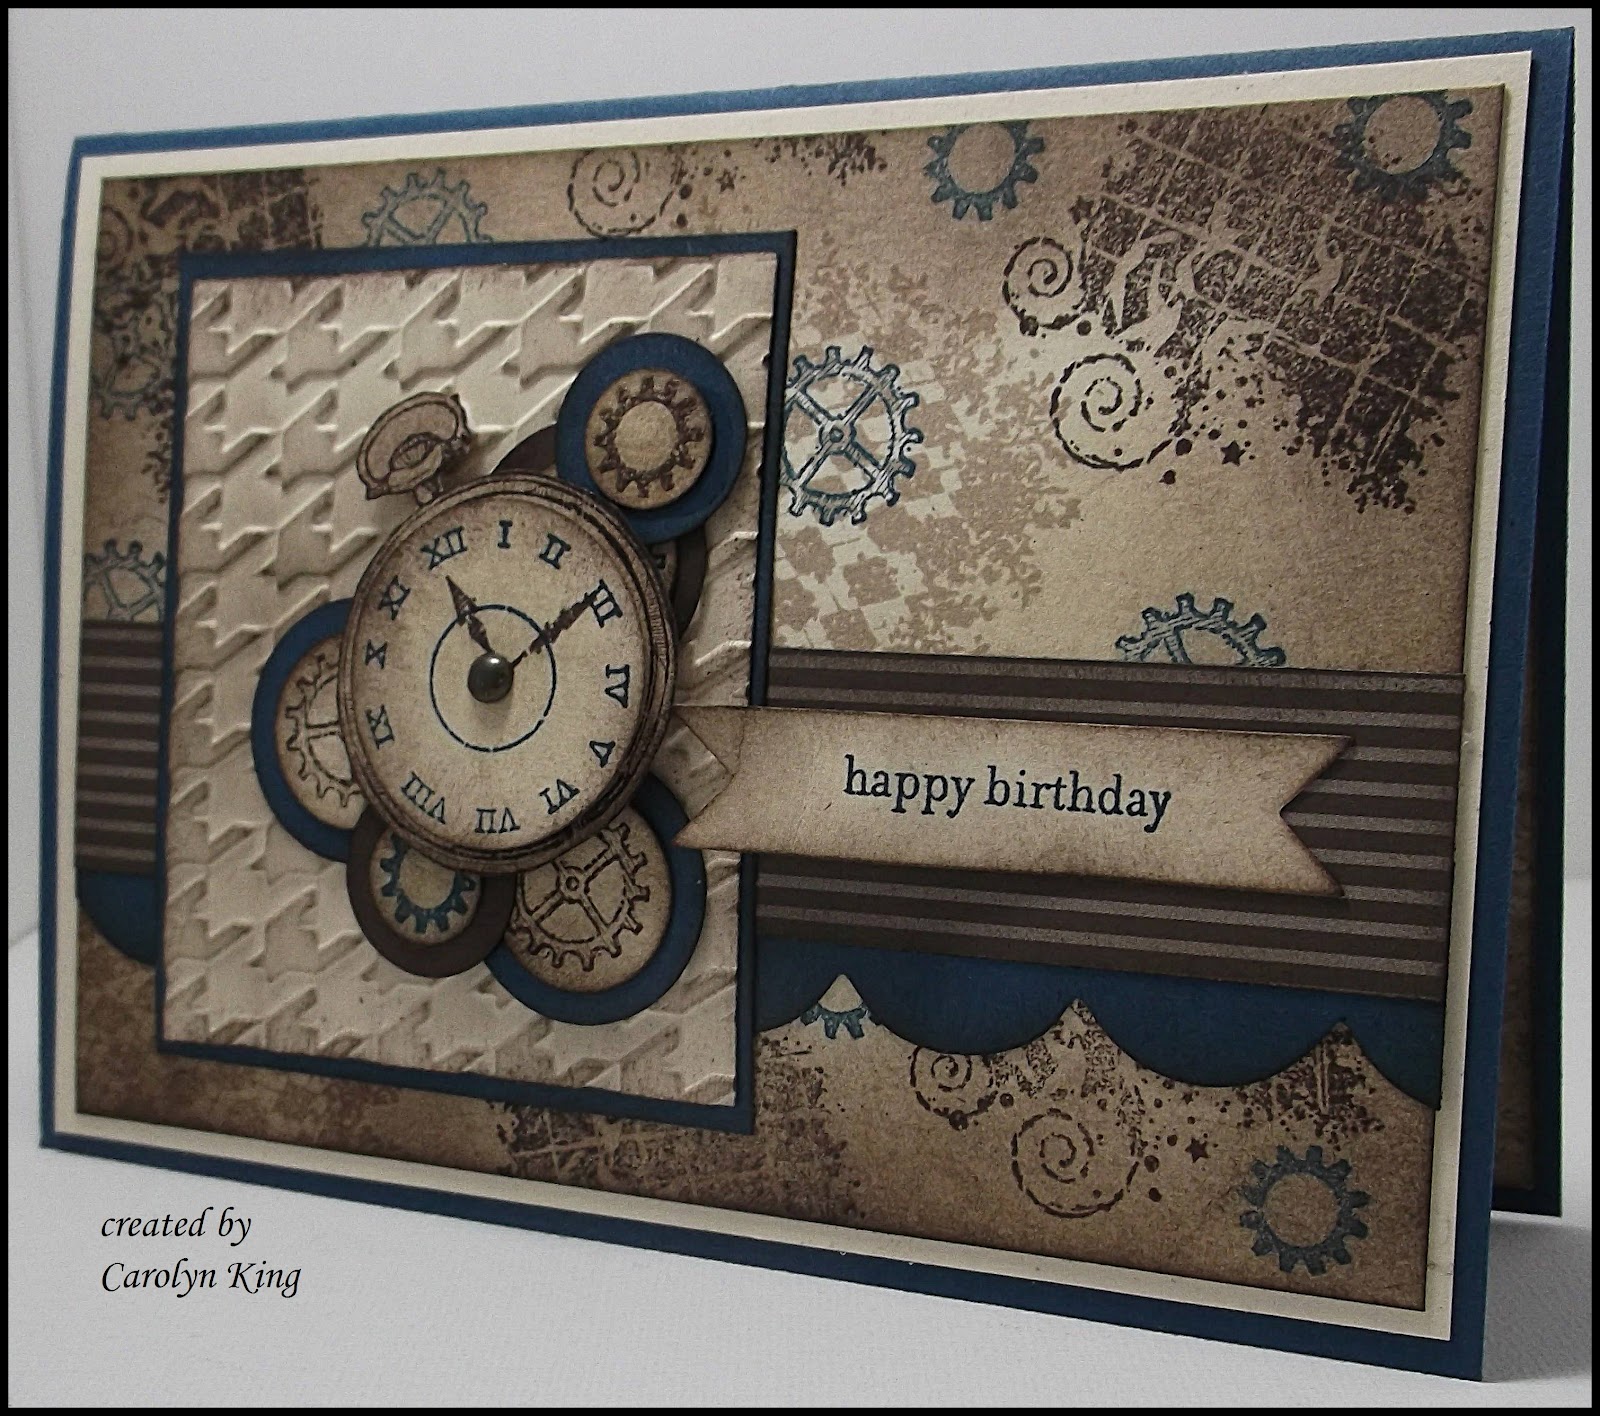
I got out one of my favourite stamps sets of the moment (I am sure this will change soon) "Clockworks" to make my card for this weeks challenge at Mojo Monday based on the following sketch:


The "Clockworks" stamp set has some great background stamps which I have used on Whisper White cardstock with Basic Gray and Staz On Black ink.

A recent purchase was the Simply Serif Mini Alphabet which is a great size to make your own words and sentiments for cards and scrapbook pages.  I stamped the sentiment on the Neutrals DSP, it is not straight but I randomly stamped it like this as I thought it went better with the style of card.  Rhinestones have been added around the edge of the circle for a little bling.


Monday, 1 October 2012

Wedding Gift Box

It is Tic Tac Toe this week for The Paper Players Challenge #115. 


I have chosen Sparkle/Bling, Wedding or Anniversary and An Element Repeated in 3s.

I found this great tutuorial on Split Coast Stampers on how to make a heart box so for this challenge I decided to make one as a little wedding gift box.  The sparkle bling is the silver embossed wedding bells and the rhinestones in the centre of the flowers and on the sentiment, the theme is Wedding and the element repeated in 3s are my flowers made using the Floral Fusion Sizzlits die.

Colour scheme of Very Vanilla and Pool Party with the DSP from the Comfort Cafe Designer Series Paper pack.  Stamp set used is "Embellished Events".


Merry Christmas

The Simply Stampin' Challenge this week is based on the sketch below which went perfectly with the colour challenge at Dynamic Duos of Cherry Cobbler and Your Choice.  I chose Gumball Green as my colour of choice and have made the following Christmas Card, which was a quick and easy make using the "Jolly Bingo Bits" stamp set and the 1", 1 1/4" and 1 3/8" circle punches.  The sentiment is from the "Petite Pairs" stamp set and the DSP is "Be of Good Cheer".


Sunday, 30 September 2012

Mojo Monday #260

The challenge this week at Mojo Monday is based on the following sketch:


I have decided to make a square card for this challenge using the stamp sets "Stippled Blossoms", "Papillon Potpourri" and "Petite Pairs" with a colour scheme of Early Espresso, Crumb Cake, Whisper White and a touch of Old Olive in the leaves of the flowers.  


Saturday, 15 September 2012

Dynamic Duos - Honourable Mention

I received an Honourable Mention this week at Dynamic Duos for my "Get Well Kit" entry in the colour challenge of Cajun Craze and Always Artichoke.  I had fun making this little get well pressie and I am very excited to have received an Honourable Mention.


Thursday, 13 September 2012

Simply Stampin' Challenge - Rustic Ute

The challenge this week at Simply Stampin' Challenge is based on the following sketch:


I was very excited when I got home from work today as I had received a parcel from Stampin' Up.  Naturally I had to have a play.

The rustic ute is from the stamp set "Countryside" which I have coloured with coloured pencils.


Tuesday, 11 September 2012

The Paper Players #PP112 - Mini Bag

I found a great tutorial by Silvey Shim on how to make a mini bag using a 11" x 8 1/2" piece of cardstock.

I have adapted the measurements to use an A4 piece of cardstock with measurements of 11" x 8 1/4".  I followed Silvey's tutorial on how to fold the basic mini bag.  I have given the measurements that I used and details on how I decorated my mini bag at the end of this post.

The challenge this week at  The Paper Players  is to create a paper project using the colours of Basic Gray, Baja Breeze and Basic Black.  My first thought as usual was to make a card, but then I wanted to try to make the mini bag, so here it is.


Bag closed.


Bag open, showing the inside of the handles.
Measurements for basic mini bag

11" x 8 1/4" piece of Basic Black cardstock
Score on the 11" edge at 3/4", 4 1/2", 6 1/2" and 10 1/4".
Score on the 8 1/4" edge at 1 7/8" and 6 3/8"

Follow Silvey's tutorial on how to fold and put the mini bag together.

Embellishments

Base Mat and DSP

4 1/4" x 3 1/2" Basic Gray cardstock - 2 pieces (one for each side)
4 1/8" x 3 3/8" Basic Gray Strip DSP from Neutrals Designer Sieries Paper Stack - 2 pieces

Adhere to sides of mini bag.

Centre Piece on Base Mat and DSP

3 5/8" x 2 1/8" Basic Gray cardstock
3 1/2" x 2" Basic Black cardstock - this is embossed using the Perfect Polka Dots embossing folder.

Adhere to base mat and DSP.

Top of Purse

4 1/2" x 1 1/2" Baja Breeze cardstock - 2 pieces, scored at 3/4", border punch with Scallop Trim Border Punch and emboss with Pefect Polka Dots embossing folder.  Fold on score line and adhere to top of purse sides.

Handles

8 1/2" x 3/4" Basic Black cardstock - 2 pieces

Measure in 1/2" from purse top sides to position the outside edge of the purse handle.  Adhere to the inside of the top of the purse with sticky strip, making sure that the handles are the same length.  I lined mine up with the bottom edge of the piece of Baja Breeze.   For extra strength I put a brad through each of the handles as well.  The brads are hidden on the inside by flowers made using the Floral Fusions Die.  The brads on the outside of the purse are hidden by Basic Gray buttons from the Neutrals Designer Buttons, a piece of Linen Thread is threaded though the buttons before adhering down.

Ribbon

Cut 2 pieces of Basic Black Taffeta Ribbon 9 3/4".  Adhere this to the top of the bag just under the top fold and the Baja Breeze top piece.  Make a ribbon bow and adhere using a glue dot.  Make sure that the ribbon join is at the front in the middle as the bow hides the join.

Flowers

The flowers are made using the Floral Fusions Sizzlits die, Baja Breeze and Basic Gray cardstock and the four petal punch from the Itty Bitty Shapes Punch Pack and Basic Black cardstock and Basic Jewel Rhinestones.

You need to make six flowers for the outside of the mini bag and four flowers for the inside handles.  I did not put rhinestones on the inside handle flowers.

To finish

To close the mini bag I have used a black velcro dot.

Sunday, 9 September 2012

Get Well Kit

I found a picture in a recent magazine for a "Get Well Kit".  I really liked the concept but alas there were no instructions, so I have spent the afternoon measuring and cutting to make this "Get Well Kit" Stampin' Up style.  I put the measurements on the bottom of this post so I hope you can understand my scratchings on how I made it.

I have made it to enter into the challenge this week at Dynamic Duos using the colours of Cajun Craze and Always Artichoke.


Front of Kit


Inside of Kit

Measurements for Kit

Main Cover

4 1/2" x 10" Cardstock, score at 4 1/2" and 5 1/2"
Punch edges with border punch of choice
4 1/8" x 4 5/8" Cardstock
4" x 4 1/2" DSP
Other decorations and embellishments of your choice

Inside Covers

4 3/8" x 3 7/8" Cardstock x 2 pieces (for left and right inside covers)
4 1/4" x 3 3/4" DSP x 2 pieces
4 3/8" x 7/8" Cardstock (for inside spine cover)
4 1/4" x 3/4" DSP

Tissue Holder

2" x 5" Cardstock, scored at 3/8", 1 3/8", 3 5/8" and 4 5/8"
1 3/4" x 5" DSP

Lozenge Holder

1 3/8" x 3 1/8" Cardstock, scored at 3/8", 1 1/8", 2" and 2 3/4"
1 1/8" x 3 1/8 DSP

Lip Balm Holder

3/4" x 2 1/2" Cardstock
1/2" x 2 1/2" DSP

Curve with bone folder as this piece needs to wrap around the Lip Balm.

Tea Bag Holder

3 3/4" x 2" Cardstock
3 1/2" x 1 3/4" DSP

When adhering this piece only put sticky strip on three sides as you need the top open to slip the tea bag into.

To Put Together

Adhere the cardstock and DSP to front cover.  Decorate and embellish as desired.

Adhere the cardstock and DSP to the inside covers and inside spine.

Wrap Lip Balm Holder around Lip Balm and stick together.  Adhere to middle panel in the kit.

Adhere Lozenge Holder 3/4" in from right hand side of DSP on the left inside cover.  This is to allow room for the Lip Balm to sit when the cover is closed.  It is best to check before adhering this piece down to make sure that it will all fit.  To do this close the cover when the Lip Balm has been stuck down to check the measurement that you will need to allow.

Adhere Tissue Holder 1/8" in from left hand side of DSP on the left inside cover, making sure that this piece is centred and the tissues fit inside.

Adhere Tea Bag Holder to bottom of right inside cover, decorate as desired and slip in the tea bag.

Saturday, 8 September 2012

JAI#134 - Just Add - Polka Dots

The challenge this week at Just Add Ink is to Just Add Polka Dots.

For this card I got out my fav stamp set for this week "Clockworks".  Still on the vintage theme as well, using a colour scheme of Primrose Petals, Crumb Cake and Naturals Ivory. 


Tuesday, 4 September 2012

Clockworks Trio

At the recent Perth Heartfelt Stampin' Event we received a free stamp set "Clockworks".  When I saw this in our Annual Catalogue I was very excited, oh the possibilities. I was even more excited when I found out that it was the free stamp set that we would be receiving at the Stampin' Event.

I have made a trio of vintage cards using the colour scheme of Midnight Muse, Naturals Ivory, Crumb Cake and Early Espresso.


The first card I made to enter into the Mojo Monday Challenge #257 based on the following sketch (I just love this sketch):


I have used the new Comfort Cafe DSP and the Neutrals DSP Stack for this card. 


Peak of the inside of the card.


The second card I made using the stamp set "En Francais" as a background stamp, this is my favourite go to stamp set for background stamping.  I added some bakers twine which I inked with the Early Espresso to tone it into the same shades as the card.

This card has been featured on My Crafty Picks here.


Peak of the inside of the card.


The third card was made by stamping on Naturals Ivory in Crumb Cake, Early Espresso and Midnight Muse and then inking with Crumb Cake over the piece and then Early Espresso around the edges.  I used the Bitty Banners Framelits for the sentiment.