Showing posts with label Petite Pairs. Show all posts

Saturday, 24 October 2015

Vintage Leaves

Sharing another card with you that I cased.  This time from StampTV, the stamp sets used are slightly different but I managed to get a similar effect.


Supplies that you will need for this card are stamp sets "Vintage Leaves", "Petite Pairs" "Hardwood" and "Lovely as a Tree", Linen Thread, Neutral Candy Dots, Very Vanilla and Early Espresso cardstock, Classic Stampin' Pads Early Espresso, Tip Top Taupe, Delightful Dijon, Cajun Craze, Pink Pirouette, Stampin' Write Markers Tip Top Taupe, Delightful Dijon and Marina Mist.

Sunday, 2 August 2015

A Little Dear for Christmas ....

Hi everyone, sharing my card I made for the sketch challenge this week at Freshly Made Sketches.

I used the little dear image from the "Made With Love" stamp set.  I was making some Christmas cards for the WA Cancer Council Relay for Life fundraising at work and really liked the sketch this week at Freshly Made Sketches.  It was a nice clean sketch to follow and my card was very quick to put together.


Tuesday, 9 December 2014

A Little Triangle Box for Christmas Goodies

Hi everyone, I would like to share with you a little triangle box perfect for some Christmas Goodies.


Take half a piece of A4 cardstock (this should be an A5 size, 21cm x 14.8cm) and score in half on the 21cm side at 10.5cm.  On the 14.8cm edge put a small pencil mark at 7.4cm (this is the middle point), do this to the top and bottom.  Score from this 7.4cm pencil mark to the 10.5cm score line point on the edge of the 21cm side, it should be on the diagonal.  Crease all fold lines and fold into a triangle shape.  Punch a hole in the middle of each side of the smallest triangles, the holes should be on either side of the back opening.  Thread ribbon thought the hole, put your goodies in and tie the ribbon into a bow to close.  Hopefully this makes sense.


The stars have been created by using the Bright & Beautiful stamp set and coordinating dies, Gold Encore ink, Brushed Gold cardstock, Very Vanilla and Cherry Cobbler cardstock.  The 'Merry Christmas' is from the Petite Pairs stamp set, finished off with a gold button and the Gold Metallic Bakers twine.  I used the "Under the Tree" Specialty DSP as it is a cardstock weight kraft sheet with colour print perfect for boxes and Cherry Cobbler Seam Binding Ribbon on these cute little boxes.


Xmas Stars 

Friday, 21 November 2014

Party Time Perth

I was recently invited to do a 15 minute "WOW" presentation at the Party Time Perth event held on 8 November, 2014.  It was a terrific day, and the presentations were so inspirational.  The display was out of this world, I did not know where to look first with so many beautiful and creative ideas.  I certainly went home inspired.


Well back to my "WOW" presentation.  I was so organised at home having decided on a theme of vintage, I had made my notes and decided on what I was going to say, cinch you say.  Well, when I got up on stage to do my presentation, the heart started beating at a great rate of knots and stage fright set in.  All my carefully prepared presentation went out the window.  I was so nervous and I can't even remember what I said.  It must have been okay, as people were congratulating me (either that or they were just being very nice to me).  Either way I went home a happy camper.

This is the card that I made for the presentation.


Saturday, 20 September 2014

Snowy Christmas Village

I was so inspired by Pamela T Stoner's card "Snowy Village Holiday Homes" that I had to make this card myself.  Once I worked out the technique it was as simple as embossing, masking and sponging.  This is the card I made the same as Pamela's card.


This is my take on Pamela's card using the same snowy scene background and the houses from the  Holiday Home stamp set.


christmas2

Wednesday, 11 June 2014

Blendabilities #2

I have been playing with the Blendabilities and have coloured some flowers made with Whisper White cardstock and the Pansy and Petite Petals punches.


I have made my card based on this week's sketch challenge at the Deconstructed Sketch.


Deconstructed Sketch 154
I have used the "Moonlight" DSP in the 2014-15 Catalogue along with Sahara Sand, Whisper White and a touch of Lost Lagoon cardstock.


I coloured the flowers by using the light Rich Razzleberry Blendability and coloured about half of each leaf.  I then coloured the edges of each leave with the darkest Rich Razzleberry Blendability.  I then spritz the entire flower with the Isocol Alchohol which blended the colours together, while still leaving some of the lighter white areas in the flower.  I let them dry overnight before using.


DS154

Blendabilities #1

Hi everyone, I would like to share a card with you that I have made for this week's challenge at Retro Sketches

I have been playing with the Blendabilities, trying out techniques that I have learnt using Copic Markers to see how they went.


The flowers on my card have been made by covering a piece of Whisper White with Heat & Stick Powder, set with the heat gun and then the Dazzling Diamonds added.  I pressed the Dazzling Diamonds into the card piece to make sure that it was well adhered.  I then used the heat gun again to set the piece.


The flower image from the "Petite Petals" stamp set was stamped with Memento Tuxedo Black ink.  I then commenced to colour using the Coastal Cabana Blendabilities Marker Assortment, starting with the darkest colour in the centre and working out to the lightest colour.  When you colour you only press the marker down to put the colour on the image, you do not colour in the usual manner.  The ink spreads quite well, and as you are only pressing the marker down lightly it will not damage the tip of your marker.  When you have finished colouring punch the image out with the Petite Petals punch.


I have used the new "Moonlight" DSP and colours of Basic Gray, Whisper White and Lost Lagoon.  Lost Lagoon is one of the new 2014-15 In-colours coming soon, so another sneak peak.  I have also used the new Lost Lagoon matching ribbon.


RS#118

Saturday, 7 June 2014

Sneak Peaks 2014-15 In-colours

Hi everyone, it was like Christmas in my house yesterday when my pre-order arrived for the 2014-15 Annual Catalogue.  I have fallen in love with the new Blackberry Bliss and Hello Honey colours and the Moonlight Designer Series Paper.


I made this card for a friend of mine using the Mojo Monday sketch for this week. 


The DSP is from the new Moonlight Paper Pack and also the Neutrals Paper Stack.  Colour scheme of Blackberry Bliss, Sahara Sand, Hello Honey and Whisper White.  The flowers are from the "Flower Shop" stamp set, stamped with Blackberry Bliss, Sahara Sand and Hello Honey ink and punched out with the matching punch.  The sentiment is from the "Petite Pairs" stamp set.  A few rhinestones were added for a bit of bling.


MOJO348

Wednesday, 14 May 2014

Retro Sketches #114

The challenge this week at Retro Sketches is based on this sketch:


For my card I have used a colour scheme of Marina Mist, Crumb Cake, Early Espresso and Naturals White.  This colour scheme is one of my favourites lately, and I keep coming back to it along with the butterflies from the Backyard Basic stamp set and matching dies.

RS#114

Thursday, 1 May 2014

White Vellum Flowers

I made this card a few weeks ago for the Mojo Monday Challenge #341 but did not get around to posting it.  I loved the sketch layout so I thought that I would share my card with you.


I took inspiration from this card for yesterday's post using the same colour scheme of Marina Mist, Early Espresso, Crumb Cake and Naturals White along with the white embossed flowers made using the Flower Shop stamp set and the matching Pansy punch.


MOJO341

Saturday, 12 April 2014

Creating Backgrounds - Distressed Embossing

Hi everyone, this is the fifth background that I promised to post (I am finally getting around to posting the backgrounds that I shared with everyone at a recent Stamparoo's get together).


The technique is distressed embossing.  It is a quick and effective technique that gives a terrific finish.  I have used Basic Gray as my base however you can use any base colour, just experiment until you find the colour combination that you like.  Gold on Basic Black is quite stunning.


Step 1 - I started with a piece of Basic Gray cardstock (9cm x 13.3cm) and embossed this with gold embossing powder.  Make sure you cover the entire piece (I dragged the Versamark over the cardstock to get the best coverage). 

Photo

Step 2 - Put the gold embossed piece of Basic Gray into the Beautifully Baroque Embossing Folder and put through the Bigshot.


Photo

Step 3 - This is now the fun part, distressing the gold embossing with the Stampin' Sanding Block.  Sand over the entire piece, this will remove some of the gold from the raised embossing.  Be careful with this step, as if you sand too heavily you will tear the background piece (this can be repaired with a bit of double sided tape on the back - it is distressed after all).  The Basic Gray will now appear through the gold embossing.

Photo


Step 4 - Make your card.  I used a Basic Gray A2 card base, a Basic Black mat 9.5cm x 13.8cm and Basic Black Taffeta Ribbon (this is retired from the Stampin' Up Catalogue but I still have a little left in my stash and it went perfectly with my card).  The sentiment is from the Petite Pairs stamp set, stamped with Basic Gray on Naturals White then punched out using the Large Oval and matted on a Basic Black Scalloped Oval.


Photo

Tuesday, 1 April 2014

Creating Backgrounds - Emboss Resist

Hi everyone, this is the third technique that I promised to post.  It is a version of an emboss resist technique.


Step 1 - Using Versamark Ink stamp the En Francais stamp onto a piece of Naturals White cardstock and emboss this with Stampin' Emboss Clear embossing powder.


Photo

Step 2 - Using Crumb Cake, Soft Suede, Chocolate Chip and Early Espresso Classic Stampin' Pads apply ink directly onto the Clear-Mount Block F.  Always start with the Crumb Cake first, then Soft Suede, Chocolate Chip and Early Espresso last.  Go lightly with the amount of Early Espresso that you use unless you want your piece to be quite dark.


Step 3 - Spritz the inked block with water using a Stampin' Spritzer.  The more water you use then the more the ink will spread on your Naturals White piece, if you want some white patches then go lightly on the water spritzing.  You can add more water to the block after you have stamped it the first time and reapply and this will move the ink around more.  The choice is yours depending upon the effect that you want, just experiment to get the effect that you like.

Photo

Step 4 - Stamp the block onto the embossed Naturals White cardstock and leave it sit for a few seconds to allow the ink to position itself on the cardstock.

Photo

Step 5 - Remove the stamp from the cardstock piece and blot off with a piece of hand towel.  You can let this dry naturally or speed up the process with a heat gun.

Photo

Step 6 - You can now use your background piece to make a card.  This is my finished card using the emboss resist background piece I created.

Photo


Sunday, 2 March 2014

Hardwood Background

ck100 (451x640)


Don't you just love the new "Hardwood" stamp.  I have stamped it with Early Espresso on Crumb Cake for the background, stamped the stars in Chocolate Chip and Crumb Cake on Naturals White cardstock and then cut them out.  The card base is Chocolate Chip and the DSP is Crumb Cake from the Neutrals Paper Stack.   The tag was made using the Scalloped Tag Topper Punch from the new Occasions Catalogue.

Friday, 3 January 2014

Vintage Butterflies

I recently found some cards made with luggage tags by Kerry Lawson.  I really liked the idea of using a tag on the card as a focal point so with Kerry's cards as inspiration, I changed things up a bit and made them Stampin' Up style.

I have used a basic colour scheme of Crushed Curry, Early Espresso and Naturals White, with some Soft Suede, Crumb Cake, Cajun Craze and Baked Brown Sugar ink add in as extras.


The butterflies were made by embossing with Early Espresso on Crushed Curry cardstock and then coloured using a Blender Pen and Cajun Craze and Crushed Curry Classic Stampin' Ink pads.  The butterfly image is from "Backyard Basics" stamp set and was cut out using the co-ordinating die.  The colour of the Early Espresso DSP from the Neutrals Paper Stack was changed by sponging Crushed Curry over it to change the colour white to the Crushed Curry colour to match our card.  The Washi Tape is from the Gingham Garden Designer Washi Tape pack.  The cards were finished off with Early Espresso Candy Dots and a Linen Thread bow with an Early Espresso button.


Thursday, 5 December 2013

Deconstructed Sketch

I know that I have not blogged for a while, but I got a real surprise when I realised that it was 2 months.  Time flies when you are having fun.  I have been creating in my blogging absence, scrapbooking a creating mini albums,just not card making to post on-line.

Anyway, I felt like creating some cards today and this is what I made for the challenge at the Deconstructed Sketch based on this great sketch.

Deconstructed Sketch No. 129
 
I have used the stamp sets "Santa's List" and "Petite Pairs" along with Crumb Cake cardstock and Cherry Cobbler DSP from the Regals DSP Stack.  I coloured Santa in with Stampin' Write Markers, Ink Pads and Blender Pen.


Tuesday, 18 June 2013

Handmade Flowers ...

Just a quick post today for the challenge at the Deconstructed Sketch based on this great sketch.

Deconstructed Sketch 105

I have been playing around making flowers using one of the new In-colours for 2013-15, Baked Brown Sugar and an old favourite Naturals Ivory along with the 7/8" scallop circle punch and the Blossom Party Originals Die.  Naturally I just had to create something with them, so I decided to use them on my card to create a little flower posy. 


The second card I made for the fun of it.


Sunday, 28 April 2013

Faux Postage

I have been playing around with the Faux Postage technique using the "Postage Due" stamp set along with the Postage Stamp punch and also making my background paper with sponging, spritzing and stamping.


The first card is one I made for the Mojo Monday Challenge based on this great sketch by Carole.


The sketch had four panels at the top, but I could only fit three on my card.  I used the postage stamps in the "Postage Due" stamps set for two of the postage stamps, but made the stamp with the sentiment on it using the Faux Postage techinque.  The sentiment is from the "Petite Pairs" stamp set.

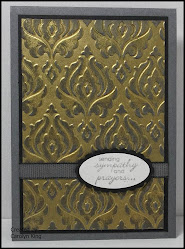
The background on the top of the card was made using the Square Lattice embossing folder, inked up with Crumb Cake ink and put through the big shot.  I gives a great finish which went perfectly with the vintage style of the card.  The bottom panel I also made using the technique as detailed on Card 2.


The second card is one I made for the challenge at Just Add Ink which was to create our own fun background. 

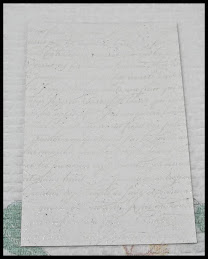
I started off with a piece of Naturals Ivory cardstock and I sponged on Early Espresso, Soft Suede and Crumb Cake ink.  I then misted it with water and blotted off the excess water, this had the effect of blending the colours slightly. Once this was dry (I cheated and used the heat gun as I am so impatient) I then cut out a doily using the Paper Doily Sizzlit for a template, which I then put over the piece and spritz over with Vanilla Shimmer Smooch Spritz.  This gave a lovely shimmery finish to the piece. which has not shown up very well in the photo.  I then stamped over the top of this with the large stamp from the "Postage Due" stamp set using Soft Suede ink.

The Faux Postage stamps were made using Natural Ivory cardstock, Crumb Cake and Soft Suede ink, 1" Square Punch, Postage Stamp Punch and a piece of Word Window Sheet for the 1" square mask.   The butterfly is from the "Kindness Matters" stamp set and the sentiment is from the "Petite Pairs" stamp set..


The final card is one I made using up all my left over bits and the "Hearts a Flutter" stamp set.  All cards were finished with Victoria Crochet Trim, Linen Thread, Antique Brads and Flower Trim.


Friday, 26 April 2013

For Everything You Are ...

While I had the "Secret Garden" stamp set and Framelits out I finished off this card that I have had on the go for 2 weeks.  I put all the DPS and cardstock together but could not quite decide how to finish it off so it has been moving around my table, patiently wating to be finished.

Secret Garden ...

The challenge this week at The Deconstructed Sketch is based on this great sketch:

Deconstructed Sketch No. 99

I have used the stamp sets "Secret Garden" and "Petite Pairs" on my card with a colour scheme of Chocolate Chip, Pacific Point, Lucky Limeade and Very Vanilla.  The DSP is from the "International Bazaar" paper pack.  Did some doodling on the flowers with a white gel pen to highlight the petals.


Friday, 8 February 2013

Bashful Blue ...

It is a colour and sketch challenge this week at Still addINKtive. The colours are Bashful Blue, Early Espresso and Crumb Cake and this is the sketch:


This is my card.  DSP is from the Print Poetry Paper Pad and the Subtles Paper Stack.  I have layered the Early Espresso Stitched Grosgrain Ribbon on top of the new Natural Trim Ribbon, I like the finished look of the two ribbons together.  Sentiment is from the "Petite Pairs" stamp set and I have used the Ovals and Labels Framelits Collection dies. The embossing folder that I used is the Lacy Brocades with a finishing touch of the button brads from the Vintage Trinklets.