Showing posts with label Stitched Shapes Framelits. Show all posts

Tuesday, 12 June 2018

Blue Stained Glass

When coloured the Graceful Glass Designer Vellum gives you a gorgeous finished piece just like a stained glass window.  I have coloured this piece of vellum with Pool Party, Bermuda Bay and Pacific Point Stampin' Write Markers.


The font on the images in the Painted Glass stamp set compliments the stained glass window effect, making is so easy to create your card.  All you have to do is decide on a design layout. 

If you live in Australia 
you can get all the supplies you need

 for this project from me. 

You can place an order online oContact Me and place an order.


Thank you for visiting.

Carolyn
 

Sunday, 12 March 2017

Special Reason - One Sheet Wonder Cards 11 & 12

Hi everyone, second last post in the series of cards for the Special Reason One Sheet Wonder.  Cards 11 and 12 are covered in this post.

Card 11


Cut a piece of A4 Basic Black cardstock in half lengthwise. This is then folded in half to create the card base.

Cut a piece of Delightful Dijon cardstock 9.5cm x 14.9cm.  Adhere this to the card front making sure to leave a small Basic Black border either side, refer to the picture for placement.


Cut a piece of Whisper White cardstock 9cm x 14.9cm.  Adhere this to the card front.

Cut a piece of Designer Series Paper 7cm x 14.9cm and adhere this to the Whisper White piece.

Cut 3 Basic Black decorative strips using the Flourish Thinlits. You will need to trim one end of two of the pieces and then cut the other piece into two small pieces.  Adhere these to the card front making sure that the join will be hidden behind the Delightful Dijon horizontal strip.

Cut a piece of Delightful Dijon cardstock 2cm x 9.5cm.  Adhere this to a piece of Basic Black cardstock 2.5cm x 9.5cm.  Adhere this to the card front making sure that it covers the decorative strip join.

Cut a Basic Black Stitched Shape circle using the 2 7/8" Circie in the set.  Adhere a Lace Doily to this circle and then adhere the to the card front using dimensionals.


Stamp and watercolour 1 large flower, 1 small flower and 3 large leaves.  Cut these out using the Stylish Stems Framelits.    Arrange these on the Lace Doily, refer to picture for placement.  The small flower is raised on dimensionals in the centre of the large flower.

Stamp the sentiment on a piece of Basic Black cardstock using Versamark Ink, add White Embossing Powder and heat set.  Punch this out using the Classic Label Punch.   Adhere across the flower using dimensionals.


For the inside cut a piece of Whisper White cardstock 10cm x 14.3cm and adhere this in place.  

Cut a piece of Designer series paper 10cm x 2cm.  Adhere this to a piece of Basic Black cardstock cut at 10cm x 2.5cm.  Adhere this across the bottom of the Whisper White piece.

Card 12


A5 piece of Delightful Dijon cardstock (this is A4 cut in half) folded in half to create the card base.

Cut a piece of Basic Black cardstock 13.8cm x 9.5cm.  Adhere to card front.

Cut a piece of Whisper White cardstock 13.3cm x 9cm.  Put this through the Lovely Lace Textured Impressions Embossing folder and then adhere to the card front.

Cut a piece of Designer Series Paper 8.5cm x 5cm and adhere this to a piece of Basic Black cardstock cut at 9cm x 5.5cm.  Adhere this to the card front, refer to picture for placement.

Cut a piece of Delightful Dijon cardstock at 2cm x 10.5cm and adhere this to a piece of Basic Black cardstock cut at 2.5cm x 10.5cm.  Adhere this to the card front, refer to picture for placement.

Stamp and watercolour 1 large flower, 1 small flower and 3 large leaves.  Cut these out using the Stylish Stems Framelits.    Arrange these on the card front along with some Basic Black Metallic Thread, refer to picture for placement.  The small flower is raised on dimensionals in the centre of the large flower.

Stamp the sentiment on a piece of Basic Black cardstock using Versamark Ink, add White Embossing Powder and heat set.  Punch this out using the Classic Label Punch.  Adhere this to a piece of Burlap Ribbon and adhere this to the card front, refer to picture for placement.  Add three Rhinestones to the Delighful Dijon strip to finish the card front.

For the inside cut a piece of Whisper White cardstock 10cm x 14.3cm and adhere this in place.  

Stamp and watercolour a small flower and 3 small leaves.  Cut these out using the Stylish Stems Framelits.  Arrange the flowers and leaves in the bottom right corner of the card inside. Stamp the sentiment using Basic Black Archival ink near the small flower arrangement


You can get all the supplies you need

 for this project from me. 

You can place an order online and join in the fun with the On-line Club or Contact Me and place an order.

Don't forget Sale-A-Bration. 
 For every $90 AUD you spend you get to choose a free item
from the Sale-A-Bration catalogue.


Thank you for visiting.

Carolyn

Friday, 10 March 2017

Special Reason - One Sheet Wonder Cards 7 & 8

Hi everyone, sharing how I made cards 7 and 8 of the Special Reason One Sheet Wonder.

Card 7


Cut a piece of A4 Basic Black cardstock in half lengthwise.  This is then folded in half to create the card base.

Cut a piece of Delightful Dijon cardstock 9.5cm x 13.8cm.  Adhere this to the card front.

Cut a piece of Whisper White cardstock 9cm x 13.3cm.  Adhere this to the card front.

Cut a piece of Designer Series Paper 8.5cm x 10.8cm.  Cut this on the diagonal about 2 cm from the bottom.  Adhere the top half to the card front and then the bottom half to the card front making sure to leave the 2cm diagonal space between the two pieces.  Cut a Basic Black decorative strip using the Flourish Thinlits and adhere this to the card front in the 2cm diagonal space.  Adhere a Lace doily in place, refer to picture for placement.

Stamp and watercolour a large flower and 3 large leaves.  Cut these out using the Stylish Stems Framelits.  Arrange the flowers and leaves on the Lace Doily, refer to the picture for placement.

Stamp the sentiment on a piece of Basic Black cardstock using Versamark Ink, add White Embossing Powder and heat set.  Punch this out using the Classic Label Punch.  Adhere this across the flower.


For the inside cut a piece of Whisper White cardstock 10cm x 14.3cm.   Adhere this in place.

Stamp and watercolour a small flower and 3 small leaves.  Cut these out using the Stylish Stems Framelits.  Arrange the flowers and leaves on the bottom right of the card inside, this is the same as for card 6.  Stamp the sentiment using Basic Black Archival ink on the bottom of the card inside near the small flower arrangement.

Card 8


Cut a piece of A4 Basic Black cardstock in half lengthwise.  This is then folded in half to create the card base.

Cut a piece of Delightful Dijon cardstock 9.5cm x 13.8cm.  Adhere this to the card front.

Cut a piece of Whisper White cardstock 9cm x 13.3cm. Stamp the sentiment on the bottom right corner using Basic Black Archival ink.  Adhere this to the card front.

Cut a piece of Designer Series Paper 10.5cm x 3.5cm.  Adhere this to a piece of Whisper White cardstock cut at 10.5cm x 3.8cm and then adhere this to a piece of Basic Black cardstock cut at 10.5cm x 4.1cm.  Adhere this to the card front, refer to the picture for placement.

Cut a Basic Black decorative strip using the Flourish Thinlits and adhere this across the Designer Series Paper piece.

Cut a Basic Black scalloped edged square using the Layered Squares Framelits, this is the 2 1/2" scalloped square in this set.  

Cut a Whisper White stitched square using the Stitched Shaped Framelits, this is the 2 1/8" square in this set.

Layer the two squares together and adhere to the card front, refer to the picture for placement.

Stamp and watercolour a large flower, a small flower, 3 small leaves and 3 large leaves.  Cut these out using the Stylish Stems Framelits.  Arrange the flowers and leaves on the Scallop/Stitched Shaped Square, refer to the picture for placement.   Add some Rhinestones to finish the card front.

For the inside cut a piece of Whisper White cardstock 10cm x 14.3cm.  Adhere this in place.

Stamp and watercolour a small flower and 3 small leaves.  Cut these out using the Stylish Stems Framelits.  Arrange the flowers and leaves on the bottom right of the card inside, this is the same as for card 6.  Stamp the sentiment "except to let you know how special you are!" using Basic Black Archival ink on the bottom of the card inside near the small flower arrangement.


You can get all the supplies you need

 for this project from me. 

You can place an order online and join in the fun with the On-line Club or Contact Me and place an order.

Don't forget Sale-A-Bration. 
 For every $90 AUD you spend you get to choose a free item
from the Sale-A-Bration catalogue.


Thank you for visiting.

Carolyn

Saturday, 28 January 2017

The Card Concept #65

Hi everyone, do you like a challenge?  I certainly found one when I decided to play along with the Fresh and Bold challenge this week at The Card Concept.  I will admit that I sat and pondered over this challenge for a couple of days.


I used the colour scheme of Melon Mambo, Pumpkin Pie and the black and white photos of vintage ladies on the wall as my inspiration.


The stamp set is Beautiful You which has these gorgeous ladies and some terrific sentiments. 


For the inside of my card I did a "W" fold to create this pop out section.  I also did a little paper piecing on this card, using patterned paper from the Pop of Pink Speciality Designer Series Paper Pack and Festive Birthday Designer Series Paper Pack.

Thank you for visiting.

Carolyn

Mojo Monday #481

Hi everyone, this week I am playing along with the Mojo Monday sketch challenge.  I love these challenges and when I am looking for a bit of inspiration they me me thinking outside the normal card layouts that I tend to go to all the time.


I have used the Falling in Love Designer Series Paper along with the So Detailed Thinlits Dies, Stitched Shape Framelits Dies, Dragon Dreams Stamp Set and the Butterflies Thinlits Dies. Colour scheme is Soft Sky and Very Vanilla.


Originally I was going to put Dragonflies on my, but the pretty background paper has all these little butterflies so I went with a large butterfly instead.

I also made a matching box that holds a small 3 3/4" x 3 3/4" box of GuyLian chocolates, perfect for a small gift.


The So Detailed Thinlits Dies make creating belly bands so easy and they have the beautiful decorative finish.  You can also use them on card fronts to create a beautiful detail on your card.

Thank you for visiting.

Carolyn

Friday, 30 December 2016

Stained Glass Technique

Hi everyone, sharing a quick post today on the Stained Glass Technique.  There is a great tutorial on Splitcoaststampers here.


I embossed my image, from the 'Touches of Texture' stamp set using Silver as I liked the finished look better than the White embossing powder.  The sentiment is from the 'Balloon Celebrations' stamp set.


The image was coloured using Wisteria Wonder, Elegant Eggplant, Old Olive and Always Artichoke Stampin' Write Markers.

The card base is Wisteria Wonder and the patterned paper is from the Subtles Designer Series Paper Stack.  A few silver metallic enamel dots were added to finish the card.

You can get all the supplies you need for this project from me.

You can place an order online and join in the fun with the On-line Club or Contact Me and place an order.


Thank you for visiting.

Carolyn

Wednesday, 28 December 2016

Thank You ...

Hi everyone, sharing a design I cased from Angela Maine on my card today.   I have used Stampin' Up! products which created a different look to the card, but the actual design and layout I cased from Angela.


The flowers from the 'Grateful Bunch' stamp set were stamped with Early Espresso and coloured using Peekaboo Peach and the Clear Wink of Stella pen (in case you had not noticed I love the finished look of the Wink of Stella pen).  The flowers were then punched out using Blossoms Bunch punch.  The leaf and stem image was stamped with Always Artichoke and again coloured using the Clear Wink of Stella pen.

I used the Seasonal Decorative Mask (these are still available on the Year-End Closeouts specials for $7.00 AUD, but only until 3 January 2017) along with some texture paste for the background.  I also used the Flourish Thinlits dies and the Layering Circles and Stitched Shaped Framelits.    The Thank You sentiment is from the stamp set 'Flourishing Phrases"

You can get all the supplies you need for this project from me.

You can place an order online and join in the fun with the On-line Club or Contact Me and place an order.


Thank you for visiting.

Carolyn

Tuesday, 27 December 2016

Purse Notebook

Hi everyone, wishing you a belated Merry Christmas and a Happy New Year.  I had a great Christmas Day with my brothers, sister-in-law and nephews having lunch together before we went and spent the afternoon with Mum at the Nursing Home.  It was a delight to see her face light up when we all trooped in with our presents and then giving her all the hugs and kisses.  We had a terrific time with her sharing a lot of laughter and just catching up.  It was good to see Mum still had her sense of humour.  She received a box of chocolates as one of her presents and after opening them she said "Now I suppose you want to help me eat them".  My nephews had a few, but we left most of them for her to enjoy.

Now to today's post.  I was recently given this cute little post-it note holder with a calendar for my purse by a good friend.  You know when you are trying to find something to write-on and you cannot find even a scrap of paper.


I thought that this is a terrific idea, but I am not sure if you are like me and you can also never find a pen either.  So I stepped up the design slightly and added a mini gel pen, now set and ready to go. I will be using the one that I was given at home as I also have the same problem of never being able to find anything to write-on when I need to jot something down, especially when I am on the phone and need to take down a phone number, date or other information.


For the covers I used the cardboard from the Designer Series Paper stacks and I also tried the cardboard from the Foil Sheet packs as this was slightly thicker.  I liked the finished looked using the cardboard from the Designer Series Paper stacks, but both worked out okay.

I have used a small disc magnet for the closure on my design as it was easier to open and shut.  The stamp set used is 'Flourishing Phrases' and I also used the coordinating 'Flourish' Thinlits to create the small flower on the inside.  I used the Stitched Shapes Framelits and the Layering Circles Framelits for the 'Just a Note' sentiment on the front cover of the holder.  The patterned paper is from the 'Blooms and Bliss' Designer Series Paper.

The ladies that attend my regular fortnightly classes will be making this in January.  After this time I will post the measurements and how it was put together.

You can get all the supplies you need for this project from me (does not include mini calendar).

You can place an order online and join in the fun with the
 On-line Club or Contact Me and place an order.


Thank you for visiting.
Carolyn

Monday, 5 December 2016

Falling Flowers

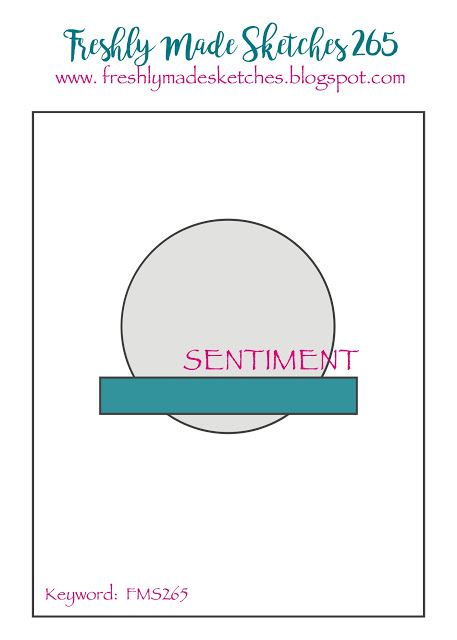
Hi everyone, I am playing along this week with Freshly Made Sketches.  

For my card I have used the Falling Flowers, Gorgeous Grunge and Teeny Tiny Sentiments stamp sets along with Layering Circles, Stitched Shapes and May Flowers Framelits dies.

The flowers were water coloured with Sweet Sugarplum and Pink Pirouette for the petals and the flower centres coloured with Daffodil Delight and Delightful Dijon with the leaves cut from Pear Pizzazz cardstock.  Some Black Metallic Thread was added behind the circle and some Fancy Frost Sequins added to finish.


You can get all the supplies you need for this project from me.

You can place an order online and join in the fun with the On-line Club or Contact Me and place an order.

Thank you for visiting.

Carolyn