Showing posts with label Simply Serif Mini Alphabet. Show all posts

Wednesday, 1 January 2014

Six Sided Sampler

Happy New Year everyone.
 
I had a quiet New Years Day at home with my family and I had some time to play this afternoon.
I made 3 cards using the "Six Sided Sampler" stamp set and matching punch.  The colour scheme is Basic Black and Baked Brown Sugar.  I wanted to have a masculine feel to my cards and I just adore these two colours together.
 
These are the cards.
 

Card 1
 
I used the Stripes embossing folder to create the black gingham background piece.  The sentiment is from the Itty Bitty Banners stamp set, black button and Linen Thread to finish.  Other tools used were the Hexagon Punch with the matching stamp set "Six Sided Sampler".


Card 2
 
The tools I used are the Honeycomb embossing folder, Dotted Scallop Ribbon Border punch, Hexagon punch, small circle from the Itty Bitty Shapes Punch Pack, 1/2" Circle punch, Word Window punch, Modern Label punch,  along with stamps "Six Sided Sampler", "Music Notes" Wheel, "Simply Serif Mini Alphabet" and "Fabulous Phrases", a piece of
Basic Black Taffeta Ribbon was added to finish off the card.

 
Card 3
 
The background was made by stamping and punching out the shapes using the "Six Sided Sampler" stamp set and matching Hexagon punch, then sticking them down on a piece of card cut to size.  Other tools used are Chevron Border punch, embossing folder from the new Sale-a-bration catalogue, Ticket Duo Builder punch and matching stamp set "That's the Ticket", with finishing touches Burlap Ribbon.


Sunday, 9 June 2013

Some Sneak Peaks ...

It was like Christmas in my house on Friday, my Stampin' Up pre-order arrived.  Naturally I had to play and I created my first card using one of the new 2013-15 In-colours, Baked Brown Sugar.  I used the Music Note Stampin' Wheel and die cut the word birthday in Basic Black.  The background piece was embossed using the Perfect Polka Dots embossing folder and the edging was made using the Dotted Scallop Ribbon Border punch.


Having made my first card, this got me to thinking about the rest of the 2013-15 In-colours and designing some cards for a Catalogue Launch workshop.  So I made another card using the other In-colours of Coastal Cabana, Crisp Cantaloupe, Pistachio Pudding, Strawberry Slush and Baked Brown Sugar.


My final card is also for the new Catalogue Launch Workshop, using all the 2013-15 In-colours as well as the new "Mosaic Madness" stamp set with the matching Mosaic punch.  The other stamp sets used are "Fabulous Phrases" and "Simply Serif Alphabet". 


Sunday, 18 November 2012

Howdy Partner

Have you ever seen a stamp set and you just have to have it, but when you get it you do not use it?  Well this applies to me with the "Horse Frontier" stamp set from Stampin' Up.  I finally used it this week and created this cowboy themed card.  The coiled bakers twine is supposed to resemble a rope, not sure if it worked but it is now stuck to the card so I have gone with it.

The sentiment was made using the Simply Serif Mini Alphabet and the 1/2" circle punch and the small punch from the Itty Bitty Shapes Punch Pack.

Colour scheme of Early Espresso and Naturals Ivory.

Just Add Music

The challenge this week at Just Add Ink is to Just Add Music.

The inspiration for this Post-it Note & Calendar holder came from a post by Carolyn Lindenmayer where Carolyn made an easel card with the Calender on the top of the card and the Post-It Notes on the bottom of the card.  I really liked the idea and I have adapted it and made a Post-It Note holder.  I tried to make the front look like a satchel, but had a bit of trouble rounding the corners of the tiny pieces for the straps (I will have to work on this one).

The Music part of the challenge is incorporated in Natural Composition Specialty DSP, which has the music notes printed on it.  I love this DSP with the glossy raised pattern on the heavy weight Natural paper. 

I made the title using the Simply Serif Mini Alphabet and the 1/2" circle punch and small circle punch from the Itty Bitty Shapes Punch Pack.

I put instructions on how I made it at the end of this post.


Materials

Crumb Cake Cardstock
Scraps of Early Espresso & Naturals Ivory Cardstock
Natural Composition Specialty DSP – Music Note Sheet
Neutrals DSP – Striped Crumb Cake piece
Early Espresso Core’dinations Cardstock
Designer Sanding Blocks
Soft Suede Stampin’ Write Marker
Crumb Cake Classic Stampin’ Pad
Early Espresso Classic Stampin’ Pad
Stamping Sponge
Simply Serif Mini Alphabet Stamp Set
½” Circle Punch
Small Punch from the Itty Bitty Shapes Punch Pack
Post-It Notes
Small Calendar
Buttons #5 Sizzlits
Sticky Strip
Multipurpose Liquid Glue

Instructions

1.         Cut a piece of Crumb Cake cardstock 6 ½” x 3”.  Score this on the long side at 3” and 3 ½”.  Fold on crease lines.  This creates the base Post-It Note cover.

2.         Cut a piece of Music Note paper 3” x 3”
            Cut a piece of Crumb Cake  CS 3” x 1 ¼” – Round corners on one long edge
            Cut a piece of Music Note paper 2 7/8 x 1 1/8” – Round corners on one long edge
            Cut 2 pieces of Crumb Cake CS  5/8” x 2” – Round edges on one end
            Cut 2 pieces of Music Note paper ½” x 1 7/8” – Round edges on one end
            Cut a piece of Striped Crumb Cake DSP 2 7/8” x 2 7/8”

3.         Ink the edges of all pieces by sponging Crumb Cake on edges.

4.         Adhere the 3” x 3” piece of Music Note paper to front of the Post-It Note cover.

5.         Adhere the  2 7/8” x 1 1/8” piece of Music Note paper to the 3” x 1 ¼” Crumb Cake cardstock, making sure that the top straight edges are flush so the border is only around the short sides and along the bottom of the piece with the rounded corners. This is the flap for the satchel.

6.         Adhere the ½” x 1 7/8” piece of Music Note paper to the 5/8” x 2” Crumb Cake cardstock, making sure that the straight edges at the top are flush so the border is only around the long sides and along the bottom of the piece with the rounded corners.  This creates the straps for the satchel.

7.         Using the Soft Suede Stampin’ Write Marker, create Faux Stitching around the cover piece, flap and straps. 

8.         Adhere the flap to the top of the Post-In Note cover then adhere the straps.

9.         Create the buttons on the satchel straps by cutting 2 small buttons using the Buttons Sizzlit Die and the Early Espresso Core’dinations cardstock.  Lightly sand these with the sanding blocks to give them a distressed look.  Adhere these to the straps on the satchel.

10.       Create the Notes title by stamping NOTES on Naturals Ivory cardstock with the Early Espresso and the Simply Serif Mini Alphabet stamp set.  Punch the letters out using the small circle punch from the Itty Bitty Shape Punch Pack.  Punch out small circles from Early Espresso cardstock using the ½” Circle Punch.  Ink the letters lightly with Crumb Cake and adhere to the Early Espresso circles.  Adhere to the bottom of the Post-It Note cover.

11.       Adhere the piece of striped Crumb Cake DSP to the inside of the Post-It Note cover, making sure that you put it on the top cover and not the bottom.  Adhere the calendar to the centre of this piece.

12.       Adhere the Post-It Notes to the inside bottom cover and you now have your completed Satchel Post-It Note cover.


Friday, 5 October 2012

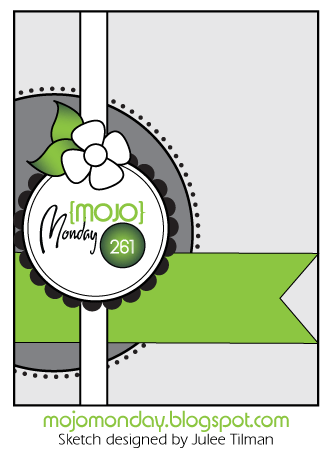
Mojo Monday #261

I got out one of my favourite stamps sets of the moment (I am sure this will change soon) "Clockworks" to make my card for this weeks challenge at Mojo Monday based on the following sketch:


The "Clockworks" stamp set has some great background stamps which I have used on Whisper White cardstock with Basic Gray and Staz On Black ink.

A recent purchase was the Simply Serif Mini Alphabet which is a great size to make your own words and sentiments for cards and scrapbook pages.  I stamped the sentiment on the Neutrals DSP, it is not straight but I randomly stamped it like this as I thought it went better with the style of card.  Rhinestones have been added around the edge of the circle for a little bling.