Monday 30 May 2016

Using Designer Series Paper

Hi everyone, my card today is one that I made a couple of weeks ago.  I have been on a "using my designer series paper" design effort lately.  I seem to have this big hoard of pretty papers that I just do not use, so I have been making an effort to use them in my designs.


This card is actually pretty easy to make (apart from fussy cutting the flower images).  It also uses Washi Tape which is another plus, it gives a little lift to the design.

To create the gap in the patterned paper cut it 2.5cm shorter than you need, cut the diagonal and them just move the bottom piece down to line up where you want it in relation to the bottom of the mat piece. This creates the gap where you can add the Washi Tape or any other embellishments you want.

The circle arrangement I made when designing a card for the Stamp Camp that I attended last weekend but did not use it.  I realised when I made it that I had put it on Mint Macaron instead of Pool Party cardstock so into the "I will use it later box" it went.  It kept looking at me all weekend, begging to be used on a card as it was so pretty.  I decided to go with the Mossy Meadow cardbase and patterned paper as this picked up the colour in the leaves of the flowers and also teamed well with the Mint Macaron and silver. The patterned paper is from the "Going Places" paper pack.

You can get all the supplies you need for this project
 by shopping with me.
  You can place an order online and join in 
the fun with the On-line Club or Contact Me and place an order.


Thank you for visiting.

Carolyn

Sunday 29 May 2016

3rd Day at Stamp Camp

Hi everyone, day 3 at the Stamp Camp at "Avalon Homestead", Toodyay.  We are finishing up at 12 noon today, travelling back to Perth so should be home mid afternoon.  A great time has been had by all with lots of stampin', laughin', more stampin', chattin' and even more stampin'.

Final card that I made for the Stamp Camp.


I fussy cut all the little flowers for the card front and inside from the Birthday Bouquet Designer Series Paper pack.  I got all the little flowers for 20 cards from one sheet of paper, how amazing is that.  I fussy cut the flowers as I did not want the ladies who do not like fussy cutting or have difficulty doing it to freak out when they opened their kits.

Thank you for visiting.

Carolyn

Saturday 28 May 2016

2nd Day of Stamp Camp..

Hi everyone, still going strong at the Stamp Camp at "Avalon Homestead", Toodyay.  We have a full-on day today, it will probably be a late night.


For this card I stamped the image on the Designer Series Paper to give it a little more texture.  This is a great way of changing up Designer Series Paper.  For my card it looked a little bland with just the marbled design on the paper but by stamping the image from the Timeless Textures stamp set in Early Espresso it gave it more depth and it coordinated perfectly with the monochrome colour scheme of my card.

Thank you for visiting.

Carolyn.

Friday 27 May 2016

1st Day at Stamp Camp...

Hi everyone, I am at a Stamp Camp at "Avalon Homestead" in Toodyay this weekend.  It is about an hours drive from where I live in the northern suburbs of Perth, Western Australia.  It is so pretty in the picturesque Avon Valley.  I grew up on a farm about 45 minutes north of Toodyay so I like to visit from time to time (getting back to my country roots).

Anyway I am sharing with you over the next three days the cards that I designed for the Stamp Camp.  The Camp is organised and run by a good friend of mind and I like to help her out each year as it is a big task to do kits for three days for 20 people.


Thank you for visiting.

Carolyn.

Friday 20 May 2016

A Small Gift ...

Hi everyone, I have been playing this week with the Grateful Bunch stamp set and the matching Blossoms punch.

I like to have a few little gifts on hand for when you get an unexpected invitation or would like to give someone a small thank you gift.  With this in mind I made a set of 4 cards and holder to keep them it.  The holder holds the 4 cards plus 4 envelopes.


The front cover I kept quite simple.  The images were stamped with Black Archival ink and then coloured with a Blushing Bride Stampin' Write Marker.  Wink of Stella was added over this to add a bit of sparkle.  The Designer Series Paper is from the Going Places Paper Pack


The four cards are made using the Going Places Designer Series Paper and a colour scheme of Basic Black, Sahara Sand, Very Vanilla and Blushing Bride.

The sentiments are from the Crazy About You and Tin of Cards stamp sets.

You can get all the supplies you need for this project
 by shopping with me.

  You can place an order online and join in 
the fun with the On-line Club or Contact Me and place an order.


Thank you for visiting.

Carolyn

Monday 16 May 2016

Going! Going! Gone!

With the new Annual Catalogue being launched on 1 June 2016, we are saying goodbye to some stamps and accessories.


As sad as it is to see these products go, there is still time for you purchase them before they are gone.  An added bonus is that retiring products have discounts of up to 50%.  Retiring products will only be available until 31 May, or while stocks last, so do not miss out, contact me to place an order before they are gone!

See the list here!
Remember if you order Online to make sure that 
you select me as your Demonstrator!!

Also if you order Online check out 
the Online Club for even more benefits.

Thank you for visiting.

Carolyn

Sunday 15 May 2016

Fundraiser for Type 1 Junior Diabetes Research

My Great Niece, Harper Rose, was diagnosed with Type 1 Diabetes at the age of 18 months, so on Saturday, 9th July 2016 from 9am to 4.30pm I will be holding a fundraiser for research into Type 1 Junior Diabetes.  Harper is the cutest little girl who has just turned 3 and is such a trooper with all that she has been through and what she lives with day to day.  There is no cure for Type 1 Diabetes so research is so important to help find a cause and cure for this disease. 

On the day of the fundraiser you will be making 8 projects that you get to take home. It is BYO lunch with morning and afternoon tea supplied.  Cost is $60 per person.  If you live in or near Perth, Western Australia and would like to come and join in the fun and help raise funds for this research please send me an email at carolyn.king@bigpond.com.  

Places limited to 32 so do not miss out.

Thank you for visiting.

Carolyn

Saturday 14 May 2016

Celebrate with Peekaboo Peach

Hi everyone, I was lucky enough today to have some time to play with some of the new products in the new Annual Catalogue.  The colour scheme is Basic Black, Very Vanilla and Peekaboo Peach. 


The patterned paper is from the Playful Palette Designer Series Paper Stack.  This pack has such bold designs and then on the reverse there is the more subtle design, they coordinate perfectly. 

The stamp sets I have used are Grateful Bunch and Thoughtful Banners.  Stampin' Up! have made life so much easier for us, they have made two punches that match the Thoughtful Banners stamp set, so you can make the sentiment for your card in quick time. How cute is the little "Celebrate" banner.  This was made using the Thoughtful Banners stamp set and the coordinating Duet Banner punch.

The base card is a Basic Black A2 size.  The Very Vanilla mat is 9cm x 13.3cm with the patterned paper pieces cut at 8.5cm x 12.8cm for the Peekaboo Peach piece and 12.8cm x 3cm for the colour dotted Black piece.  I just layered the dotted Black paper over the top of the Peekaboo Peach piece.  

The tag was created using the Scalloped Tag Topper Punch and a piece of Very Vanilla cardstock 10cm x 5cm.  Washi tape from the Playful Palette Designer Washi Tape pack was added to the top and bottom with a piece of the colour dotted Black pattern paper added as well.  A piece of Peekaboo Peach Ruched Ribbon was attached to the top of the tag using the handheld stapler.

The leaf images from the Grateful Bunch stamp set were stamped on Very Vanilla cardstock using Basic Black Archival ink, these I hand cut. The butterfly was also stamped on Very Vanilla cardstock using Basic Black Archival ink and hand cut.  A swirl was created using the Swirly Scribbles Thinlits dies (I love these) and Peekaboo Peach cardstock.  The leaves, butterfly and swirl were adhered to the tag.

The flowers were made using the new Copper Embossing Powder, Versamark ink, Very Vanilla cardstock and the Grateful Bunch stamp set. Once the Copper Embossing Powder was heat set I coloured the flowers using an Aqua Painter and Peekaboo Peach ink.  I punched these out using the Blossoms Bunch Punch. These were then added to the tag using dimensionals.

Do you like this little sneak peak?  Come and join in the fun at my Catalogue Launch to be held on Monday 6th June 2016 from 1pm to 2pm at my home.  If you would like to attend just send me an email to carolyn.king@bigpond.com with your contact details and I will advise you of the address of the event.

Thank you for visiting.

Carolyn

Tuesday 10 May 2016

Awesomely Artistic

Hi everyone, sharing the card instructions for the "Awesomely Artistic Classes in the Mail" set I made last December.  


I have had numerous requests to sell the instructions separately but decided to post the instructions and cards here for everyone to enjoy.  The cards are all made using a standard size A2 cardbase.

Card 1


Stamp the floral image using the Basic Black Archival ink onto the Whisper White cardstock circle piece.  Colour the flowers using the Blackberry Bliss and Mossy Meadow Classic Stampin’ Pads.  Adhere this to the Blackberry Bliss cardstock circle.

Adhere the Designer Series Paper to the Silver Glimmer Paper strip and adhere this to the embossed Whisper White cardstock piece.  Adhere this to the Blackberry Bliss mat and then adhere this to the Whisper White card base.

Adhere the circle onto the card front, over the Designer Series Paper strip, add the word “Celebrate” and 3 rhinestones.  Stamp the dragonfly image on a piece of Whisper White cardstock with Blackberry Bliss ink and hand cut out.  Put a small piece of dimensionals in the centre of the dragonfly and adhere to the card front.

For the inside stamp the dragonfly image with Blackberry Bliss onto the Whisper White cardstock and then adhere this to the Blackberry Bliss mat and the adhere this to the inside of the card.

Card 2


Create a mask using a piece of Window Sheet and cut out 4 squares evenly using the smallest sqare in the Squares Collection Framelits set.  Take the mask and position over the piece of Whisper White cardstock the same size.  Sponge Blackberry Bliss ink lightly in the squares and then harder on some edges and corners in each square (do not make the ink too dark as you will be stamping over this).   With the mask still in place stamp the dragonfly in 3 of the squares using Blackberry Bliss ink.  Remove the mask and stamp the dragonfly in the top left corner.

Using the 2-way glue pen or wet glue apply the glue to the wings of the dragonflies and add the Dazzling Diamonds Glitter.

Adhere the embossed Whisper White 1 ¼” strip onto the Blackberry Bliss 1 ½” strip.  Adhere this across the bottom of the card front. 

Stamp the frame using Blackberry Bliss ink onto the small piece of Whisper White cardstock.  Then stamp the word “Friend” in the centre of the frame.  Hand cut out.  Add 3 dimensionals on the back of this frame.   Wind the Silver Metallic Thread 5 times around your fingers to create a circle of thread, attach this the back of the dimensionals on the back of the frame and adhere to the embossed strip.  Add 3 sequins randomly on this panel to finish.  Add dimensionals to the back of the card front and adhere to the Blackberry Bliss card base.

For the inside of the card, stamp the dragonfly with Blackberry Bliss ink in the right bottom corner on the Whisper White piece.  Adhere this to the inside of the card.

Card 3


Stamp the flower image with Basic Black Archival Ink onto the Whisper White cardstock piece.  Colour the flowers using the Blackberry Bliss and Mossy Meadow Classic Stampin’ Pads.  With the Stampin’ Pads closed press the lid in the centre to transfer ink to the inside lid, open the Stampin’ Pad and using the Aquapainter (filled with water) pick up some ink from the lid and colour the image.  Allow to dry after finishing the watercolouring.

Take the random dots image and second generation stamp using Mossy Meadow around the floral image.  Second generation stamping is where you ink up the stamp, stamp onto a scrap piece of paper and then stamp onto your project.

Adhere the piece of Designer Series Paper on the right hand side of the stamped piece.  Adhere this to the Blackberry Bliss mat and then onto the Whisper White card base.  Add the word “Thanks” to the bottom of the card front and place three rhinestones randomly on the card to finish.

Adhere a thin strip of Designer Series Paper to the Whisper White inside piece, adhere the Blackberry Bliss mat and adhere to the inside of the card.

Card 4


Stamp the floral image using the Basic Black Archival ink onto the Whisper White cardstock piece.  Colour the flowers using the Blackberry Bliss and Mossy Meadow Classic Stampin’ Pads. 

Stamp the random dots image using Blackberry Bliss ink.  Adhere this piece to the Mossy Meadow mat and then adhere this piece to the Blackberry Bliss card base.  Adhere the Whisper White 1 ¼” strip onto the Blackberry Bliss 1 ½” strip.  Adhere this across the bottom of the card front.  Adhere the word “Thanks” to this piece.  Add 3 sequins randomly on the card to finish.

The inside Whisper White piece as stamped on the bottom right corner with the floral image and Basic Black Archival ink.

Card 5


Stamp the floral image using the Basic Black Archival ink onto the Whisper White cardstock piece.  Colour the flowers using the Blackberry Bliss and Mossy Meadow Classic Stampin’ Pads.  Take the random dots image and second generation stamp using Mossy Meadow around the floral image. 

Adhere the word “Hello” to the bottom of the card front and the silver glimmer paper butterfly to the top of the card.  Add 3 rhinestones to the card front to finish.  Adhere the card front to the Basic Black mat and then adhere this to the Blackberry Bliss card base. 

For the inside of the card stamp the floral image in Basic Black Archival ink on the bottom right corner and then adhere this piece to the inside of the card.

Thank you for visiting.

Carolyn

Sunday 8 May 2016

Happy Mother's Day to all the Mums

Happy Mother's Day to all the Mums, hope you had a great day with lots of love and hugs from your family.

I have had several ladies with me today doing the One-sheet Wonder Class, we had a lot of laughs and really enjoyed the day. During the class we talked about some basic card sketches which are quick and easy to do and how they could be used in their card making.  The ladies went home with 12 cards from one piece of designer series paper. 

I am sharing the cutting template (at the bottom of this post) and card instructions with you. The cutting template is not to scale, however the measurements are detailed.

The designer series paper sheet used to make the cards is from the Birthday Bouquet Designer Series paper pack.

Card 1


  • A2 Pool Party card base. 
  • Whisper White mat 14.3cm x 10cm embossed with the Lovely Lace Embossing folder.  Mats for Flower – Pool Party 7.5cm x 7.5cm & Whisper White 7cm x 7cm, adhere to card front with dimensionals.
  •  Flower – Silver Emboss the flower images from Beautiful Bunch, Flower Shop and Petite Petals stamp sets onto Whisper White, do a watercolour wash on the petals using Pool Party ink.  Punch out using the matching punches Fun Flower, Pansy and Petite Petals.  Layer up with dimensionals and add an Iced Rhinestone for the flower centre.  Create the leaves using Whisper White and the Botanical Builder Framelit Dies.  Ink the edges of the leaves with Pool Party.  Add Silver Metallic Thread to the back of the flower and adhere to the flower mat.  Add some Rhinestones to finish panel.
  • Sentiment Panel – Pool Party 10cm x 4.4cm, Designer Series Paper (DSP) 10cm x 3.9cm.  Stamp the sentiment from the Wetlands Stamp Set using Basic Black Archival ink. Punch out with the Large Oval Punch and then mat onto a Pool Party Scalloped Oval and adhere to the sentiment panel using dimensionals.


Card 2


  • A2 Pool Party card base.
  • Whisper White mat 13.8cm x 9.5cm.
  • DSP 13.cm x 9cm, adhere this to the Whisper White mat and then to the card front.
  • Pool Party cardstock 8cm x 2.5cm, create a flag one end using the Triple Banner Punch.  Stamp the sentiment in Basic Archival Black from the Greatest Greetings stamp set.  Add a strip of Rhinestones and adhere to the card front.
Card 3


  • A2 Pool Party card base.
  • Whisper White mat 13.8cm x 9.5cm embossed using the Lovely Lace embossing folder.  Adhere this to the card front.
  • Centre Panel – Pool Party mat 10.5cm x 8cm, DSP 10cm x 7.5cm.  Add a piece of Pool Party Glitter Ribbon to the DSP and then adhere this to the Pool Party cardstock mat.  Adhere to the card front.
  • Sentiment Panel – Pool Party mat 7.5cm x 4cm, Whisper White 7cm x 3.5cm on which the sentiment is stamped with Basic Black Archival ink.  The sentiment is from the Birthday Blossoms stamp set.  Adhere this to the DSP centre panel using dimensionals, add some Rhinestones to finish.

 Card 4


  • A2 Pool Party card base.
  • Whisper White mat 13.8cm x 9.5cm embossed using the Lovely Lace embossing folder. Wrap a piece of Pool Party Glitter Ribbon around this piece and adhere this to the card front.
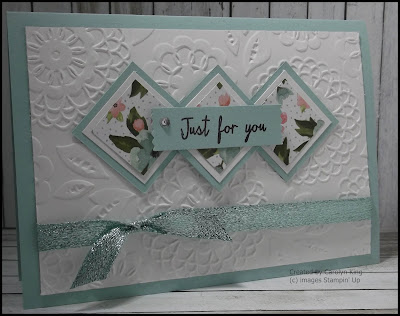
  • Centre panels – cut  3 Pool Party mats 3.5cm x 3.5cm, 3 Whisper White mats 3cm x 3cm and adhere the 3 DSP 2.5cm x 2.5cm pieces to these.  Adhere the two outer pieces to the card front and then the centre one using a dimensional.
  • Stamp the sentiment from the Watercolor Wings stamp set using Basic Black Archival ink onto a piece of Pool Party cardstock and punch out using the Washi Label punch.  Adhere this to the centre of the card and add a Rhinestone to finish.

 Card 5


  • A2 Pool Party card base.
  • Whisper White mat 13.8cm x 9.5cm embossed using the Lovely Lace embossing folder.  Adhere this to the card front.
  • 3 Panels – Pool Party mats 8cm x 4cm, adhere the pieces of DSP 7.5cm x .5cm to these and adhere to the card front.
  • Sentiment Panel – stamp the sentiment from the Petite Pairs stamp set onto Whisper White using Basic Black Archival Ink and punch out using the 1 3/8” Circle Punch and mat onto a 1 ½” Pool Party Circle using the 1 ½” Circle Punch.  Layer these together and adhere to a small Silver Metallic Doily.  Adhere the card front using dimensionals.

 Card 6


  • A2 Pool Party card base.
  • Whisper White mat 13.8cm x 9.5cm embossed using the Lovely Lace embossing folder.  Adhere this to the card front.
  • Centre Panel – Pool Party mat 10.5cm x 8cm.  Take the 10cm x 7.5cm piece of DSP and cut the centre out, leaving a 1cm frame.  Adhere this to the Pool Party mat.  Stamp the sentiment from the Birthday Blooms stamp set onto a piece of Whisper White cardstock 9.5cm x 7cm using Basic Black Archival Ink (make sure that you stamp towards to bottom of the panel to allow room for the banner at the top.  Adhere this on top of the DSP.
  • Banner - Cut the DSP remaining into 5 strips 1.5cm wide.  Create the flag on one end, you can use the Banner Punch for this or just use your scissors.  Fold these over a piece of Whisper White Bakers Twine, sticking together with a glue dot (I found this easier than glue or tape).  Evenly space the banners along the Bakers Twine and adhere to the centre panel just above the sentiment (again using glue dots).  Tie two bows using Bakers Twice and adhere these at each end of the banner.  Add some Rhinestones between the flags to finish.

 Card 7


  • A2 Pool Party card base.
  • Whisper White mat 13.8cm x 9.5cm embossed using the Lovely Lace embossing folder.  Adhere this to the card front.
  • Centre Panels – 3 Pool Party mats 4.5cm x 4.5cm, 2 DSP pieces 4cm x 4cm and 1 Whisper White piece for the sentiment 4cm x 4cm.    Stamp the sentiment from the Wetlands stamp set onto the 4cm x 4cm piece of Whisper White, making sure that you same it on the diagonal.  Adhere the sentiment panel and the DSP to the Pool Party mats.  Adhere the top and bottom panels in place and adhere the centre panel with dimensionals. Punch out some small flowers from the left over DSP using the flower punch from the Itty Bitty Accents Punch Pack.  Add small Rhinestones to the flower centres to finish.

Card 8


  • A2 Pool Party card base.
  • Whisper White mat 13.8cm x 9.5cm, DSP 13.3cm x 9cm.  Adhere these together and then adhere to the card front.
  • Sentiment Panel – Pool Party 9.5cm x 3cm, Whisper White 9.5cm x 2.5cm.  Stamp the sentiment from the Birthday Blossoms stamp set in Basic Black Archival ink onto the Whisper White 9.5cm x 2.5cm piece (make sure you stamp to the right side to allow for the embellishment).  Adhere this to the Pool Party mat.  Adhere a piece of Pool Party Glitter Ribbon to the back of the panel and the adhere this to the card front.  Add a Botanical Garden Jewel to finish.

 Card 9


  • A2 Pool Party card base. 
  • Whisper White mat 13.8cm x 9.5cm embossed with the Lovely Lace Embossing folder.
  • DSP 9.5cm x 13.8cm cut on the diagonal (the other piece is used for Card 11).  Adhere this to the embossed piece of Whisper White cardstock and then adhere this to the card front.
  • Flower – Silver Emboss the flower images from Beautiful Bunch, Flower Shop and Petite Petals stamp sets onto Whisper White, do a watercolour wash on the petals using Pool Party ink.  Punch out using the matching punches Fun Flower, Pansy and Petite Petals.  Layer up with dimensionals and add an Iced Rhinestone for the flower centre.  Create the leaves using Whisper White and the Botanical Builder Framelit Dies.  Ink the edges of the leaves with Pool Party.  Adhere this to the card front and add some Rhinestones.
  • Sentiment – Stamp the sentiment from And Many More onto a piece of Whisper White cardstock using Basic Black Archival Ink and punch out using the Word Window Punch.  Layer this onto a Washi Label panel made using a piece of Pool Party cardstock and the Washi Label Punch.  Adhere to the card front using dimensionals.

 Card 10


  • A2 Pool Party card base.
  • Whisper White mat 13.3cm x 9cm, adhere this to the card front.
  • 4 Panels – Pool Party mats 3.5cm x 3.5, Whisper White mats 3cm x 3cm and DSP 2.5cm x 2.5cm.  Layer together and adhere to the top of the card front making sure to leave space that the bottom for the sentiment panel.
  • Sentiment Panel – Pool Party 4.4cmx 9cm and DSP 3.9cm x 9cm.  Adhere these together and adhere to the card front.  Stamp the sentiment from the Petite Pairs stamp set onto a piece of Whisper White cardstock using Basic Black Archival Ink and punch out using the Large Oval Punch, mat this onto a Scallop Oval Punch.  Adhere this to the sentiment panel using dimensionals and a Rhinestone to finish. 
Card 11


  • A2 Pool Party card base.
  • Whisper White mat 13.8cm x 9.5cm embossed with the Lovely Lace Embossing folder.
  • DSP 9.5cm x 13.8cm cut on the diagonal (the other piece was used for Card 9).  Adhere this to the embossed piece of Whisper White cardstock and then adhere this to the card front.
  • Flower – Silver Emboss the flower images from Beautiful Bunch, Flower Shop and Petite Petals stamp sets onto Whisper White, do a watercolour wash on the petals using Pool Party ink.  Punch out using the matching punches Fun Flower, Pansy and Petite Petals.  Layer up with dimensionals and add an Iced Rhinestone for the flower centre.  Create two more flowers but for the second flower only use the Flower Shop and Petite Petals stamp and for the third flower use the Petite Petals Stamp only.  Adhere these to the card front along the diagonal line where the DSP and the Whisper White cardstock meet.
  • Sentiment – Stamp the sentiment from And Many More onto a piece of Whisper White cardstock using Basic Black Archival Ink and punch out using the Word Window Punch.  Layer this onto a Washi Label panel made using a piece of Pool Party cardstock and the Washi Label Punch.  Adhere to the card front using dimensionals.
Card 12


  • A2 Pool Party card base.
  • Whisper White mat 14.3cm x 10cm, DPS 13.8cm x 9.5cm.  Adhere together and adhere to card front.
  • Centre Panel – Pool Party mat 10cm x 6.5cm, Whisper White 9.5cm x 6cm embossed with the Lovely Lace embossing folder.  Wrap a piece of Pool Party Glitter Ribbon around the Whisper White embossed piece and adhere this to the Pool Party mat.  Adhere this to the card front. 
  • Sentiment Panel – Stamp the sentiment from the Watercolor Wings stamp set on a piece of Whisper White cardstock and cut out using the Tags and Labels Framelits.  Cut out a Pool Party mat using the next size up label from the Tags and Labels Framelits.  Layer these together and adhere to the centre panel.
  • Cut out a butterfly using Dazzling Diamonds Glimmer Paper and the Bold Butterfly Framelits.

Cutting Template


Thank you for visiting.

Carolyn.


Saturday 7 May 2016

Love Blossoms Gift Boxes

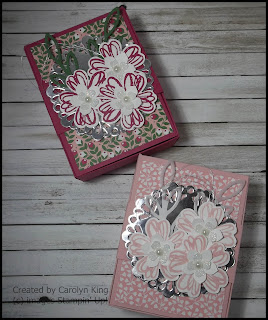
Hi everyone, how cute are these little boxes.  They are made using a 12" x 12" piece of cardstock with no glue or double sided tape. The boxes are just folded and a belly band added to help keep the box together (I found that the box stays together with out the belly band).


I decorated the boxes using the Love Blossoms Designer Series Paper Stack, a Silver Metallic Doily, Silver Metallic Thread and flowers made using Flower Shop stamp set and Pansy and Petite Petals Punches along with the small flower punch from the Itty Bitty Accents Punch Pack.  The leaves behind the flowers were made using the Rose Garden Thinlits.

These little boxes are perfect for chocolates and some other little treat or gift.

You can get all the supplies you need for this project
 by shopping with me.
  You can place an order online and join in 
the fun with the On-line Club or Contact Me and place an order.


Thank you for visiting.

Carolyn

Friday 6 May 2016

Sneak Peak - Painter's Palette

Hi everyone, another sneak peak for you.  I have used the Painter's Palette stamp set and Playful Palette Designer Series Paper Stack along with some old favourites.


I did not start out making this card with any intention to add flowers, but the painter's easel looked a bit bare just sitting in the middle of my card.  I thought that it needed a little bit of dressing up.  I tried stars, circles but ended up with flowers as I really liked the framed look that was created.

Keep a look out for these products on the 1 June 2016 when the new catalogue is launched.

  You can place an order online and join in 
the fun with the On-line Club or Contact Me and place an order.


Thank you for visiting.

Carolyn

Wednesday 4 May 2016

Painter's Palette

Hi everyone, I am playing along this week with the sketch challenge at Mojo Monday.  


I have used the stamp set Painter's Palette, the Playful Palette Designer Series Paper Stack and Peekaboo Peach Cardstock on my card.  This is a little sneak peak on some of the new products available in the new catalogue 1 June 2016.

I love the easel in this stamp set.  I stamped it in Basic Black Archival ink and fussy cut it out.  It was layered on top of the Very Vanilla Thick Bakers Twine using dimensionals.

The small flowers were made using the Petite Petals stamp set and punch.  The image was stamped with one of the new 2016-18 In Colors Sweet Sugarplum.  

Hope you like this little sneak peak and thank you for visiting

Carolyn.

For My Mum

Hi everyone, sharing the card I made for my Mum for Mother's Day this Sunday.  I have no worries about her seeing it before Sunday as she does not even know how to turn a computer on.  I have tried to get her to learn but she is more than happy to ask me to look up whatever she wants to know.


I wanted something pretty for my Mum as she is a pretty amazing lady.  I have used a colour scheme of Whisper White and Blushing Bride with the patterned paper from the Love Blossoms Paper Pack. The heart doily is from the Love Blossoms Embellishment Kit, I just turned the gold doily around and used the white side. The Blushing Bride ribbon and sequins are also from the Love Blossoms Embellishment Kit.

The spray of leaves behind the flower was made using the Rose Garden Thinlits, Vellum and Dazzling Diamonds Glimmer Paper with a little bit of Silver Metallic Thread. The flower was made using the Flower Shop stamp set, Blushing Bride ink and the Pansy Punch.  The flower centre was made with a Whisper White Petite Petals flower using the punch and a Dazzling Diamonds Glimmer Paper flower using the punch from the Itty Bitty Accents Punch Pack.  A Basic Jewel Pearl was added for the flower centre. 

The Love Blossoms Paper Pack and Love Blossoms Embellishment Kit are retiring at the end of May or while stocks last.  So make sure you do not miss out.

See the retiring list here!
Remember if you order Online to make sure that 
you select me as your Demonstrator!!

Also if you order Online check out
the Online Club for even more benefits.

Thank you for visiting.

Carolyn.

Tuesday 3 May 2016

Don't Miss Out on the Retiring Items!!

With the new Annual Catalogue being launched on 1 June 2016, we are saying goodbye to some stamps and accessories.


As sad as it is to see these products go, there is still time for you purchase them before they are gone.  An added bonus is that retiring products have discounts of up to 50%.  Retiring products will only be available until 31 May, or while stocks last, so do not miss out, contact me to place an order before they are gone!

See the list here!
Remember if you order Online to make sure that 
you select me as your Demonstrator!!

Also if you order Online check out 
the Online Club for even more benefits.

Thank you for visiting.

Carolyn

Monday 2 May 2016

One Sketch - Three Cards

Hi everyone, do you sometimes get a bit of a block when you sit down to design a card?  When this happens to me I reach for my sketch folder.  I keep a little file of my favourite sketches along with the cutting dimensions to make the card.  I find that this helps me get my design started and things just flow from there.

I have three cards to show you today, all the same base sketch but by using different papers and embellishments you get a different look each time.

I have used the Love Blossoms Designer Series Paper Pack for my cards, this shows how versatile theses paper packs are.  


My first card is for a Wedding.  The base card is Crumb Cake to match the pattern in the paper.  I have just added a gold flower made using the Botanical Builder Framelits, Gold Foil Sheet, Gold Glimmer Paper and an Iced Rhinestone for the flower centre. Some gold sequins from the Love Blossoms Embellishment Kit were added to finish.  The sentiment is from the Rose Wonder stamp set.


My second card is a pretty birthday card, made using a Rose Red card base to match the flower colours in the patterned paper.  The flower was made using the Flower Shop stamp set, Rose Red ink and the Pansy Punch.  An Iced Rhinestone was added for the flower centre.  The spray of leaves behind the flower were made using the Rose Garden Thinlits, Vellum and Garden Green cardstock.  Rose Red Candy Dots were added to the sentiment panel to finish.  The sentiment is from the Rose Wonder stamp set.


My third card is made using a patchwork pattern for the background that I cased from Mary Fish.  You cut 1/2" strips of patterned paper and adhere to the Whisper White cardstock.  The sentiment panel I made using the Rose Wonder stamp set, with the embellishments from the Love Blossoms Embellishment Kit.  An Iced Rhinestone was added to just below the bow to finish.

The Love Blossoms Designer Series Paper and the Love Blossoms Embellishment Kit are retiring along with the Iced Rhinestones, so if you like these products make sure you do not miss out.

See the retiring list here!
Remember if you order Online to make sure that 
you select me as your Demonstrator!!

Also if you order Online check out
the Online Club for even more benefits.

Thank you for visiting.

Carolyn.