Wednesday 27 January 2016

Pocket Cards

One of the ladies who regularly attends my card classes ask me the question recently "What else could you make with the Have A Cuppa Designer Series Paper pack?"  I have quite a few card samples where I have used the A Nice Cuppa stamp set and the Cups and Kettle Framelits Dies along with the Have A Cuppa Designer Series Paper, but no other projects.

So I took up the challenge and using the Pocket Card fold created two Pocket Cards, one for a Birthday and one for a Wedding.  


It was not until I really had a good look at the reverse side of these papers that I realised that they are appropriate for a lot of different occasions.


The first card is using a colour scheme of Basic Gray, Basic Black and Whisper White.


I used the stamp set Rose Wonder and the Rose Garden Thinlits dies.  The ribbon is Whisper White Seam Binding, it gives such a soft finish to the bow.


I die cut the smaller rose image and the leaves from the large rose, added some glitz with the clear Wink of Stella pen and layered them together on the card front.  Rhinestones were added to finish.

A 1 3/4" circle was folded over the top of the inside tag and a large Designer Vintage Faceted button with an Iced Rhinestone for the middle was attached using glue dots.  This allowed for an easy tab to slide the tag in and out of the card.


The second card is using a colour scheme of Bermuda Bay, Basic Black and Whisper White.  The other colours in the Designers Series Paper give a lift to the card.


Again I used the Rose Wonder stamp set.  I really like the sentiments and the outline frame in this set so you will probably see me use this set a bit in the months to come.


The embellishments on this card are quite simple, Whisper White seam binding ribbon and Dazzling Diamonds Glimmer Paper hearts punched out using the Sweetheart Punch.

Thank you for visiting.

Carolyn

Tuesday 26 January 2016

Sale-A-Bration - 5 January-31 March 2016

Happy Australia Day to all my fellow Aussies. It is a beautiful day in Perth a little bit warm with an expected maximum today of 33, I am sure that the beach goers will be enjoying the sun and surf.  I have been sitting out on my patio enjoying the early morning rays with my cup of coffee.

Onto the reason for my post.

Would you like to earn Free products? During Sale-A-Bration you have the chance to earn Free products three ways:
  • Shop with me;
  • Host a party; or
  • Join My Team and become a member of Stampin' Up.

For every $90 you spend (before postage and handling) you will earn a Free Sale-A-Bration item.  If you host a party you get the added bonus of Stampin' Rewards for your party sales.

By joining My Team you will get even more product for your Starter Kit along with a small gift from me.

An added bonus is my Rewards Club and you will also receive free from me the One Sheet Wonder cutting template and card instructions to make 12 cards.

Interested?  Contact Me here.


Thank you for visiting.

Carolyn

Monday 25 January 2016

Anyone for a Cuppa ....

Hi everyone, sharing my card for the challenge this week at Can You Case It.


The stamp set I have used is A Nice Cuppa along with the matching Cups & Kettle Framelits, I also used the Circles Collection Framelits.  The Designer Series Paper is from the Have A Cuppa Designer Series Paper Pack.


I always find the colour scheme of Melon Mambo, Basic Black and Whisper White so striking.  I picked up the Melon Mambo colour from the piece of Designer Series Paper and added the Basic Black for the contrast.

Thank you for visiting.

Carolyn

January Class in the Mail

Hi everyone, the January Class in the Mail is now available and further information can be found here.


This month the stamp set "Birthday Blooms" is show cased, I have used the large floral stamp on three of the cards to create the background with a bit of glimmer added by using the Wink of Stella Pen.

An added bonus is the One Sheet Wonder template and card instructions that you will receive for free when you purchase the January Class in the Mail.

Thank you for visiting.

Carolyn

One Sheet Wonder

On the 6 January 2016. I posted one of the cards I made as part of the one sheet wonder that I designed, you can see it here.  I have been getting a few enquiries about the one sheet wonder, so if you like the idea of getting 12 cards from one sheet of 12"x 12" Designer Series Paper, the cutting template and card instructions are yours for free when you submit an order with me for $50 or more. This is only available to residents of Australia.
  

The sentiments are from various stamp sets. I just got out my sets with sentiments and font styles that I liked and incorporated these into my design.

Thank you for visiting.

Carolyn

Friday 22 January 2016

A Little Gift of Cards ...

I am sharing a project with you today that a learnt how to make at a Stamp Camp that I attended last September.   I have remade the project using some of the latest stamps and framelits, it is a card holder for 4 cards made using the Whisper White Note Cards and Envelopes.

Does it look familiar, it should I cased myself from a card I recently posted here.


The stamp sets used on my project are Writing Notes, Timeless Textures, Grateful Bunch, Crazy About You, And Many More and Picture Perfect.  Colour scheme of Tip Top Taupe, Whisper White and Rose Red.  The flowers were cut from Rose Red patterned paper from the Love Bossoms Designer Series Paper Stack using the Botanical Builder Framelits.

Create the folder front and before you adhere it down make sure that you have put your ribbon around the cover so that you can tie a bow on the side to keep it closed.  I used about 26" of ribbon, this allows you to tie the bow easily.


To create the cover just score a piece of A4 cardstock in half portrait and then in half landscape.  Fold and burnish all the score lines.  Using your Stampin' Trimmer cut on the diagonal  on two sides from the centre score line to the edge of the middle score line to create the pockets for the card.  There is no adhesive required, it just folds up into a little booklet.


I made the 4 cards all the same, just changing up the sentiment to Thanks, Just A Note, Celebrate and Happy Birthday.  I thought that this would cover a lot of occasions where these cute little cards would be appropriate.


This project was actually quite quick to make as I made the cards all the same just changing the sentiment.  Also Stampin' Up make it so easy with the Note Cards and Envelopes already made for us.

Thank you for visiting.

Carolyn

Tuesday 19 January 2016

Cucumber Crush ...

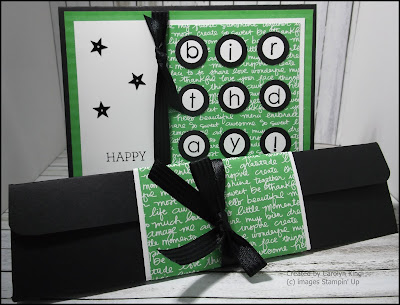
Have you ever had a stack of paper and cardstock that you just could not get into?  This has happened to me with the new In-colour Cucumber Crush.  The colour is so vibrant and is not usually one that I pick when creating.  I decided today to get right out of my comfort zone and this is what the end result is.


The card was made using Cucumber Crush from the 2016-17 In-color Designer Series Paper pack, the Color Me Irresistible Specialty Designer Series Paper, Basic Black and Whisper White cardstock.

Stamp sets used are Back to Basics Alphabet and Crazy About You along with 1/2" and 3/4" circle punches with some stars from the Metallics Sequin Assortment Pack and Basic Black Stitched Satin Ribbon.


I made a matching long triangle box from the tutorial by Sam Donald which I adapted to fit a small Toblerone chocolate bar.  The shape of the box just said "Toblerone" however it did not fit so a few small adjustments were needed, voila!


Thank you for visiting.

Carolyn

Saturday 16 January 2016

Enjoy the Little Things ....

Do you have someone that you have not seen in while and would like to catch up with or someone that you have met socially and would like to get to know better.  How about sending them a little invitation to come and sit together and drink some tea.  What a great way to extend the hand of friendship.


For my card I have used the 'Twisted Card' tutorial by KellyJean Gettelfinger that you can find on Splitcoast Stampers.

I had already made my cardbase using Tip Top Taupe cardstock and the matching Designer Series Paper from the Sale-A-Brations Catalogue "Perfectly Artistic" when I decided to use some Twinings tea bags "Australian Afternoon", very apt as it is afternoon here in Perth, Western  Australia.  The colour Pumpkin Pie went perfectly with the colours in the tea bag covers, so I used this to create the kettle, tea cup and flowers.

Back to the "Perfectly Artistic" Designer Series Paper - Do you like it? Do you want a chance to get it for free?   If you live in Australia then just place an order with me for $90 and it is yours. You can order online here or contact me here

I added some Tip Top Taupe Dotted Lace Trim (this I trimmed down and used the other piece for the tag) to the back of the Designer Series Paper on the pocket before I adhered it to the pocket front. For the inside pocket I created a little tag using the stamp set "Enjoy the Little Things", the "Lots of Labels" Framelits and the 1/8" handheld punch finishing with the piece of Tip Top Taupe Dotted Lace Trim and some Linen Thread.  The flowers were made using the punch from the "Itty Bitty Accents" Punch Pack with some Rhinestones added for a little bit of bling.

The kettle is made using Pumpkin Pie cardstock and the "Cups and Kettle" Framelits and the sentiment is from the "Ballon Celebration" stamp set.  A little more bling was added with the Rhinestone Trim on the kettle lid.


The inside of the card is decorated with more die cuts from the "Cups and Kettle' Framelits, flowers and the words from the "Balloon Celebrations" stamp set.  These were stamped onto Tip Top Taupe cardstock with Black Archival ink and punched out using the Word Window Punch.  I did try stamping direct onto the Designer Series Paper but the words got a bit lost.  The tea bags are held in place with a little bit of Washi Tape on the back.

Send someone a little surprise invitation today.

Thank you for visiting.

Carolyn

Tuesday 12 January 2016

Special Card for a Special Boy...

A special boy in my family has a birthday today, he is turning 12.  I think he is a bit of a star so the Pictogram Punches stamp set was perfect to use to create his card.


For the background I used Shimmery White cardstock and arranged star shapes over the cardstock made using the Stars Framelits, this created a mask for the star shapes.  I then misted with a mix of Marina Mist reinker and Isocol rubbing alcohol, removing the star shapes and revealing the star outlines on the background.


To finish the card I created a cardbase of Marina Mist and a Basic Black mat for the background Shimmery White piece.  I cut out some Basic Black stars and arranged these on the top two thirds of the card.  The sentiment was stamped on a piece of Shimmery White and matted onto Basic Black and then Marina Mist.  This was then adhered to the card front.  Stars from the Metallics Sequin Assortment were added to finish the card.  For the inside of the card I adhered 3 of the stars that I used to create the background piece, these were misted with the Marina Mist as part of the process.

Built for Free Using: My Stampin Blog
>

Saturday 9 January 2016

My Friend

Just getting my card making fix in for today after celebrating my Mum's 80th Birthday.

I am playing along with the challenge at ColourQ to use the colours Kraft, Pool Party, Melon Mambo, Blushing Bride and White.


I used the Watercolor Wash stamp for the background.  I inked it up with Pool Party, misted it with water and then stamped it onto a piece of Shimmery White cardstock.  This I adhered onto a mat of Melon Mambo and then adhered this to the cardbase.

Do you like the pink leaves?  I sponged Blushing Bride and Melon Mambo onto a piece of Shimmery White cardstock and then cut out the leaves using the Botanical Builder Framelits.  The flower was made using the same Framelits, cutting the flower from Shimmery White cardstock and the flower centre from the same piece that I cut the leaves from.  An Iced Rhinestone was added to the flower centre.

I looped some of the Silver Metallic Thread behind the leaves and flowers and added some silver sequins from the Metallics Sequin Assortment for a bit of bling.  The sentiment is from the And Many More stamp set.

Thank you for visiting.

Carolyn

80th Birthday

My Mum is 80 today, yeah!!  Happy Birthday to you, Happy Birthday to you, Happy Birthday dear Mum, Happy Birthday to you.  To celebrate we are having an afternoon tea with a small gathering. Mum did not want a big fuss so a small gathering was the compromise as we could not let such a milestone pass with out celebrating.

For a special lady I had to make a special card.  Mum loves the Soft Sky, Silver and Whisper White colours together so this is the colour theme that I use on her card.


I used the stamp sets "Grateful Bunch" and "Amazing Birthday", Blossom Bunch Punch, Metallic Doilies, Silver Glimmer Paper, Soft Sky and Whisper White cardstock, Scalloped Tag Topper Punch, 1/8 Silver Ribbon, Metallics Sequin Assortment, Iced Rhinestones and Jewels Basic Rhinestones.

Thank you for visiting.

Carolyn

Friday 8 January 2016

Special Friend...

I confess, I did not get around to sending out Christmas Cards this year and I really, really, really should have sent one to a very good friend who lives on the other side of Australia.

So I decided to make her a very special card for a special friend.


For the background I stamped the Writing Notes stamp in Soft Sky ink onto Whisper White cardstock.  I then stamped some of the images from the Timeless Textures stamp set with Crumb Cake and Tip Top Taupe, first, second and third generation stamping to get the various shades of the images.  The butterfly is from the Grateful Bunch stamped in Tip Top Taupe.   The small splatter images is from the Timeless Textures stamp set which was stamped with Rose Red ink.

The other embellishments include Metal Rimmed Pearls which are part of the Weekly Deals which you can find here.  Just click on the Shop Now tab.  The flower is made using the Botanical Builder Framelits and Designer Series Paper from the Love Blossoms Paper Stack.  The leaves were from the same Framelits set, die cut in Whisper White with Tip Top Taupe sponged on the edges.  I have added a small silver doily from the Metallic Foil Doilies pack and also I cut down one of the White Lace Doilies which I slipped under the Sahara Sand Lace Trim.  Silver Metallic Thread was layered under the flower which was finished with a Crumb Cake Candy Dot added to the flower centre.


Thank you for visiting.

Carolyn

Wednesday 6 January 2016

Beautiful Bunch

Just a quick post today of a card I made last week while on holidays.  I started back to work on Monday after two weeks off over the Christmas and New Year period so I have not had a lot of time to play in my craft room (working seriously cramps my stamping time).

The new Birthday Bouquet Designer Series Paper is so pretty and I have used one of the sheets to make a one sheet wonder.  I have never done this before and it was a bit of a challenge to design the cards and cut the paper to get the most out of it.  I managed to get 12 cards with a colour scheme of Pool Party and Whisper White.

I am sharing one of the cards that I made using the Lovely Lace Embossing Folder on the background and a flower that I made using the stamp sets Beautiful Bunch, Flower Shop and Petite Petals.  The flower images were stamped on Whisper White using Versamark and Silver Embossed.  The petals were then coloured using Pool Party ink and an Aquapainter.  Once the flowers had dried I punched them out with the matching punches.   The petals were shaped using a bone folder and then layered together with dimensionals.  An Iced Rhinestone was added for the flower centre.


Close up of the flower, it finished the card perfectly.


Thank you for visiting

Carolyn

Saturday 2 January 2016

A Little bit of Elegance

I just had to make some more of these beautiful gold flowers using the Botanical Builder Framelits and Gold Foil Sheet, they are just so elegant.


To showcase these beautiful flowers, I made a matching gift bag and card using the Basic Black sheet from the Color Me Irresistible Specialty Designer Series Paper.  This paper has a beautiful sheen to the diagonal stripe.  I added some Gold Foil Sheet and Gold Fancy Foil Designer Vellum banners along with some Gold Satin Ribbon for the bow.


The little gift card is 3" x 3" and I made a matching Basic Black envelope.


The gift bag was made using the Gift Bag Punch Board and a piece of the Basic Black Colour Me Irresistibly Specialty Designer Series Paper cut at 11" x 7".

Thank you for visiting.

Carolyn
Friday 1 January 2016

Some changes to Blogger - a little Housekeeping

Hi everyone, just advising that starting from the week of 11 January 2016, you will need a Google Account to sign into Friend Connect and follow blogs.  So if you follow by Twitter, Yahoo, Orkut or another Openld provider you will no longer be able to follow my blog.

So if you wish to continue to follow my blog please set up a Google Account and re-follow my blog, that way you do not miss out on anything (amazing and not so amazing).  With a Google Account, you will get blogs added to your Reading List, making it easier for you to see the latest posts and activity of the blogs that you follow.

Happy New Year everyone.

Carolyn

Happy New Year!

I gave some serious thought to my New Year's Resolution this year.  I had several ideas and this is what I came up with:
  • Stop Eating Chocolate (never going to happen);
  • Lose some weight (I really should, but never going to happen);
  • Join the Gym to get fit (again I really should, but never going to happen).  I have taken the good advice of Paul Terry "When I feel like exercising, I just lie down until the feeling goes away.”;
  • Give up stamping for a month (that is never, never, never going to happen); and
  • Look after my garden better (now that is doable so I am going with this but not sure how long my New Year' Resolution will last).
To celebrate my resolution I made myself a card (I know pretty naff), but this is a card that I was shown how to make at a recent stamp camp, I have just changed up the paper and the wording but everything else is the same.  I made a card with the same Apron pattern last week and you can see this here.

I have used the stamp set "Gift from the Garden" and "Alphabet Rotary Stamp", Real Red and Whisper White cardstock, Brights Designer Series Paper Stack, Love Blossoms Designer Series Paper Pack, Itty Bitty Accents Punch Pack, Ovals and Handjpicked Framelits, Large Oval Punch, 1/4" handheld Circle Punch, Whisper White 1/4" Cotton  Ribbon, Early Espresso and Smoky Slate ink.

Wishing you a great New Year.

Thank you for visiting.

Carolyn