Showing posts with label Pattern Party Designer Series Paper. Show all posts

Saturday, 12 February 2022

Pattern Party Designer Series Paper Scraps - Dwellingup Project 5

Hi everyone, sharing that last of my Dwellingup projects using the Pattern Party Desinger Series Paper.

I used the Celebrating You stamp set from the January-June 2022 Mini Catalogue, Pattern Party Designer Series Paper Pack, Stampin' Write Markers and the Loose Flower Flourishes from the Annual Catalogue.

Hope you enjoyed this scrappy project.

If you live in Australia

you can get all the supplies you need
for this project from me.

You can place an order online or Contact Me and place an order. 


Thank you for visiting.
Carolyn

Friday, 11 February 2022

Pattern Party Designer Series Paper Scraps - Dwellingup Project 4

Hi everyone, sharing another of my cards from my Dwellingup crafting getaway.

This is another of the projects I made using my scraps from the Pattern Party Designer Series Paper pack.

I used the Hello Beautiful stamp set and the Beautiful Shapes Dies for this card.  Did you notice the Adhesive Backed Hexagons embellishments on the card?  These come in a pack of 90 pieces with 3 colours and 3 sizes.

Hope you enjoyed this scrappy card.

If you live in Australia

you can get all the supplies you need
for this project from me.

You can place an order online or Contact Me and place an order. 


Thank you for visiting.
Carolyn

Thursday, 10 February 2022

Pattern Party Designer Series Paper Scraps - Dwellingup Project 3

Hi everyone, sharing another of my projects from my crafty Dwellingup getaway weekend.

This card uses 4" x 1" strips, great way to use up the paper strips that always seem to appear, lol.  I have previously posted on how to make this card here.


I used the Celebrating You stamp set from the January-June 2022 Mini Catalogue, Pattern Party Designer Series Paper Pack, Stampin' Write Markers,  Loose Flower Flourishes from the Annual Catalogue and White 1 cm Glittered Organdy Ribbon which is a carry over from the July-December 2021 Mini Catalogue.

I really like the colourful look of this card.

Hope you enjoyed this project.

If you live in Australia

you can get all the supplies you need
for this project from me.

You can place an order online or Contact Me and place an order. 


Thank you for visiting.
Carolyn

Wednesday, 9 February 2022

Pattern Party Designer Series Paper Scraps - Dwellingup Project 2

Hi everyone, sharing another of my cards I made while at a crafting weekend away a couple of weeks ago at Dwellingup.

I decided to use up some of the left over scraps I had from the Pattern Party Designer Series Paper pack.  I was really pleased with the cards that I made using up these leftover pieces, will post more over the next few days.  I have quite a few of these scraps as I used this paper pack for projects in a fundraiser I held last June.  Definitely time I created something with them.


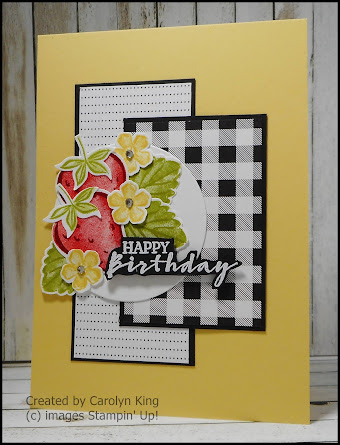
I used the Sweet Strawberry stamp set and the matching Strawberry Builder punch for this card.  

Hope you enjoyed this project.

If you live in Australia

you can get all the supplies you need
for this project from me.

You can place an order online or Contact Me and place an order. 


Thank you for visiting.
Carolyn 

Wednesday, 2 February 2022

Cut and Shuffle Cards

Hi everyone, sharing a set of cards made using 3 pieces of 6" x 6" (15.2cm x 15.2cm) Designer Series Paper.  The technique is called cut and shuffle.  You cut the 3 pieces of Designer Series Paper exactly the same and then shuffle the pieces until you have the layouts for the 3 cards.  You will make two of the same card, 6 cards in all.


I cut the pieces as per the diagram, you will have a small left over piece on one side which I just discarded as it was so tiny.  The bottom strip is cut into 3 strips to decorate the inside of the cards.


The mat is cut at 8cm x 12.3cm.  You just adhere the Designer Series Paper pieces to this and then adhere to the card front.  

These are my finished cards.  I used the Celebrating You stamp set from the January-June 2022 Mini Catalogue, Pattern Party Designer Series Paper Pack, Stampin' Write Markers,  Loose Flower Flourishes from the Annual Catalogue and White 1 cm Glittered Organdy Ribbon which is a carry over from the July-December 2021 Mini Catalogue.


To change things up a bit you can adhere the centre panel up the other way to change the look of the card.


Hope you enjoyed this project.

If you live in Australia

you can get all the supplies you need
for this project from me.

You can place an order online or Contact Me and place an order. 


Thank you for visiting.
Carolyn
Saturday, 4 December 2021

Just Add Ink #583 ... Just Add a Sketch


Hi everyone, I am playing along with this week's challenge at Just Add Ink #583 ... "Just Add a Sketch".


The challenge this week is to make our card using this sketch.

For my project I have used the Party Puffins stamp set, the Pattern Party Designer Series Paper Pack and the Painted Label Dies.

I fussy cut the Puffins after colouring them with Stampin' Blends.  I really like these cute little guys, perfect for a birthday card.

Hope you enjoyed this project.

Thank you for visiting.
Carolyn

Friday, 2 July 2021

Sweet Strawberry - JDRF Card 6

Hi everyone, another project from the cards made by the ladies at the Juvenile Diabetes Research Foundation fundraiser held on 26 June.

This card uses the Sweet Strawberry stamp set, Strawberry Builder punch and the Pattern Party Designer Series Paper Pack.


To make this card

1.         Fold the Poppy Parade card base in half

2.         Emboss the Basic White cardstock (12.3cm x 8cm) piece using the Bark 3D Embossing Folder and adhere to the Basic Black mat (12.7cm x 8.4cm)  Adhere to the card front.

3.         Adhere the Designer Series Paper (6.4cm x 10.2cm) to the Basic Black (6.8cm x 10.6cm) mat and adhere to the card front.

4.         Adhere the Petal Pink 5/8" Organdy Striped ribbon in place.

5.         Stamp the sentiment using Basic Grey ink and die cut using the Stitched So Sweetly dies before adhering to the card front using Dimensionals.

6.         Stamp the solid Strawberries using Poppy Parade and then the accents using Cherry Cobbler before punching out.

7.         Stamp the leaves using Pear Pizzazz, solid and outline images, before punching out.

8.         Stamp the small flowers using Petal Pink, solid and outline images, before punching out.

9.         Stamp the outline image of the Strawberry Calix on Garden Green cardstock before punching out.  Adhere these to the top of the Strawberries.

10.       Arrange all the Strawberries, leaves and small flowers on the card front.

11.       Add some Champagne Rhinestones to the centres of the small flowers.

12.       For the card inside stamp the Strawberries and Calix as above on the piece of Basic White cardstock.  Mat the Basic White cardstock on the Basic Black cardstock and then adhere to the card inside.

If you live in Australia

you can get all the supplies you need
for this project from me.

You can place an order online or Contact Me and place an order. 


Thank you for visiting.

Carolyn

Thursday, 1 July 2021

Pattern Party - JDRF Card 5

Hi everyone, another of the projects from the Juvenile Diabetes Research Foundation fundraiser held on 26 June.

This project uses the versatile Pattern Party Designer Series Paper Pack and Peaceful Moments stamp set.  I am sure that you noticed the Basic Black decorative circle.  This is one of those items that I nearly missed in the new Annual Catalogue.  It is from the Encircled Beauty Dies.


The card base is Granny Apple Green, I love this colour with Basic Black and it picks up the colour in the pattern paper.  

I have used three of the sheets in the Pattern Party Designer Series Paper Pack.  Each piece of the pattern paper was cut at 3.5cm x 7.5cm with Basic Black mats cut a 0.4cm larger.  

A Basic Black cardstock mat was cut at 13.8cm x 9.5cm and a Basic White cardstock piece was cut at 13.3cm x 9cm.  The Basic White cardstock piece has been die cut using the Stitched Greenery Die.  This die creates a stitched leaf and stem pattern all over the cardstock piece.  This is adhered to the Basic Black mat.  The pieces of Designer Series Paper adhere to the matching Basic Black mats was then adhere to this piece, make sure that they are evenly spaced.

The decorative circle was die cut from a piece of Basic Black cardstock.  

Stamp the sentiment from the Peaceful Moments stamp set on a piece of Basic White cardstock and die cut using a small circle from the Layering Circles dies.  This was then adhered to the decorative circle before adhering this to the card front using Dimensionals. 

To finish the card front adhere some Loose Flower Flourishes.

For the inside of the card adhere a strip of Designer Series Paper on a piece of Basic Black cardstock and adhere to a Basic White cardstock piece cut at 14.3cm x 10cm before adhering this to the card inside.

If you live in Australia

you can get all the supplies you need
for this project from me.

You can place an order online or Contact Me and place an order. 


Thank you for visiting.

Carolyn

Sunday, 27 June 2021

Make a Wish - JDRF Card 1

Hi everyone, I held a fundraiser yesterday for the Juvenile Diabetes Research Foundation (JDRF).  The ladies had a great day making the projects which I will be sharing with you over the next two weeks.  We did a lot of laughing, eating the amazing cupcakes made by my friend Danielle and catching up with friends.

The first project that I am sharing with you uses the Party Puffins stamp set.  I love these little guys.


The striped pattern paper is from the Pattern Party Designer Series Paper Pack which was cut at 5.2cm x 10.1 cm.  This was matted onto a piece of Basic Black cardstock 5.6cm x 10.5cm.  The card base is Pool Party with the Basic Black mat cut at 9.4cm x 13.7cm and the Basic White background piece cut at 9cm x 13.3cm.  The circles were die cut using the largest plain circle and scalloped circle in the Layering Dies.  

The birthday cake was stamped onto the Basic White circle using Black Memento ink and coloured using Stampin' Blends.  The Party Puffins were stamped on Basic White using Black Memento ink, coloured using Stampin' Blends and then fussy cut out.  The Puffins were adhered to the circle using Dimensionals.

The sentiment was stamped on a piece of Pool Party cardstock cut at 1.5cm x 6cm using the Black Memento ink.  One end of the sentiment piece was cut on an angle before adhering to the card front.

To finish the card front a few Rhinestones were added.

For the inside of the card the candle image was stamp 3 times across the bottom of a piece of Basic White cardstock and coloured with Stampin' Blends. 

If you live in Australia

you can get all the supplies you need
for this project from me.

You can place an order online or Contact Me and place an order. 


Thank you for visiting.

Carolyn

Monday, 14 June 2021

Hand-Penned Memories & More Card Pack - Card 2

Hi everyone, sharing another of my projects using the Hand-Penned Memories & More Card Pack.  The Memories & More Card Packs are designed for memory keeping, however they are also perfect to make cards with. 


This card uses one of the floral patterned 3" x 4" cards which I have matted on to a piece of Basic Black Cardstock. I have also used a strip of patterned paper from the Pattern Party Designer Series Paper pack, matted on a piece of Basic Black Cardstock and adhered behind the Hand-Penned Memories & More Card.  The sentiment is from the sticker sheets from the Card Pack.  I tapped the back of the sticker with the Embossing Buddy, this takes away the sticky backing.  I then adhered this to two die cut labels from the Stitched So Sweetly Dies using Dimensionals.

If you live in Australia

you can get all the supplies you need
for this project from me.

You can place an order online or Contact Me and place an order. 


Thank you for visiting.

Carolyn

Sunday, 13 June 2021

Hand-Penned Memories & More Card Pack - Card 1

Hi everyone, it has been awhile since I have posted.  I have had a little break from posting as I have been getting organised for a Junior Diabetes Research Foundation fundraiser that I am holding on the 26 June, 2021.   My beautiful Mum also passed away recently and I had a lot of other matters to attend to so creating got put on the back burner.

For today's post my card uses the Hand-Penned Memories & More Card Pack and the Pattern Party Designer Series Paper Pack.  I will be posting more cards this week using the Hand-Penned Memories & More Card Pack, so stayed tuned in.

The Memories & More Card Packs are designed for Memory Keeping, however they are also perfect to make cards with.  


I cut the piece of Pattern Party Designer Series Paper at 10.5cm x 14.8cm.  I then cut a 6.5cm piece off one end flipped this over to show the reverse side of the paper.  I adhered the two pieces to a card base and added a strip of Basic Black Cardstock to cover the join.   

The Hand-Penned Memories & More Card that I have used for the centre panel is a 3" x 4" card with the same image at top and bottom.  I cut this in half, making two pieces 3" x 2", so if you use the two cards in the pack you can make 4 of these cards.  I matted this onto a piece of Basic Black Cardstock and adhered this to the card front using Dimensionals.

The sentiment is from the Art Gallery stamp set and was stamped using Black Memento ink on a piece of Daffodil Delight Cardstock.  This was die cut using the matching die from the Floral Gallery Dies.  The sentiment was then adhered to the card front using Dimensionals.  Some Rhinestones were added to finish the card front.

If you live in Australia

you can get all the supplies you need
for this project from me.

You can place an order online or Contact Me and place an order. 


Thank you for visiting.
Carolyn