Showing posts with label Go To Greetings. Show all posts

Saturday, 27 January 2024

Stash Busting Saturday - 12" x 12" Flight & Airy Designer Series Paper

Hi everyone, it is time for another 'Stash Busting Saturday' show and tell. 

I selected the Flight & Airy 12" x 12" Designer Series Paper for this week's Stash Buster.  This Designer Series Paper is one of the free Sale-A-Bration items if you place a qualify order of $90 or more.


I have made multiples of each card, making sure to use the entire sheet of Designer Series Paper.

I did fussy cut the birds from several of the sheets of Designer Series Paper as they make great focal points on the cards. This card sketch is from Call Me Crafty Al, I did change it slightly. You can find the card sketch and all the cutting guides and information here.


These two cards a very simple, I have just let the pretty Designer Series Paper do all the work.

I hope you enjoyed these Stash Busting Saturday cards. 

If you live in Australia
    you can get all the supplies you need 
for this project from me.

You can place an order online or Contact Me and place an order. 


Thank you for visiting.
Carolyn

Saturday, 20 January 2024

Stash Busting Saturday - Inked Botanicals 6" x 6" Designer Series Paper

Hi everyone, it is time for another 'Stash Busting Saturday" show and tell.

I selected the Inked Botanicals 6" x 6" Designer Series Paper for this week's Stash Buster.  I used this paper pack previously and still had 36 sheets left, 3 of each design, and I wanted to finish using this paper pack.  I seem to have a lot of half finished paper packs in my stash so I am on mission to use them up.


I came across a Mini Slimline card design on Call Me Crafty Al's Youtube channel, which you can see here, that uses the 6" x 6" pieces of Designer Series Paper to make cards with no scraps.  Just what I was after.  It so happens that I have a heap of envelopes in my stash that fit this size card perfectly.

I worked out that if I cut 5/8" off the short edge of a piece of A4 cardstock and then cut this into 3 1/4"  strips lengthwise I get 2 card bases from the one A4 sheet.  I then scored each card base at 4 3/4" and you have the perfect size for the pieces of Designer Series Paper.  I did cut a mat for the inside at 3" x 6" and adhered the small piece of Designer Series Paper to one end of the mat.  Of course if you are using a Basic White mat then you do not need to create the mat for the card inside.


The butterflies are from the Paper Butterfly Accents which I coloured using Crushed Curry and Calypso Coral ink to match the Desinger Series Paper.

The sentiment is from the Go To Greetings stamp set.  I love the offset sentiment panel, this is another tip I picked up from Call Me Crafty Al.  These sentiment panels are a great way to use up a lot of the small strips and left overs that I seem to accumulate.

I created 72 cards using this card sketch, however I have not finished decorating the other 48, so I will have to post these at a later date.

I hope you enjoyed these Stash Busting Saturday cards.

        If you live in Australia
    you can get all the supplies you need
for this project from me.

You can place an order online or Contact Me and place an order. 


Thank you for visiting
Carolyn

Saturday, 13 January 2024

Stash Busting Saturday - Delightfully Eclectic 12" x 12" Designer Series Paper

Hi everyone, it is time for another 'Stash Busting Saturday' show and tell. 

I selected the Delightfully Eclectic 12" x 12" Designer Series Paper for this week's Stash Buster.  I made 12 cards using two sheets of 12" x 12" Designer Series Paper.  I cut the flowers from one sheet and cut the other sheet into the patterned paper for the background. The stamp set I used is Go To Greetings.


The leaves we die cut using Basic White cardstock and the new Stippled Roses Dies.  

It is not just Designer Series Paper that I am trying to use in my Stash Busting Saturday designs, but also ribbon and other embellishments.  I seem to gather these quicker than I use them, lol.

I hope you enjoyed these Stash Busting Saturday cards.

        If you live in Australia
    you can get all the supplies you need
for this project from me.

You can place an order online or Contact Me and place an order. 


Thank you for visiting
Carolyn

Saturday, 16 December 2023

Stash Busting Saturday - Inked Botanicals 6" x 6" Designer Series Paper

Hi everyone, it is time for another 'Stash Busting Saturday' show and tell. 

I selected the Inked Botanticals 6" x 6" Designer Series Paper for this week's Stash Buster. I used one sheet of each pattern and made 28 cards.  There are 48 sheets in this paper pack, so I still have 36 sheets to use up, but at least I have started (lol).


Card 1 uses 3.1cm x 3.1cm squares of patterned paper.  The card base is a standard size 10.5cm x 14.85cm (half and A4) with the mats cut at 8.5cm x 12.8cm and 11.8cn x 7.5cm.  I made 6 of these cards.


Cards 2, 3, 4 & 5 use 2 sheets of pattern paper. The Basic Black cardstock strips hide the gap between the pieces of pattern paper, that way you get more from your paper.  I made 5 cards from these two pieces of patterned paper.

Each piece of pattern paper was cut into 7.6cm x 15.2cm strips.  Cut two of the pieces 7.6cm x 15.2cm (one of each pattern) in half so you have 7.6cm x 7.6cm squares.  Put 3 of these aside for your cards and cut the other 7.6cm x 7.6cm piece in half again so you have two 7.6cm x 3.8cm pieces.

Cut the remaining 7.6cm x 15.2cm strips into 11.8cm x 7.6cm pieces.  You will have two pieces that are 3.4cm x 7.6cm. One of these is paired with the 7.6cm x 7.6cm squares and the other piece is cut into small stips to decorate the inside of the cards.

Cut the 11.8cm x 7.6cm pieces into two pieces, one measuring 11.8cm x 5.1cm and the other 11.8cm x 2.5cm. 

The mats for these cards were cut at 12.3cm x 8cm with the Basic Black cardstock strips cut at 1.3cm x 8.5cm for the short pieces and 1.3cm x 12.3cm for the long pieces.


For card 6 and 7 I used 4 pieces of patterned paper 15.2cm x 7.6cm (6" x 3").  I have only shown 2 of the cards but I made 4 of these cards using the cut and shuffle technique. 

Cut each piece of patterned paper into two pieces 2.5cm x 15.2cm and 5.1cm x 15.2cm.  You will have 2 strips. Cut the 5.1cm x 15.2cm piece into 5.1cm x 5.1cm and 5.1cm x 9.5cm pieces.  You should now have the 3 pieces you need for your cards. The mat is cut at 8.5cm x 14.85cm.  Trim off any overhang that occurs when you adhere the patterned paper in place.


For card 8 I cut three strips of patterned paper.  Two at 2.5cm x 13.8cm and one at 3.8cm x 13.8cm.  I made 3 of these cards. The leftover pieces I used to make some of the other cards and also the small strips I used to decorate the inside of the cards.


For card 9 I used the other half of the four 7.6cm x 15.2cm pieces from the Cut and Shuffle cards. I cut these pieces at 7.6cm x 2.8cm and the mat was cut at 12.3cm x 8cm. The sentiment is from the Layering Leaves stamp set and the flowers were made using the Paper Florist Dies. The label was created using the Nested Essential Dies. I made 5 of these cards.


For cards 10 and 11 I used two pieces of patterned paper.  These two pieces were cut at 7.5cm x 11.8cm (you will get two pieces from each sheet) with the small scraps pieces used to make the final card shown below.  I call this one my scrap card.

I hope you enjoyed these 'Stash Busting Saturday' cards.

      If you live in Australia
    you can get all the supplies you need
for this project from me.

You can place an order online or Contact Me and place an order. 


Thank you for visiting.
Carolyn

Wednesday, 22 November 2023

Flight & Airy Designer Series Paper

Hi everyone, what to do when it is too hot outside to venture out.  Have a play with some new Designer Series Paper and some other products from my stash of course.


I made 4 cards, all the same colour and layout, different sentiment and a different bird and foliage piece. I fussy cut these pieces from the Flight & Airy 12" x 12" Designer Series Paper from the new Sale-a-bration promotion starting in January 2024.

The stamp set is Go To Greetings, and the pattern paper is from the 2023-2025 In Color Designer Series Paper Assortment and the 2023-2025 In Color Treat Bags. I just cut one of the bags into 2" x 3" pieces and used the left over strips to decorate the inside of the cards.

Did you notice the embossed background. This was created using the new Softly Sophisticated 3D Embossing Folder which is available in the new 2024 January-April Mini Catalogue coming in January 2024.

I hope you enjoyed these 4 cards and a little sneak peek at some new products.

If you live in Australia
    you can get all the supplies you need
for this project from me.

You can place an order online or Contact Me and place an order. 


Thank you for visiting.
Carolyn

Sunday, 23 July 2023

July Class - Projects 1 & 2

Hi everyone, sharing two of the projects from today's class.  These two projects use the Paper Florist Dies.


The background for the card was done using the Artistic Mix Decorative Masks and Bubble Bath ink and a small blending brush.  This is a great way to add some subtle colour to your card front.

The flowers were die cut from Bubble Bath, Old Olive, Granny Apple Green, Berry Burst and Basic White cardstock using the Paper Florist Dies.

The sentiment is from the Go To Greetings stamp set.


A Moody Mauve 2023-2025 In Color Treat Bag was decorated to match the card.    The die cut flowers were adhered to a banner made using the Nested Essentials Dies.

This little gift bag is great for small jewellery, lotto tickets, scratchy tickets, money or a gift card.

I hope you enjoyed these two projects.

If you live in Australia

you can get all the supplies you need
for this project from me.

You can place an order online or Contact Me and place an order. 

Thank you for visiting.

Carolyn

Sunday, 19 February 2023

Abstract Beauty Designer Series Paper

Hi everyone, I have been using up my stash of Designer Series Paper making cards for the Nursing Home that took such good care of my Mum and also for the cards I sell at work with the proceeds going to the Council Council of WA.

I have used up my stash of Abstract Beauty Designer Series Paper.  This is currently available on the clearance rack for $10.40 AUD.  I had two partially used packs and ended up making 125 cards over a two week period.


This is just some of the cards I made, I made multiples of the same design.  The paper scraps were kept to a minimum, I managed to use up most the off cuts and small strips, there were a few small pieces left but these were too small to use.  I used some of the small strips to decorate the inside of the cards.


This card design I cased from Call Me Crafty Al's January 2023 Sheetload of Cards.  Alisha's card design is for a Mini Slimline, I just adjusted the measurements for a normal sized card.


This card design is one that I have used a lot as it uses the 2.5cm x 10.2cm strips which a quite often left from projects.  The sketch is 'As You See It Challenge' sketch #254.


This card sketch is from Try Stampin' On Tuesday, it is sketch number #305.  This card is one of my favourites.


This sketch from My Favouorite Things is great for using small pieces of Designer Series Paper as the centre strip covers any gaps that are created by adhering the 2.5cm x 5.1cm pieces to the cardstock mats which are cut at 8cm x 5.1cm.  The centre strip mat is cut at 13.5cm x 3.3cm and the small pieces of Designer Series Paper cut at 5.1cm x 2.9cm.  I made 3 of these cards using all the small off cuts and strips.


This card design is based on Call Me Crafty Al's February 2022 Sheetload of cards template.  I individually matted the strips instead of adhering the strips onto a larger piece of cardstock.


I have used the Mojo Monday Sketch #444 for this card. I love using card sketches as it makes card making a lot easier.


This another card design using the Call Me Crafty Al's February 2022 Sheetload of cards template.  This sketch is great for using strips of Designer Series Paper.  It is also a great sketch to use for the larger sentiments on your cards


This is a real scrappy card, using all the small left over strips.  I do not know where this idea originated as I have seen a lot of these cards on Pinterest.


This card uses Mojo Monday Sketch #323.  The Designer Series Paper was cut at 7cm x 12.7cm, the mat was cut at 7.4cm x 13.1cm, the sentiment is a 4cm x 3cm rectangle die cut using the Rectangle Stitched Framelits Dies and the circle is 5cm cut using the Stylish Shapes Dies.  I used the 3.2cm x 15.2cm strip on the next card.


For this card cut the 3.2cm x 15.2cm strips (I used 6 strips which made 4 cards)  into 3.2cm x 7.6cm pieces and adhere these onto mats cut at 3.6cm x 8cm.  Cut the Designer Series Paper strip for the centre at 7cm x 2.5cm and 5.5cm x 2.5cm (I used 8 pieces of 2.5cm x 10.2cm), and the mat at 3cm x 13cm.   There were some small strips left which I used to decorate the inside of the cards.


This card sketch is from Jess Crafts. Jess has some great sketches and cutting guides to get the most out of your Desinger Series Paper. I changed the measurements so you could get two cards from one piece of 10.2cn x 15.2cm (6" x 4") piece of Designer Series Paper.  I cut the piece in half on the 15.2cm edge so you end up with two pieces 7.6cm x 10.2cm (3" x 4").  Cut this piece into 3 pieces one at 7.6cm x 6cm and 2 pieces 7.6cm x 2.1cm.


These cards were made using another sketch from Jess Crafts.  It is Jess Crafts 6" x 6" Paper Buster #4.


I made 16 cards using this sketch, 8 of each colour way.  The tag was created using the Celebrate With Tags stamp set and the Celebrations Tag Dies.


The card is based on the January 2023 Mini Slimline template from Call Me Crafty Al.  I have adjusted the sizing to create normal sized cards.


I made 6 of these cards, 3 in each colour way using the left over pieces from the previous project.


I made 6 of these cards using the Mojo Monday Sketch #323.  Instead of a sold piece of Designer Series Paper I used the smaller left over pieces from the previous projects. 


This card sketch is from Try Stampin' On Tuesday, it is sketch number #305.  I just moved where the sentiment was situated on the card design.


This is totally a scrap design using the left over strips.  I made 8 of these cards.

I have no idea if this is a card sketch I created or adapted from another sketch, however if is I have not been able to find where it came from.  It is great for using 10.2cm x 15.2cm (4" x 6") Desinger Series Paper Packs.

Cut the Designer series paper at 9.3cm x 5.1cm and the cardsock mat at 9.6cm x 5.4cm, the next layer you can use Desinger Series Paper or cardstock cut at 11.3cm x 7.1cm and the cardstock mat at 11.6cm x 7.4cm

Hope you enjoyed these projects using the Abstract Beauty Designer Series Paper.

If you live in Australia

you can get all the supplies you need
for this project from me.

You can place an order online or Contact Me and place an order. 


Thank you for visiting.
Carolyn

Tuesday, 3 January 2023

Splendid Birthday

Hi everyone, sharing another project using the Splendid Day Specialty Designer Series Paper.


This card design is quick and simple, great for making a lot of cards in mass production.  I made 8 of these cards from the one sheet of Splendid Day Specialty Designer Series Paper.

The sentiment is fom the Go To Greetings stamp set which was stamped using Black Memento ink.  The embellishments used are Sprig Trinkets, Baker's Twine Essentials Pack and Rhinestone Basic Jewels.

I hope you enjoyed this project.

Thank you for visiting.
Carolyn

Monday, 22 August 2022

Rings of Love Designer Series Paper - Day 2

Hi everyone, sharing another of the cards I made using the Rings of Love Designer Series Paper.  This sheet with all the birds in the trees and shrubs is my favourite.  I have already made a project using this pattern paper which you can find here.


Again I have kept the card design quite simple, showing the paper to advantage.  

When I cut this piece of paper, I cut it at 7.5cm x 10.2cm.  I then cut 3cm from the bottom which enable me to stretch the pattern paper to cover the card front.  The sentiment strip hides the gap between the pattern paper pieces.  By cutting the paper this way you will get 12 cards from the one sheet of paper.

The Night of Navy card mat is cut at 8cm x 11.8cm and the sentiment strip is cut at 9.5cm x 2.5cm.  The sentiment strip was stamped using Night of Navy ink and the 'Happy Birthday' from the Go to Greetings stamp set.  This was adhered to the card front using Dimensionals.  A few Rhinestones and a White Bakers Twine Ribbon were added to finish the card.

I have made 12 of these cards which I will also be donating the Nursing Home that took card of my Mum.

Hope you enjoyed this project.

If you live in Australia

you can get all the supplies you need
for this project from me.

You can place an order online or Contact Me and place an order. 


Thank you for visiting.
Carolyn

Monday, 4 July 2022

JDRF Fundraiser - Project 7

Hi everyone, sharing Project 7 from the recent Fundraiser I held for the Juvenile Diabetes Research Foundation.

The small kraft bag is decorated using the Medium Daisy Punch, Poppy Moments Dies along with Blackberry Bliss, Daffodil Delight, Basic White and Old Olive Cardstock.


This project uses the Design a Daydream 12" x 12" Designer Series Paper Pack, Go To Greetings Stamp Set, Stylish Shapes Dies, Double Oval Punch and Bough Punch.

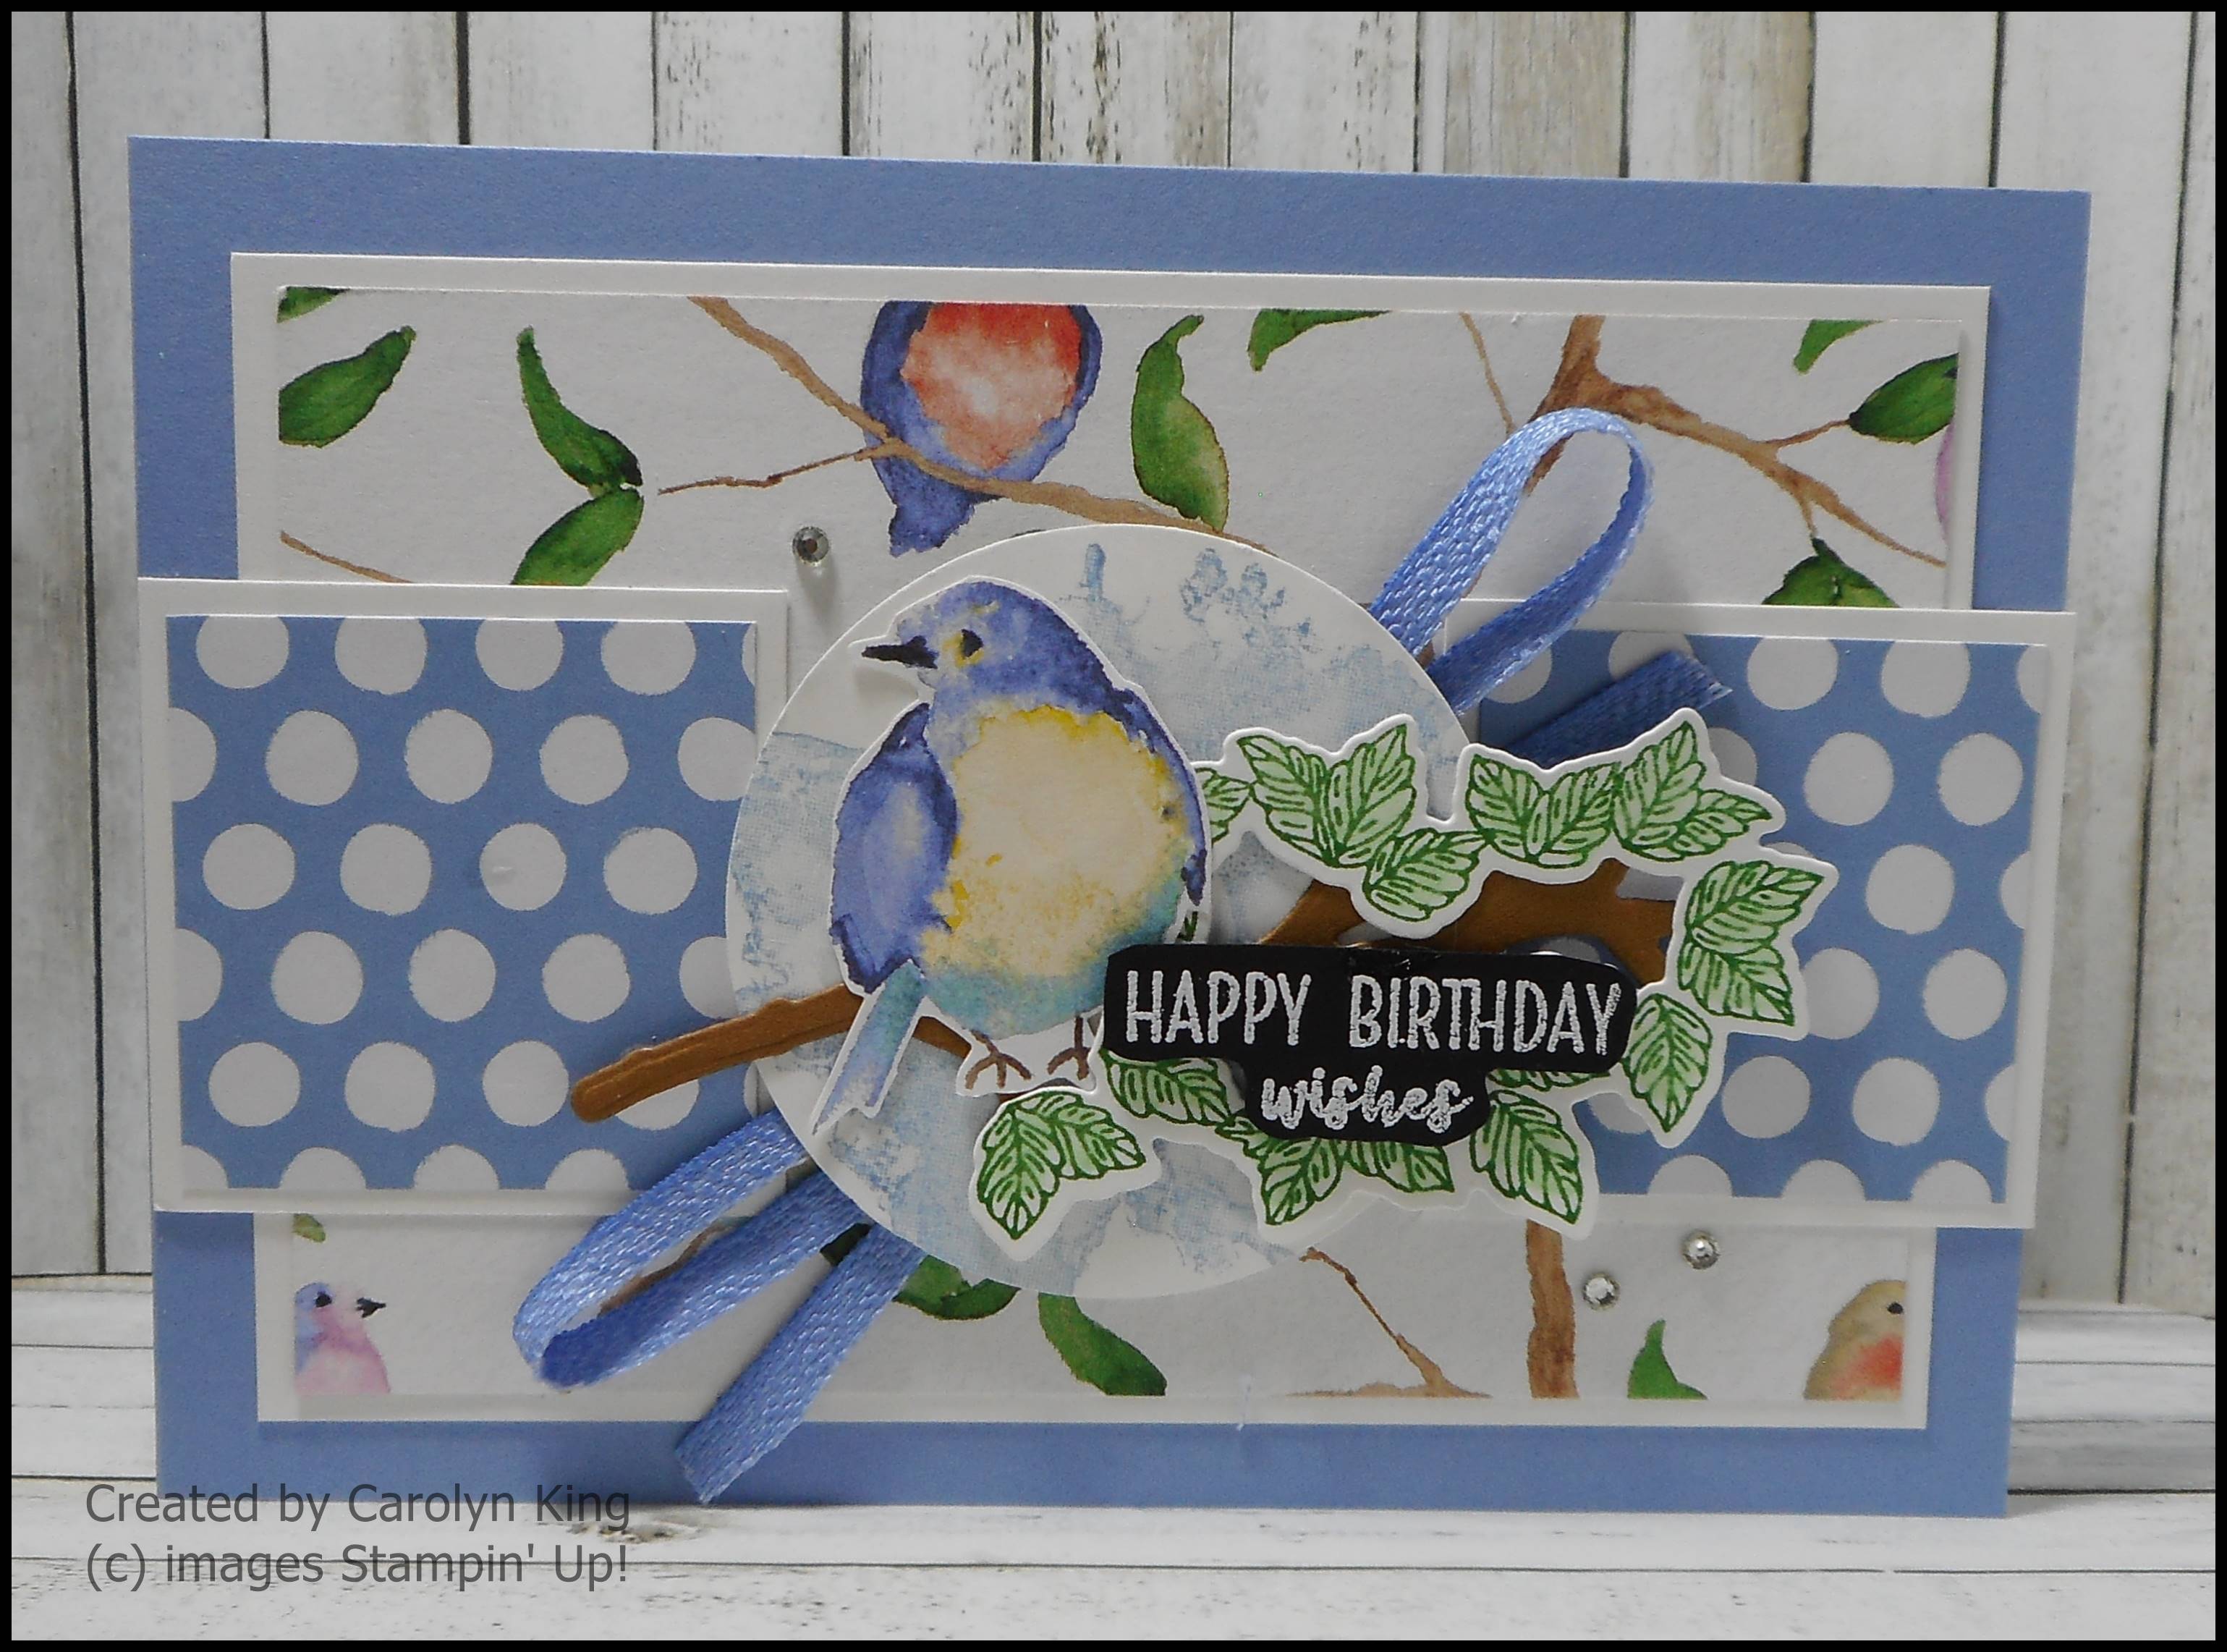
Card 1 – Blackberry Bliss

Adhere the 3 pieces of Designer Series Paper cut at 3.8cm x 7.5cm to a Basic White Cardstock mat cut at 12.3cm x 8cm, make sure to leave a small gap between each piece.  Adhere to the card front.

Stamp the ‘Happy Birthday’ on the piece of Basic White Cardstock using Blackberry Bliss ink and die cut using one of the banner dies from the Stylish Shapes Dies.

Punch out 3 Vellum leaves using the Bough Punch.

Adhere the Vellum leaves to the card front and then adhere the sentiment die cut piece in place using Dimensionals.

To finish the card front, adhere a small Rhinestone to the centre of a Fresh Freesia Loose Flower Flourishes flower.  To make it secure put a very small (and I mean very small) drop of liquid glue in the centre of the flower.  Leave it for a little while to become tacky and then adhere the small Rhinestone to the centre.  You can just put the Rhinestone direct to the centre of the flower, however sometimes it is not very secure and can come loose.  Adhere the flower (using a Glue Dot) and two Rhinestones to the die cut sentiment piece. 
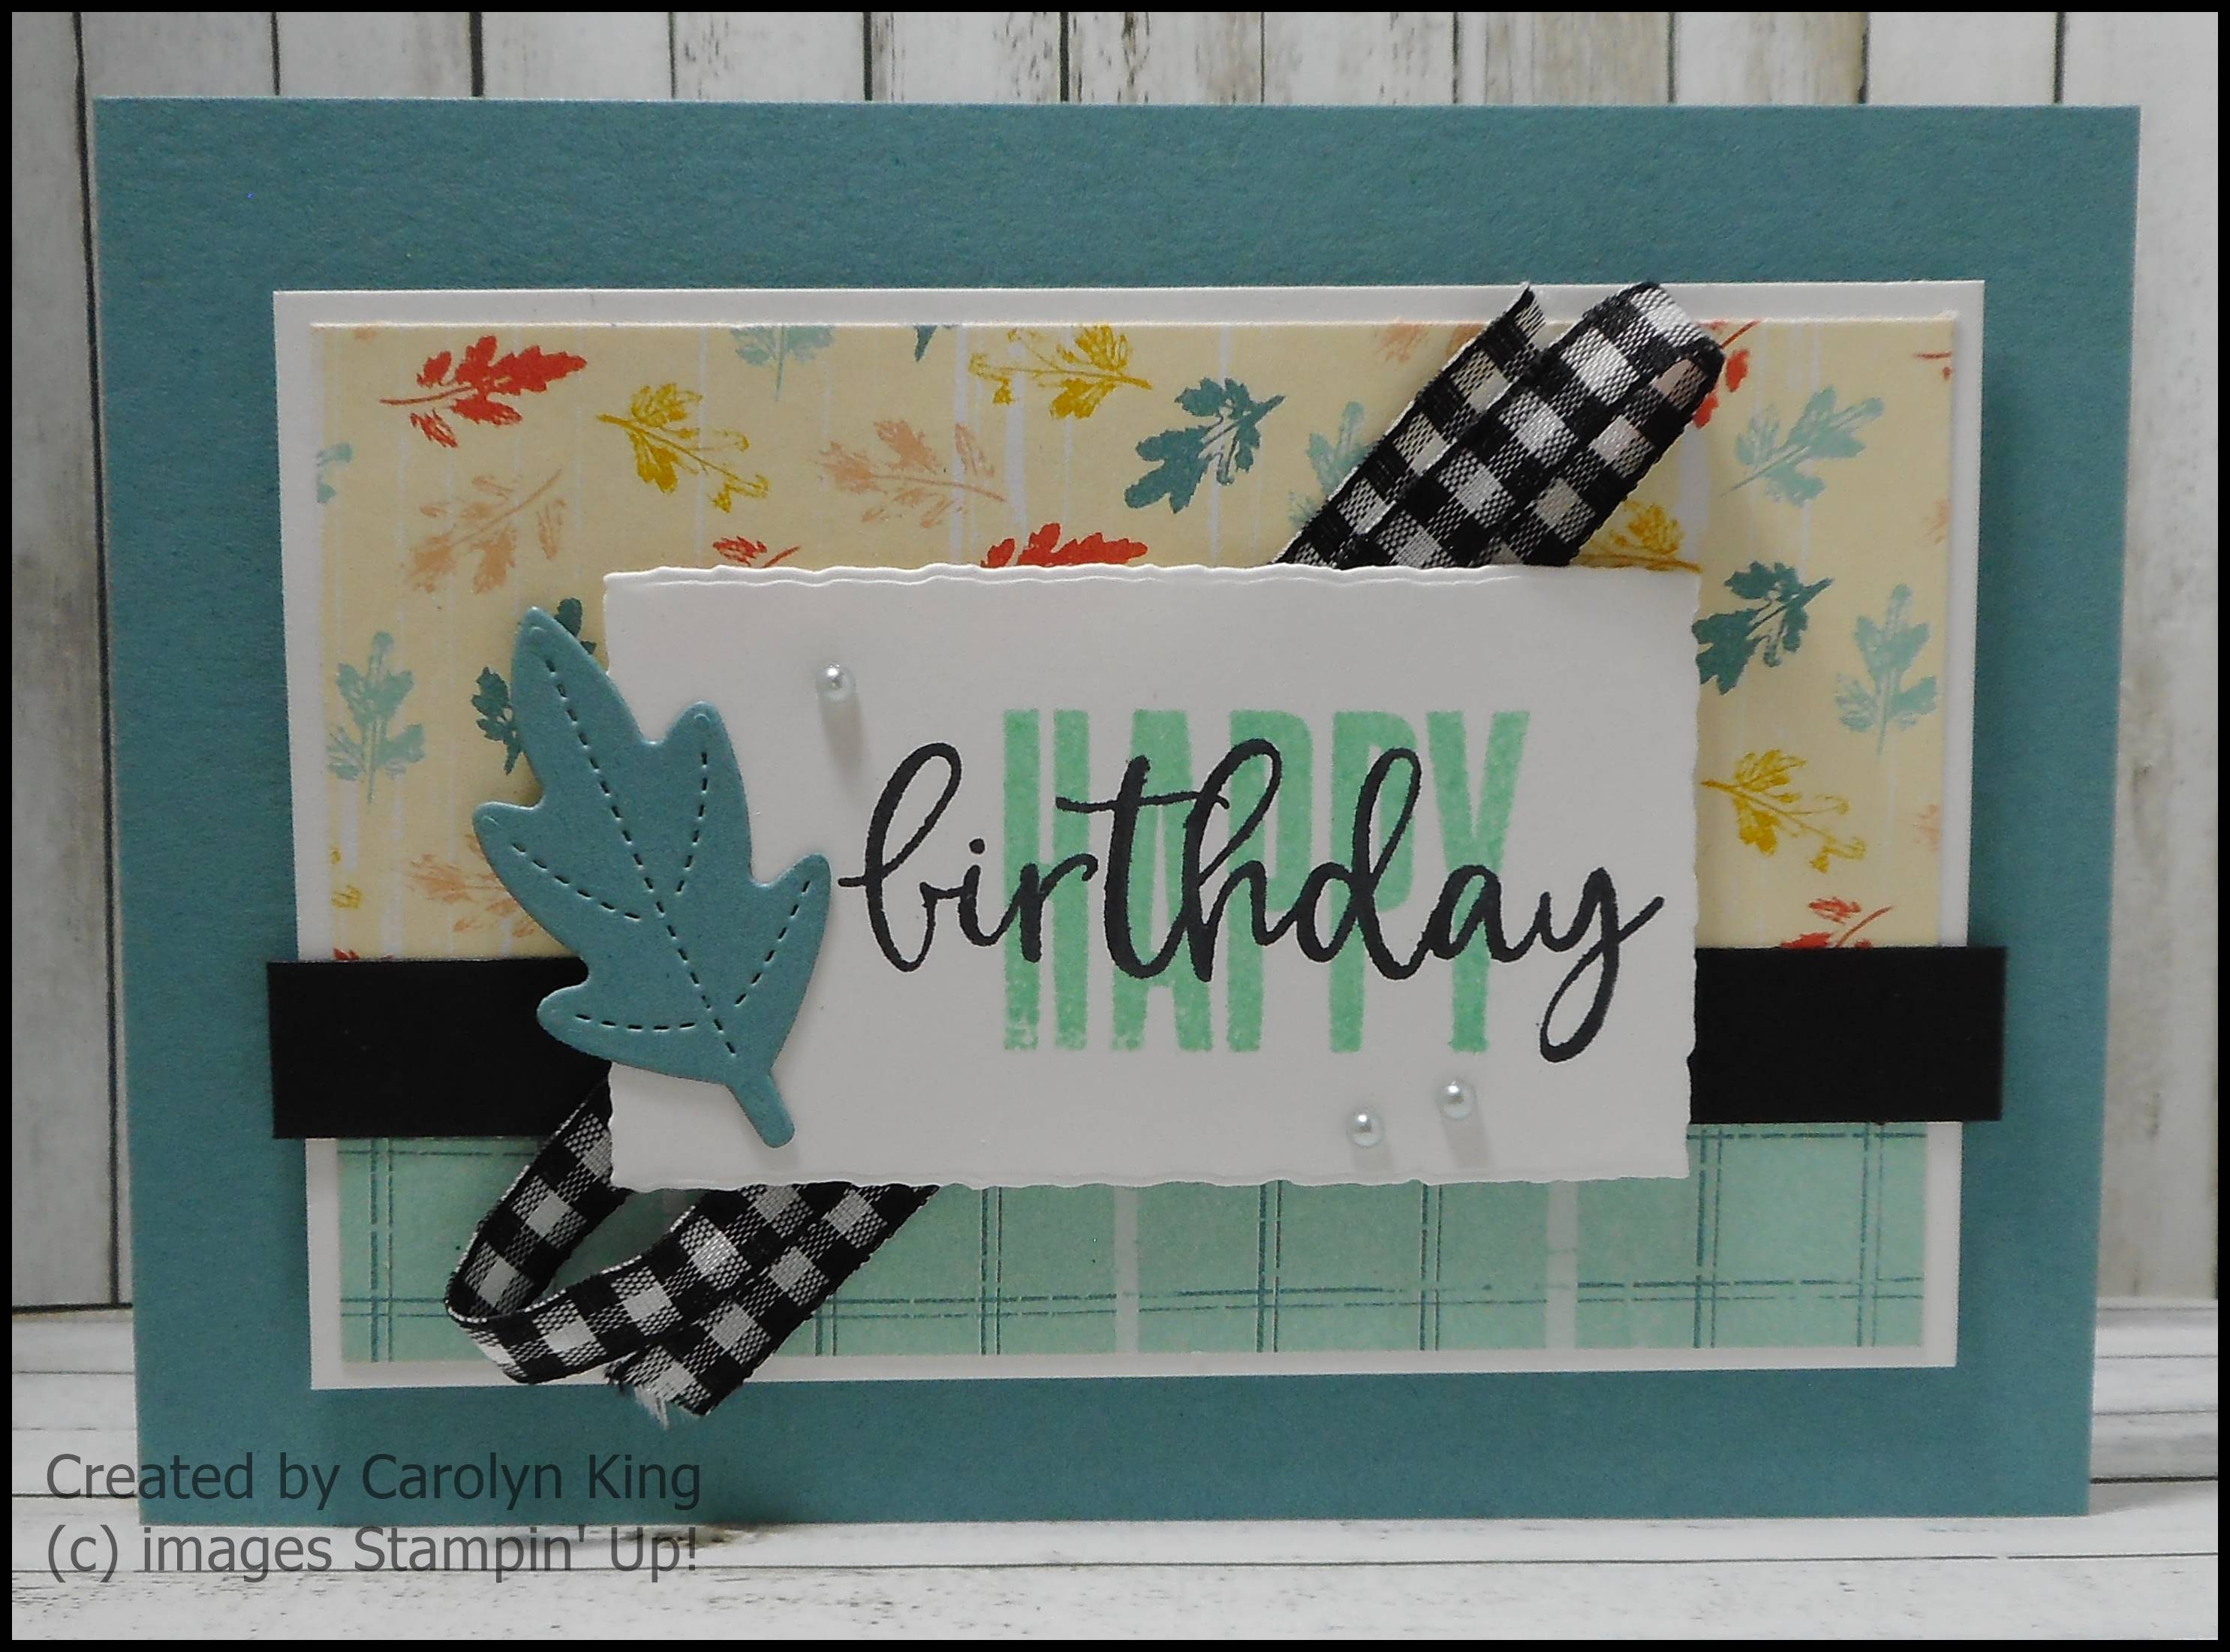
Card 2 – Pool Party


Adhere the 3 pieces of Desinger Series Paper cut at 4cm x 7cm (2 pieces) and 2.7cm x 7cm (1 piece) to the Basic White Cardstock mat cut at 7.5cm x 11.8cm.
  Make sure to leave a small gap between each piece.  Adhere to the card front.

Stamp the ‘Happy Birthday’ on the piece of Basic White Cardstock using Black Memento ink and die cut using one of the banner dies from the Stylish Shapes Dies.

Die cut the small Pool Party banner using one of the banner dies from the Stylish Shapes Dies.  Cut this in half to form two pieces, each with a flagged end.

Adhere the die cut sentiment panel to the card front using Dimensionals, making sure to leave room each end to tuck the flagged end banner pieces in place.  Note that these small flagged end pieces are adhered flat to the card front.

To finish the card front add 3 Glossy Dots, one of each size.
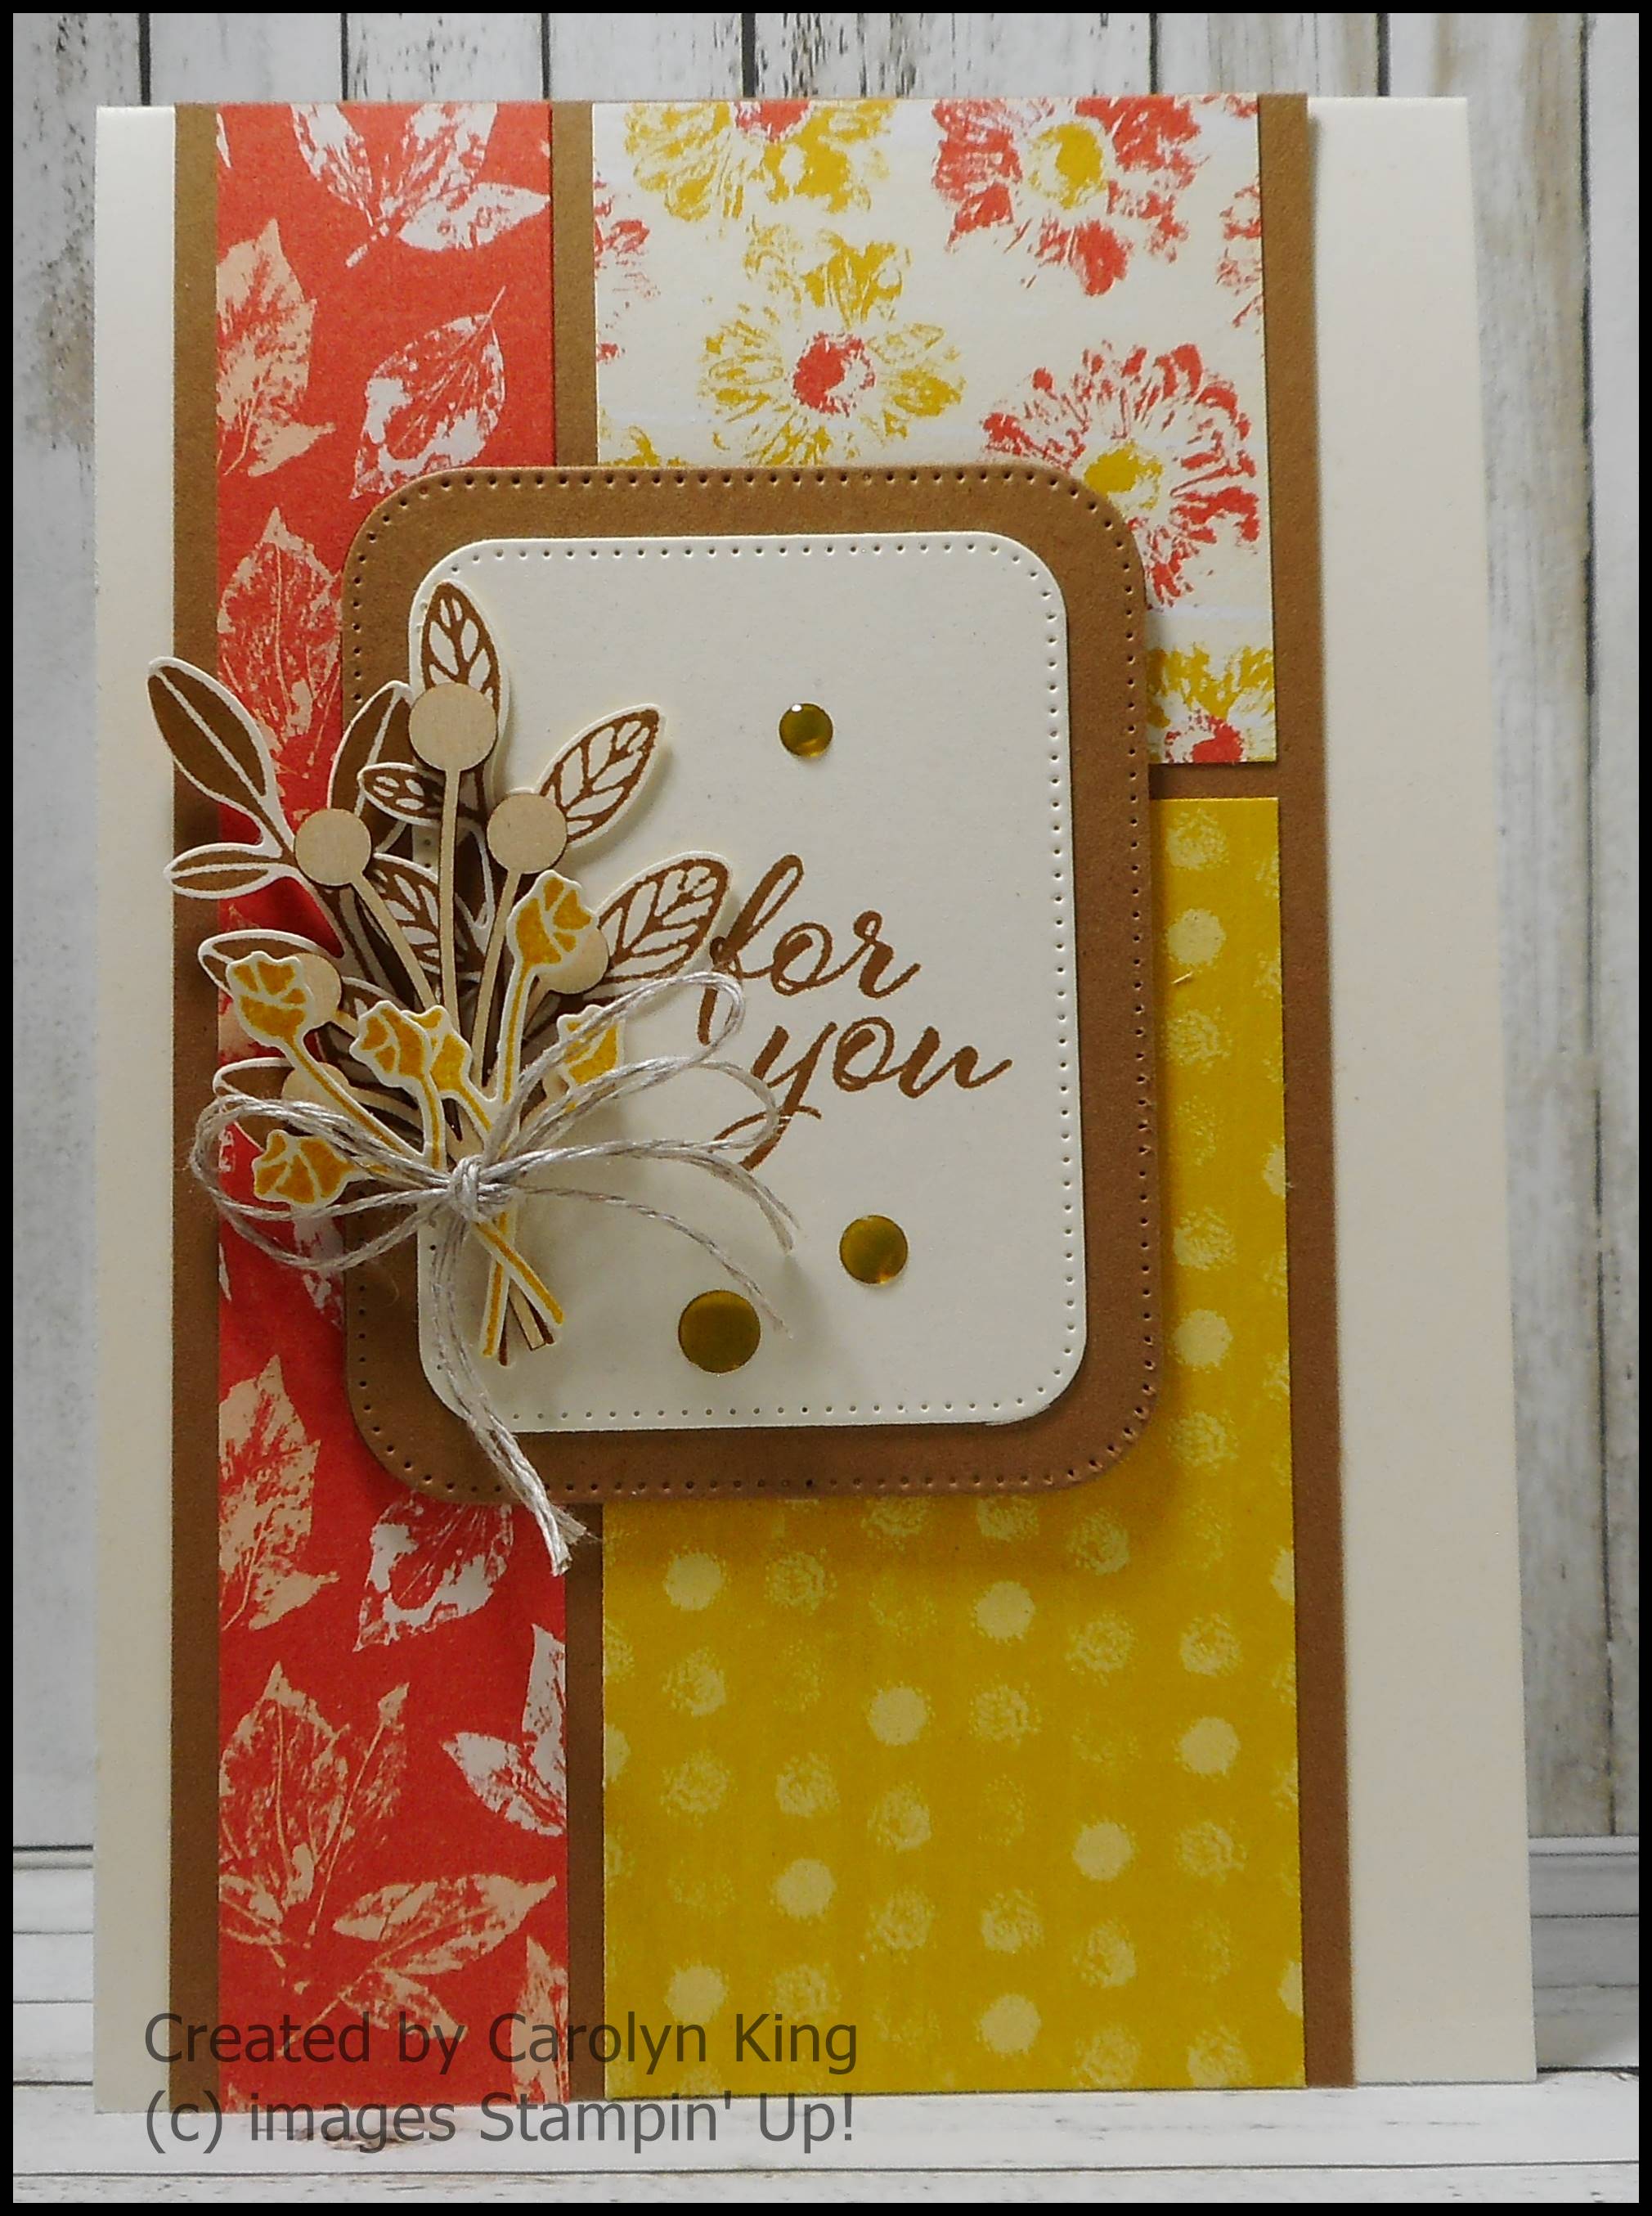
Card 3 – Petal Pink


Adhere the 3 pieces of Designer Series Paper cut at 7.5cm x 3.1cm, 7.5cm x 4.1cm and 7.6cm x 4.1cm to the Basic White Cardstock mat cut at 8cm x 12.3cm.  Make sure to leave a small gap between each piece and that the 7.6cm x 4.1cm piece of Designer Series Paper is on the bottom section.  Adhere to the card front.

Adhere the small strip of Petal Pink patterned Designer Series Paper cut at 9.5cm x 1.5cm to the Basic White Mat cut at 9.5cm x 2cm and adhere to the card front.

Stamp the ‘Just a Note’ on a piece of Basic White Cardstock using Black Memento ink and punch out using the Double Oval Punch.  Punch out a Blackberry Bliss Scalloped Oval.  Layer these two ovals together.

Punch 3 Vellum Leaves and 3 Basic White Flower Sprigs using the Bough Punch. 

Layer the Vellum Leaves and the Basic White Flower Sprigs on the card front and adhere the sentiment oval in place using Dimensionals.

To finish the card front add 3 Glossy dots, one of each size.

Hope you enjoyed this project.

If you live in Australia


you can get all the supplies you need
for this project from me.

You can place an order online or Contact Me and place an order. 


Thank you for visiting.
Carolyn