Showing posts with label Pretty Pines Thinlits. Show all posts

Wednesday, 14 November 2018

Christmas Pines One Sheet Wonder - Christmas Tags

The final project and day 10 of the Christmas Pines One Sheet Wonder are the 3 Christmas Tags.
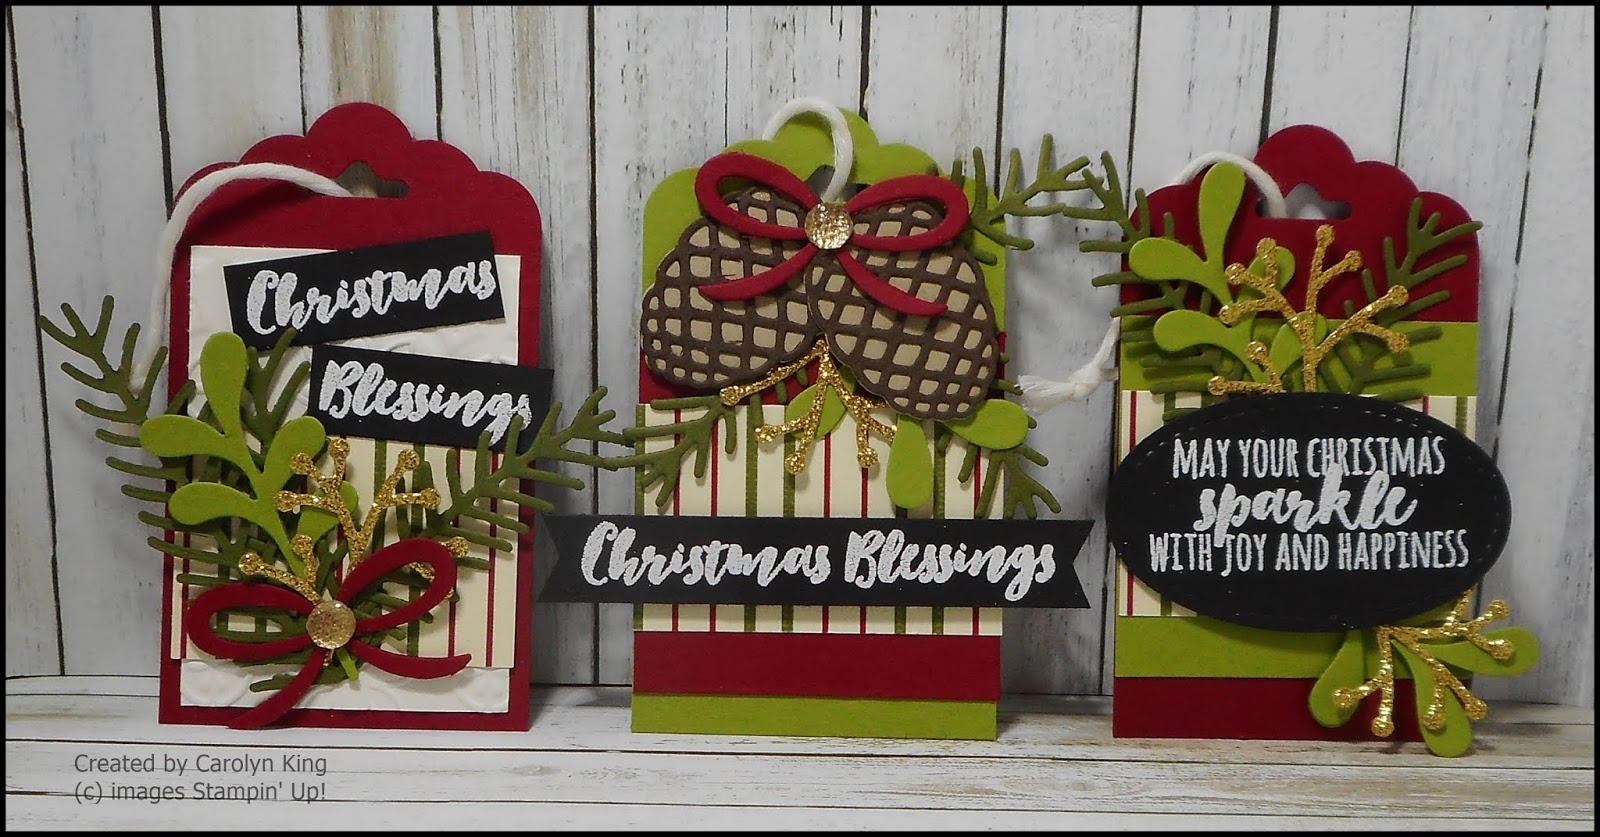

Tags are great for using up the small left over pieces of Designer Series Paper.  You will need the following pieces of Designer Series Paper for the tags:

  • 1 7/8" x 1 1/4" for Tag 1
  • 1 7/8" x 2" for Tag 2
  • 1 7/8" x 2" for Tag 3


You will need 2 Cherry Cobbler Tag Bases and 1 Old Olive Tag Base made using the Scalloped Tag Topper Punch.

Tag 1

Emboss a piece of Very Vanilla cardstock 1 3/4" x 2 1/2" using the Tin Tile Dynamic Textured Impressions Embossing Folder and adhere to a Cherry Cobbler Tag base.  Adhere the piece of Designer Series paper to this and decorate with Ferns, Leaves and Foliage and the Christmas Blessing sentiment.

Tag 2

Adhere a piece of Old Olive cardstock 2" x 2" to a Cherry Cobbler Tag base and then adhere the Designer Series Paper to this.  Decorate with Ferns, Leaves, Foliage and the 'May Your Christmas Sparkle with Joy and Happiness' sentiment.

Tag 3

Adhere a piece of Cherry Cobbler cardstock 2" x 2" to an Old Olive Tag base and then adhere the Designer Series Paper to this.  Decorate with the Pine Cones, Ferns, Leaves, Foliage, bow and the Christmas Blessing sentiment.

If you live in Australia 
you can get all the supplies you need

 for this project from me. 

You can place an order online oContact Me and place an order.


Thank you for visiting.
Carolyn  

Tuesday, 13 November 2018

Christmas Pines One Sheet Wonder -Triangle Treat Box

The Triangle Treat Box is the project for day 9 of the Chrismas Pines One Sheet Wonder.  This gorgeous little treat box was designed by Amanda Charlesworth and you can find a great video tutorial by Julie DiMatteo on how to make it here.


I only put the Designer Series Paper on the outside of the box with the small magnets being put in place before the Designer Series Paper is adhered in place.

You will need to cut the following pieces of Designer Series Paper

  • 1 piece 2 3/4" x 1 1/2"
  • 2 pieces 2 3/4" x 2 1/4"
  • 1 piece 2 3/4" x 2 3/4"
Note that the top panel of the box and the Designer Series Paper piece have had the corners rounded.


Die cut the Fern using Mossy Meadow cardstock, the Leaves using Old Olive cardstock and the small foliage using Gold Glimmer Paper.  

Stamp the "May the Simple Joys of the Season Be Yours" on a piece of Basic Black cardstock using Versamark ink, add White Embossing Powder and heat set.  Cut out using the 2nd smallest Oval in the Stitched Shaped Framelits.

Layer the leaves and foliage on the top panel of the box, add a piece of Gold Sequin Trim and place the sentiment oval on top using dimensionals.

If you live in Australia 
you can get all the supplies you need

 for this project from me. 

You can place an order online oContact Me and place an order.


Thank you for visiting.
Carolyn  

Monday, 12 November 2018

Christmas Pines One Sheet Wonder - Card 5

Card 5 is the project for Day 8 of the Christmas Pines One Sheet Wonder.


You will need an Old Olive cardbase for this card and a piece of Old Olive cardstock 5 1/2" x 3 3/4".


Emboss the piece of Old Olive cardstock using the Tin Tile Dynamic Textured Impressions Embossing Folder.  Adhere this to the card front.

Cut a piece of Designer Series Paper 2 3/8" x 5" and a Cherry Cobbler mat 2 5/8" x 5 1/4".  Adhere the Designer Series Paper to the Cherry Cobbler mat and then adhere this to the card front.

Stamp the sentiment panel on Basic Black cardstock using Versamark ink, add White Embossing Powder and heat set.  This was then fussy cut.

Cut a Very Vanilla Stitched Shaped square and a Basic Black Scalloped Square.  Adhere these together and then adhere to the card front using dimensionals.

Die cut the Fern using Mossy Meadow cardstock, the Leaves using Old Olive cardstock and the small foliage using Gold Glimmer Paper.  Arrange these onto the Very Vanilla Stitched Shaped Squre, add a piece of Gold Cord and then add the sentiment panel using dimensionals.

For the inside of the card stamp the Fern Foliage images using Old Olive and Mossy Meadow ink onto a piece of Very Vanilla cardstock.  Adhere this to the inside of the card.

If you live in Australia 
you can get all the supplies you need

 for this project from me. 

You can place an order online oContact Me and place an order.


Thank you for visiting.
Carolyn  

Saturday, 10 November 2018

Christmas Pines One Sheet Wonder - Card 7

Card 7 is the project for day 7 of the Christmas Pines One Sheet Wonder.


You will need a Cherry Cobbler cardbase for this card, a piece of Old Olive cardstock 5 1/2" x 3 3/4" and a piece of Very Vanilla cardstock 5 1/4" x 3 1/2".


Emboss the piece of Very Vanilla cardstock using the Tin Tile Dynamic Textured Impressions Embossing Folder.  Adhere this to the Old Olive mat and then to the card front.

Cut a piece of Designer Series Paper 1 1/4" x 3 3/4" and mat this onto a piece of Cherry Cobbler cardstock 1 1/5" x 3 3/4".  Adhere this to the card front about 1 1/4" inches from the bottom on the card.

Die cut the Fern using Mossy Meadow cardstock, the Leaves using Old Olive cardstock and the small foliage using Gold Glimmer Paper.  

Stamp the "May the Simple Joys of the Season Be Yours" on a piece of Basic Black cardstock using Versamark ink, add White Embossing Powder and heat set.  Cut out using the 2nd smallest Oval in the Stitched Shaped Framelits.

Layer the leaves and foliage on the piece of Very Vanilla cardstock and add a piece of Gold 1/8" Cord before placing the sentiment oval on top using dimensionals.

For the inside of the card stamp the Fern Foliage images using Old Olive and Mossy Meadow ink onto a piece of Very Vanilla cardstock.  Adhere this to the inside of the card.

If you live in Australia 
you can get all the supplies you need

 for this project from me. 

You can place an order online oContact Me and place an order.


Thank you for visiting.
Carolyn  

Friday, 9 November 2018

Christmas Pines One Sheet Wonder - Card 4

The project for Day 6 of the Christmas Pines One Sheet Wonder is Card 4.


For this card you will need a Cherry Cobbler cardbase, a piece of Old Olive cardstock 3 3/4" x 3 3/4" which is adhere to the card front and then a piece of Designer Series Paper 3 3/8" x 5" which is adhere over this.

Cut out a large Very Vanilla Stitched Shaped Circle and a large Cherry Cobbler Scalloped Circle.  Stamp the 'Season of Joy' sentiment on the bottom of the Very Vanilla Stitched Shaped Circle using Momento Black ink.

Cut the Fern using Mossy Meadow cardstock, the Leaves using Old Olive cardstock and the Foliage using Gold Glimmer Paper.  The Pine Cones were made using Crumb Cake and Early Espresso cardstock with the bow cut from Cherry Cobbler cardstock 

Arrange the Pine Cone display how you like and add Gold Metallic Pearls around the Fern and Leaves and a Gold Faceted Gem to the bow centre.

For the inside of the card stamp the Fern Images using Mossy Meadow and Old Olive ink in the bottom right corner on a piece of Very Vanilla cardstock and adhere this to the card inside.

If you live in Australia 
you can get all the supplies you need

 for this project from me. 

You can place an order online oContact Me and place an order.


Thank you for visiting.
Carolyn  

Thursday, 8 November 2018

Christmas Pines One Sheet Wonder - Card 6

Card 6 is the project for the 5th day of the Christmas Pines One Sheet Wonder.


You will need a Cherry Cobbler cardbase for this card, a piece of Old Olive cardstock 5 1/2" x 3 3/4" and a piece of Very Vanilla cardstock 5 1/4" x 3 1/2".

Emboss the piece of Very Vanilla cardstock using the Tin Tile Dynamic Textured Impressions Embossing Folder.  Adhere this to the Old Olive mat and then to the card front.

Cut a piece of Designer Series Paper 1 7/8" x 4 1/4" and a Cherry Cobbler mat 2 1/8" x 4 1/2".  Adhere the Designer Series Paper to the Cherry Cobbler mat and then adhere this to the card front.

Stamp the sentiment panel on Basic Black cardstock using Versamark ink, add White Embossing Powder and heat set.  This was then fussy cut.

Die cut the Fern using Mossy Meadow cardstock, the Leaves using Old Olive cardstock and the small foliage using Gold Glimmer Paper.  Arrange these onto the Designer Series Paper, add a piece of Gold Cord and then add the sentiment panel using dimensionals.

For the inside of the card stamp the Fern Foliage images using Old Olive and Mossy Meadow ink onto a piece of Very Vanilla cardstock.  Adhere this to the inside of the card.

If you live in Australia 
you can get all the supplies you need

 for this project from me. 

You can place an order online oContact Me and place an order.


Thank you for visiting.
Carolyn  

Wednesday, 7 November 2018

Christmas Pines One Sheet Wonder - Gift Card Holder 1

Gift Hard Holder 1 is the project for Day 4 of the Christmas Pines One Sheet Wonder.


Cut a piece of Cherry Cobbler cardstock 3 1/5" x 8 1/2" and score on the 8 1/2 edge at 2 1/2" and 6 1/5".

The 2" section is the top of the Gift Card Holder.  Round the corners on this piece and then emboss the Gift Card Holder using the Tin Tile  Dynamic Textured Impressoins Embossing Folder.  You will need to do this in two sections.  Fold the bottom part of the Gift Card Holder up and adhere the sides to form the envelope section where the gift card goes.

Cut a piece of Very Vanilla cardstock 1 1/4" wide by 9", wrap around the Gift Card Holder and adhere the ends together, this creates the Belly Band.  Cut a piece of Designer Series Paper 1 7/8" x 2 5/8" and mat this onto a 2 1/8" x 2 7/8 piece of Old Olive cardstock.  Adhere this to the Belly Band.

Cut the Fern from Mossy Meadow cardstock and the Leaves from Old Olive cardstock.  The foliage is die cut from Gold Glimmer Paper.  Arrange the Fern and Leaves on the Designer Series Paper, add a piece of Gold Cord Trim and then the sentiment.  The sentiment has been made by stamping the 'May the Simply Joys of the Season be yours" on a piece of Basic Black cardstock using Versamark ink, add White Embossing Powder and heat set.  Cut out using the 2nd smallest Stitched Shaped Oval.

If you live in Australia 
you can get all the supplies you need

 for this project from me. 

You can place an order online oContact Me and place an order.


Thank you for visiting.
Carolyn  

Tuesday, 6 November 2018

Christmas Pines One Sheet Wonder - Card 3

Day 3 of the Christmas Pines One Sheet Wonder.  


This is Card 3 of the One Sheet Wonder.   Cut a piece of Designer Series Paper 3 3/8" x 5" and mat onto a piece of Cherry Cobbler cardstock 3 5/8 x 5 1/4" and then adhere this to an Old Olive cardbase.

Cut a piece of Cherry Cobbler cardstock 5 1/4" x 1 1/4" and adhere this across the card front about 1 1/5" from the bottom of the card.

Die cut the Fern using Mossy Meadow cardstock and the Leaves using Old Olive cardstock.  The foliage is die cut from Gold Glimmer Paper.  Arrange the display as you like on the piece of Cherry Cobbler cardstock and add a piece of Gold Cord.

Stamp the 'Christmas Blessing' on a piece of Basic Black cardstock 1/2" x 3 1/2" using Versamark ink.  Add White Embossing Powder and heat set.  Flag the ends and then adhere on top of the leaf and fern display using dimensionals.

For the inside of the card stamp the sentiment "Tidings of Comfort and Joy" using Momento Black ink in the centre of a piece of Very Vanilla cardstock and adhere this to the inside of the card.


If you live in Australia 
you can get all the supplies you need

 for this project from me. 

You can place an order online oContact Me and place an order.


Thank you for visiting.
Carolyn  

Monday, 5 November 2018

Christmas Pines One Sheet Wonder - Hexagon Box

I have seen several of these little gift boxes on Pinterest but I am not sure who first designed it, so whomever did you thank you very much.  The one that I found was made from a piece of 4 1/2 by 6" piece of Designer Series Paper with the finished box being quite small.  

I re-designed the box making it larger so that base of the box is 2 1/4" with the height being 2".  It fits 5 small round soaps perfectly or you can put in 6 wrapped toffees, or a piece of jewellery or money.


Cut a piece of  Cherry Cobbler cardstock 8” x 5” (you will get 2 boxes from one piece of A4 cardstock).


Score on the 8” edge at 1 ¼”, 2 ½”, 3 ¾”, 5”, 6 ¼” & 7 ½”
Score on the 5” edge at 1 ½” & 3 ½”

Measure 5/8” between each 1 ¼” panel (this is the centre point) and score from this point on the diagonal to where the first horizontal score line meets the vertical score lines (see picture below).


Snip the vertical score lines from the bottom to the bottom horizontal score line (see picture).

Cut away the small corner (this is at the bottom of the ½” strip on the edge) this is not required (see picture).

Fold and burnish all the score lines.

Cut 6 pieces of 1 1/8” x 1 7/8” DSP and adhere these to the box sides.

Join the sides of the box together and make sure that the diagonal folds on the top are burnished. 

Punch a hole in each diagonal flap using the 1/8" handheld circle punch.  This is for the Baker's Twine.  

Join the bottom of the box together. 

Cut two pieces of Baker's Twine, one Cherry Cobbler an one Very Vanilla, about 18" long. Thread the Baker's Twine through the holes, add your soap or toffees and close the top of the box with a bow.   Tie a knot in each end of the Baker's Twine.

To decorate die cut the Fern using Mossy Meadow cardstock, the Leaves using Old Olive cardstock and the small foliage using Gold Glimmer Paper.  

Stamp the "May the Simple Joys of the Season Be Yours" on a piece of Basic Black cardstock using Versamark ink, add White Embossing Powder and heat set.  Cut out using the 2nd smallest Oval in the Stitched Shaped Framelits.

Layer the leaves and foliage on the box front before placing the sentiment oval on top. 

If you live in Australia 
you can get all the supplies you need

 for this project from me. 

You can place an order online oContact Me and place an order.


Thank you for visiting.
Carolyn  

Sunday, 21 October 2018

Simple Joys of Christmas

This is a project I designed for a Stamp Camp held by my beautiful friend Pat Carr.  I was not able to attend this year, but I made this card at our stamp retreat at Dwellingup in late September and offerred to kit it up for Pat.  Hopefully the ladies enjoyed making it.


This is the same card sketch that I have used before.  You get 12 cards from a 12" x 12" piece of patterned paper as you cut the paper into 2" strips.  

The stamp set is Christmas Pines with the foliage and leaves being cut using the Pretty Pines Thinits.  The striped patterned paper is from the Festive Farmhouse Designer Series Paper.   The panel behind the centre spray has been embossed using the Subtle Dynamic Textured Impressions Embossing Folder.

If you live in Australia 
you can get all the supplies you need

 for this project from me. 

You can place an order online oContact Me and place an order.


Thank you for visiting.
Carolyn