Showing posts with label Mediterranean Blooms Designer Series Paper. Show all posts

Saturday, 8 March 2025

Stash Buster Saturday - Using up Paper Scraps

Hi everyone, for this week's Stash Buster project I decided to use up the paper scraps and strips I had left in the Mediterranean Blooms 12" x 12" Designer Series Paper pack.  I cut them down to 3.8cm x 3.8cm squares and then matted them onto 4.3cm x 4.3cm Basic White cardstock mats.


I made 11 cards using Night of Navy cardbases, the matted squares of Designer Series Paper, a Basic White cardstock rectangle die cut using the Textured Notes Dies, a Lemon & foliage image fussy cut from one of the sheets in the same paper pack, Linen Thread, Gold Textured Adhesive Backed Dots and the sentiment from the Delightful Wishes stamp set which was white heat embossed on Night of Navy cardstock.


I hope you enjoyed this simple card layout showing you how to use those pesky paper scraps.

If you live in Australia

    you can get all the supplies you need 
for this project from me.

You can place an order online or Contact Me and place an order. 


Thank you for visiting.
Carolyn

Saturday, 18 January 2025

Stash Busting Saturday - 12 Ways to use 3" x 4" pieces of Designer Series Paper

Hi everyone, for this week's Stash Buster I have made 12 cards using 3" x 4" pieces of Designer Series Paper.  I used one sheet of patterned paper from the Mediterranean Blooms 12" x 12" Designer Series Paper Pack, which I cut into 3" x 4" pieces, along with the Lemon images from another sheet of patterned paper in the same pack.

I set myself a little challenge to see how I could adapt the 3" x 4" pieces of Designer Series Paper to make full sized cards.  All the card bases are the metric 10.5cm x 14.85cm.  All the other measurements are in imperial as I found it easier to measure and cut using imperial so that I did not have any small scraps.


I have used the same embellishment layout for each card to make things a little easier for myself.  The sentiment is from the Citrus Blooms stamp set, the ribbon is the Daffodil Delight 3.2mm Satin Ribbon which is available in the new January-April 2025 Mini Catalogue and the little bit of bling is from the Tinsel Gems Four Pack.

Card 1


On the 4" side (this is the long side) from the bottom measure up 1" on the right hand side and 1 1/2" up on the left hand side.  Cut on the diagonal from the 1" mark to the 1 1/2" mark.

Adhere these pieces to a cardstock mat that measures 3 1/8" x 4 7/8".  Adhere to the card front.

Cut a cardstock strip that measures 5" x 1 1/8" and emboss this.  Adhere this across the card front on the diagonal to cover the gap between the two pieces of Designer Series Paper.  Trim off any excess on either side.

Add your embellishments and sentiment to finish.

Card 2


On the 4" side cut at 2 3/4" so you have two pieces, one measuring 2 3/4" x 3" and 1 1/4 x 3".  Adhere these to a cardstock mat cut at 3 1/8" x 4 7/8".  Adhere to the card front.

Cut a cardstock strip that measures 1" x 3 1/2" and emboss this.  Adhere to the cut from over the gap between the 2 pieces of patterned paper.

Add your embellishments and sentiment to finish.

Card 3


On the 4" side cut at 1" and 3" so you have 3 pieces, 2 measuring 1" x 3" and 1 measuring 2" x 3".  Adhere these to cardstock mats cut at 1 1/4" x 3 1/4" and 2 1/4" x 3 1/4".  

Adhere these pieces to the card front and add your embellishments and sentiment to finish.

Card 4


On the 4" side cut at 2 1/4", 3 1/3" and 3/4" so you have 3 pieces, 1 measuring 2 1/4" x 3, 1 measuring 1" x 3" and 1 measuring 3/4" x 3".  Adhere these to cardstock mats cut at 2 1/2" x 3 1/4", 1 1/4" x 3 1/4" and 1" x 3 1/4".  

Adhere these pieces to the card front and add your embellishments and sentiment to finish.

Card 5


Cut the 3" x 4" piece into 3 strips that measure 1" x 4".  Then cut up 1 1/2" from the bottom edge of these 3 pieces.  You will have 3 pieces that are 1" x 2 1/2" and 3 pieces that are 1" x 1 1/2".  Adhere the 1" x 2 1/2" pieces to the top of the 1 1/8" x 5 7/16 cardstock mats and the 1" x 1 1/2" pieces to the bottom of the cardstock mats. Adhere these to the card front.  

Cut a cardstock strip that measures 1 1/2" x 3 15/16" and emboss.  Adhere to the card front covering the gap between the pieces of patterned paper.

Add your embellishments and sentiment to finish.
 
Card 6


Cut the 3" x 4" piece into 2 strips that measure 1 1/2" x 4".  Then cut up 1 1/2" from the bottom edge of these 2 pieces.  You will have 2 pieces that are 1 1/2" x 2 1/2" and 2 pieces that are 1 1/2"" x 1 1/2".  Adhere the 1 1/2" x 2 1/2" pieces to the top of the 1 5/8" x 5 1/8" cardstock mats and the 1 1/2" x 1 1/2" pieces to the bottom of the cardstock mats. Adhere these to the card front.  

Cut a cardstock strip that measures 1 1/2" x 3 7/8" and emboss.  Adhere to the card front covering the gap between the pieces of patterned paper.

Add your embellishments and sentiment to finish.
 
Card 7


Cut a 7/8" x 4" strip from the left hand side of the 3" x 4" (cut on the 3" edge) piece of patterned paper.  You will have 2 pieces, 1 that measures 7/8" x 4" and 1 that measures 3 1/8" x 4".  Adhere these to the cardstock mat cut at 4 1/8" x 4 1/4" (or 10.5cm x 10.3cm).  Adhere to the card front.

Cut a strip that measures 1 1/2" x 5" and emboss.  Adhere this to the card front covering the gap between the 2 pieces of patterned paper.

Add your embellishments and sentiment to finish.

Card 8


Cut the 3" x 4" piece into 1 1/2" x 2" rectangles, you will have 4 pieces.  Adhere these to cardstock mats cut at 1 5/8" x 2 1/8" and adhere to the card front

Add your embellishments and sentiment to finish.

Card 9


Cut the 3" x 4" piece of patterned paper on the 4" edge at 1 1/2" and 2 1/2", you will have 3 pieces, 2 that measure 1 1/2" x 3 and 1 that measures 1" x 3".  Adhere these to the cardstock mats cut at 1 3/4" x 3 1/4" (2 mats) and 1 1/4" x 3 1/4".

Adhere to the card front and add your embellishments and sentiment to finish.

Card 10


Cut the 3" x 4" piece into 1" x 4" strips, you will have 3 pieces.  Adhere these to the cardstock mats cut at 1 1/8" x 4 1/8" and then adhere to the card front staggering them to create the step up look.

Add your embellishments and sentiment to finish.

Card 11


Cut the 3" x 4" piece into 1" x 3" pieces, you will have 4 pieces.  Adhere these to the cardstock mats cut at 1 1/8" x 3 1/8".  Adhere these to the card front.

Add your embellishments and sentiment to finish.

Card 12


Cut the 3" x 4" piece into 2 strips, 1 measuring 1" x 4" and 1 measuring 2" x 4".  Cut up 1 1/2" from the bottom of these two strips so you have 1 piece at 2" x 2 1/2", 1 at 1" x 2 1/2", 1 at 2" x 1 1/2" and 1 at 1" x 1 1/2".  Adhere the 2" wide pieces to the cardstock mat cut at 5 1/8" x 2 1/8" leaving a gap in the middle and adhere the 1" wide pieces to the cardstock mat cut at 5 1/8" x 1 1/8" leaving a gap in the middle.

Cut a strip of cardstock that measures 1 1/2" x 3 7/8", emboss and adhere to the card front covering the gap between the patterned paper.  Add your embellishments and sentiment to finish.

I hope you enjoyed this week's Stash Buster projects.

If you live in Australia

    you can get all the supplies you need 
for this project from me.

You can place an order online or Contact Me and place an order. 


Thank you for visting.
Carolyn

Saturday, 23 November 2024

Stash Busting Saturday - Mediterranean Blooms 12" x 12" Designer Series Paper

Hi everyone, I am back this week with a Saturday Stash Buster after taking a break last week.  I am using the Mediterranean Blooms 12" x12" Designer Series Paper for this week's projects.  

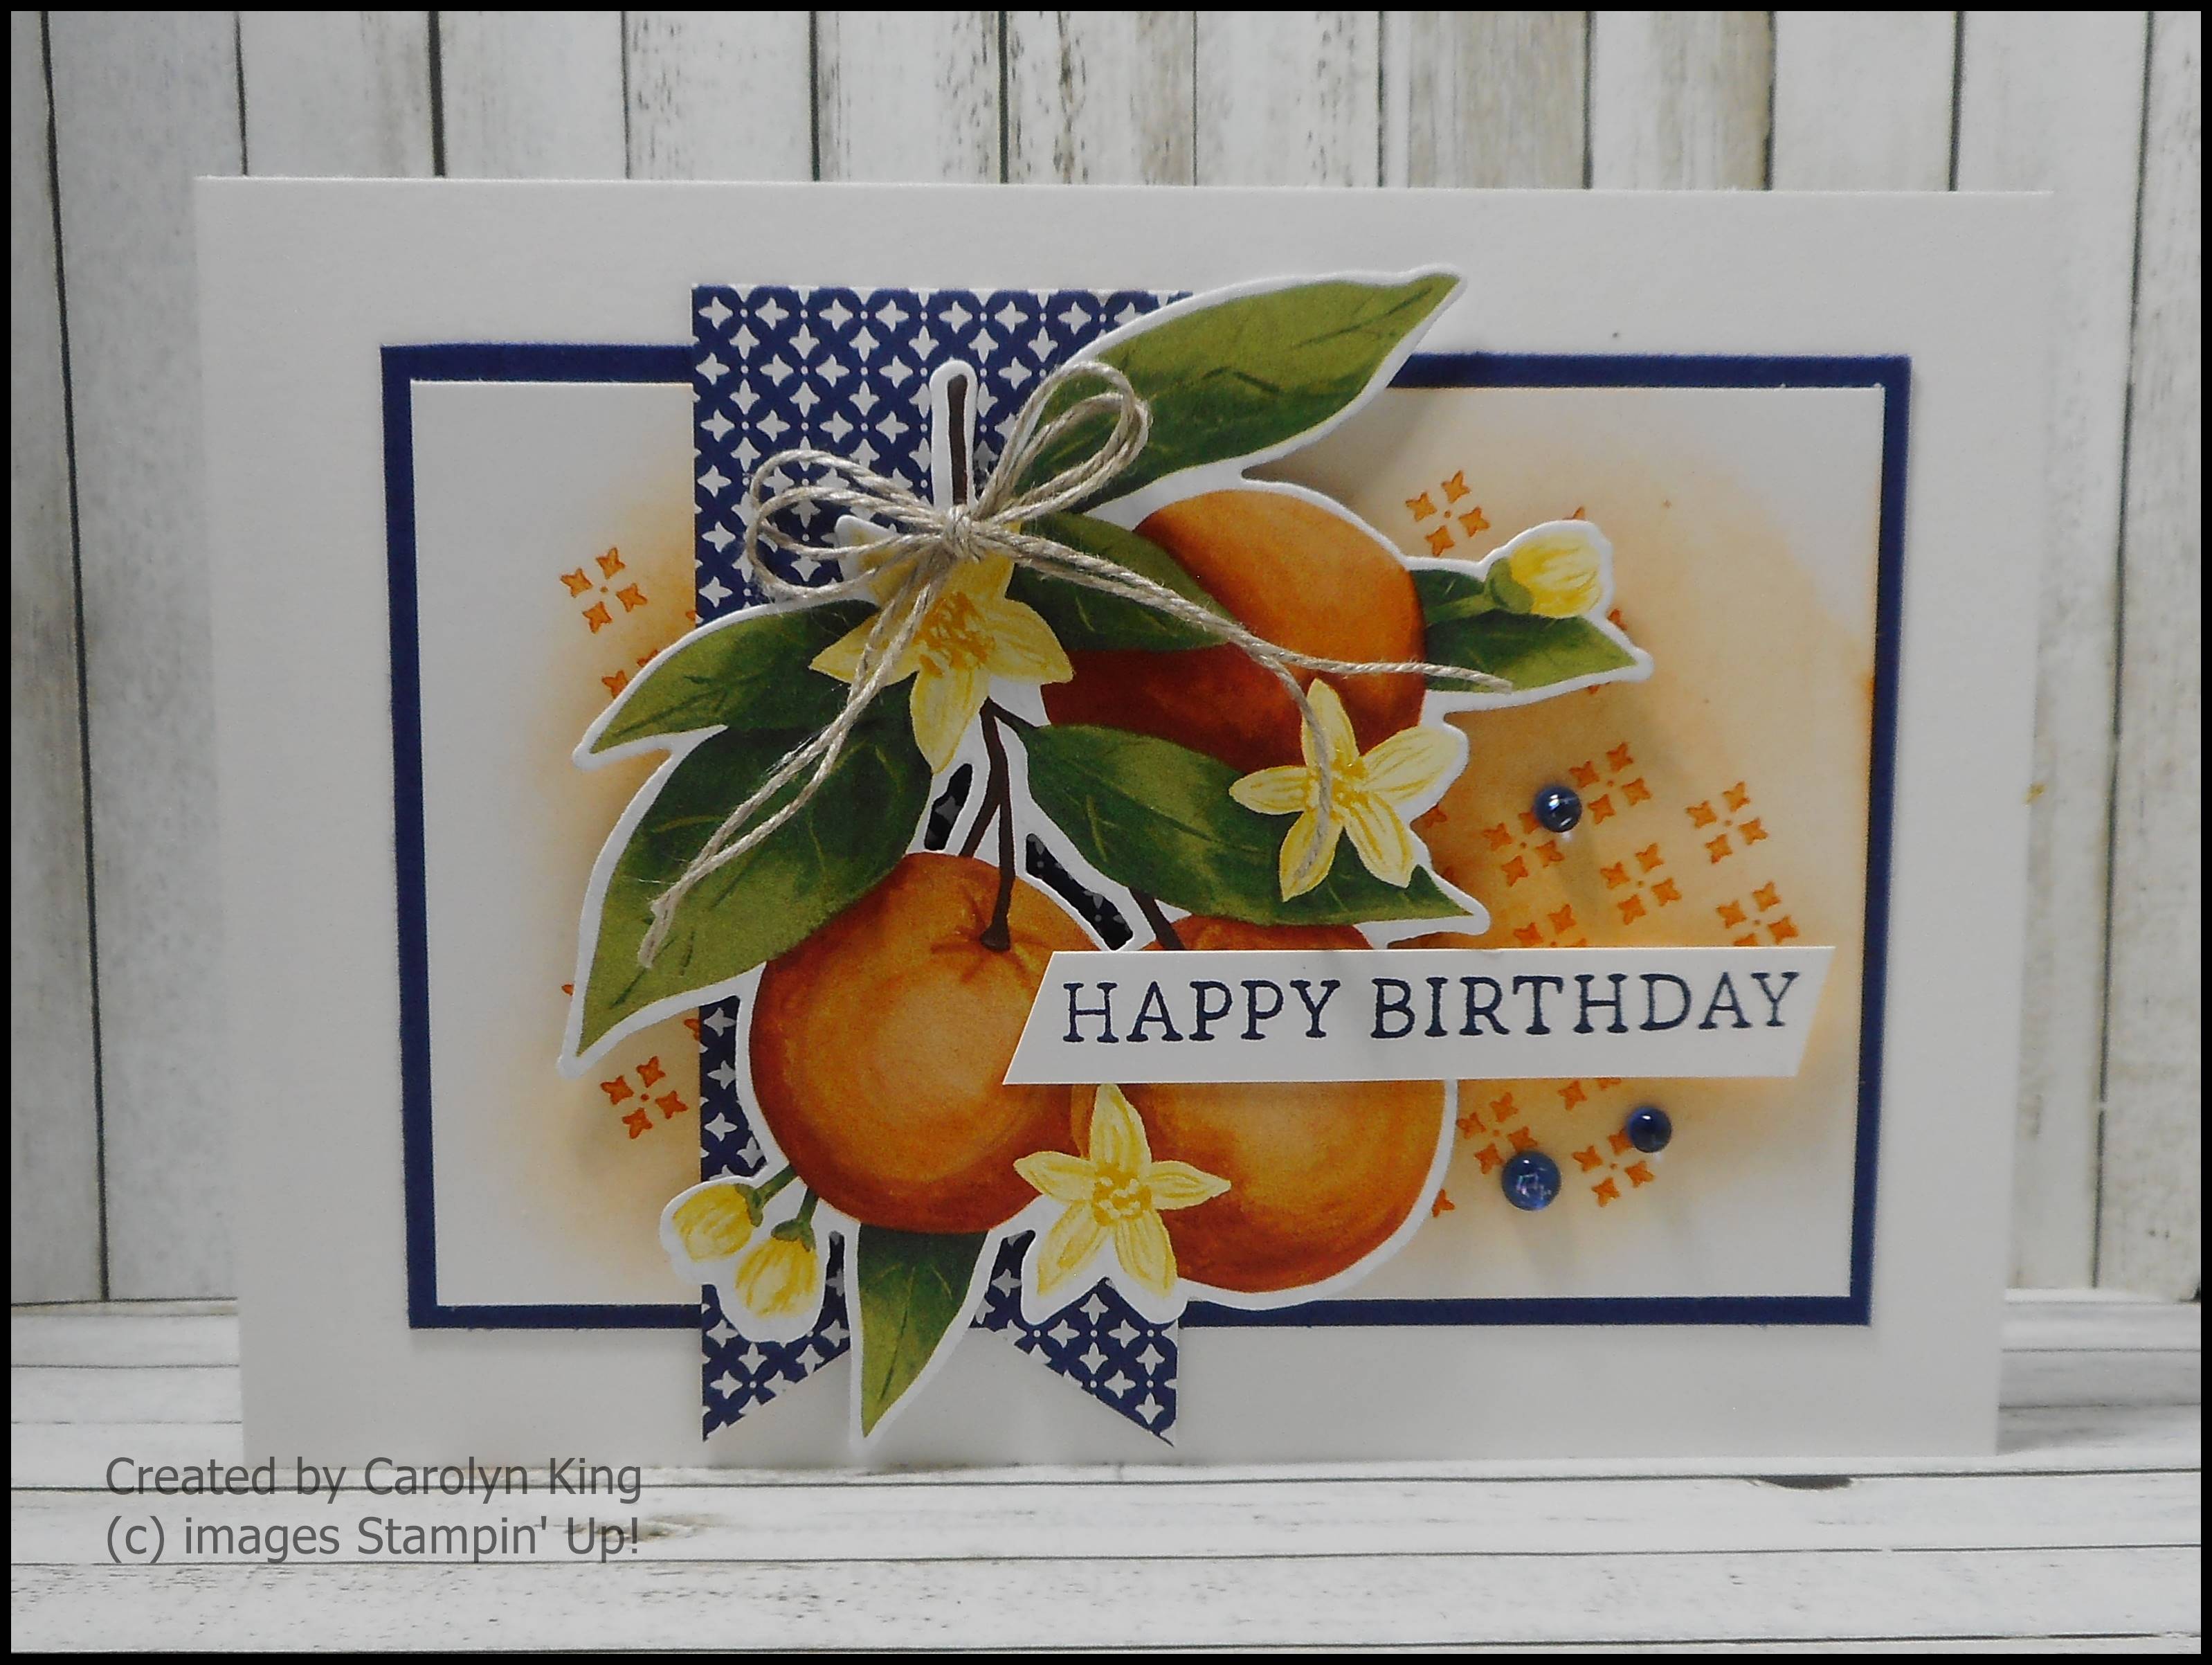
I had strips of the Night of Navy/White patterned Designer Series Paper and the Oranges and Lemon sprays left in the pack along with a lot of sheets of the Blossom and Leaf patterned Designer Series Paper.


I used the Simply Said stamp set for the sentiment as I wanted to make some Birthday Cards for the cards I sell at work for our Cancer Council Relay for Life Team fundraising.  The other stamps used were from the Citrus Blooms stamp set.


The sketch is one from the Annual Catalogue, I just turned it on it's side to change the orientation of the sketch. 

For the first set of cards I cut a piece of Basic White cardstock at 7.5cm x 11.8cm and added Pumpkin Pie ink using a Blending Brush.  I then stamped the background with an image from the Citrus Bloom stamp set using Pumpkin Pie ink, stamped off once.  The Night of Navy mat was cut at 8cm x 12.3cm.  The banner was cut at 4cm wide and 9.5cm long, I flagged the end to create the banner.

The oranges spray and sentiment were added to finish the card along with some embellishments.


This card uses the Blossoms and Leaf piece of Designer Series Paper.  

The cutting layout is the same, with the only change being the Banner piece was cut at 5cm wide and 9.5cm long.

I hope you enjoyed this week's 'Stash Buster' projects.

If you live in Australia

    you can get all the supplies you need 
for this project from me.

You can place an order online or Contact Me and place an order. 


Thank you for visting
Carolyn

Sunday, 25 August 2024

August Class Project 1 - Winged Gatefold Card

Hi everyone, sharing one of the cards from my August Class.  It is a Winged Gatefold card using the Mediterranean Blooms Designer Series Paper.  I am not sure who created this fun fold, however I found it on a Youtube video by Sharon Armstrong TX Stampin.


For all the directions and measurements if you watch Sharon's video these will all be given as she makes her card. There are 4 fun folds in her video, it is the last one. 


I love the finished look of the card, using one of my favourite packs of Designer Series Paper, Mediterranean Blooms.

The stamp sets used are Simply Said, Citrus Blooms and Layering Leaves.


I hope you enjoyed this project.  I know that the ladies loved creating it.

If you live in Australia

    you can get all the supplies you need 
for this project from me.

You can place an order online or Contact Me and place an order. 


Thank you for visiting.
Carolyn

Saturday, 13 July 2024

Stash Busting Saturday - Mediterranean Blooms 12" x 12" Designer Series Paper

Hi everyone, it is time for another 'Stash Busting' show and tell.

This week I have made 12 cards, 4 each of 3 designs, using one sheet of the Mediterranean Blooms 12" x 12" Designer Series Paper.

I needed some Thank You cards for the cards I sell at work for the fundraising efforts of our Cancer Council Relay for Life Team.  The stamp is 'Simply Said'.  This is a great stamp set to have in your collection as it has sentiments that cover most occasion.

I use the same sentiment and embellishments for all the cards to make it quick and simple for myself.


I cut the Designer Series Paper into 3 horizontal strip.  The first strip was cut at 11.8cm x 30.5cm (this is used on Card 3), the second strip was cut at 10.5cm x 30.5cm (this is used on Card 1) and the third strip was cut at 8.2cm x 30.5cm (this is used on Card 2).


The 10.5cm x 30.5cm piece of Designer Series Paper was cut into 4 pieces measuring 7.5cm x 10.5cm (I did have a small piece left which I put in the compost bin).  These pieces were further cut into 3 pieces at 7.5cm x 5.5cm, 7.5cm x 2.5cm and 7.5cm x 2.5cm.  The Basic White cardstock mats were cut at 8cm x 6cm and 8cm x 3cm (2 pieces).


The 8.2cm x 30.5cm strip of Designer Series Paper was cut into 2 pieces 14.85cm x 8.2cm (there was a small piece left which I put in the compost bin).  These 2 pieces were then cut in half horizontally, leaving you with 4 pieces 14.85cm x 4.1cm.  The Basic White cardstock mat was cut at 14.85cm x 5.1cm.  

The card front was embossed to add a little more interest to this card.

The 11.8cm x 30.5cm strip of Designer Series Paper was cut into 4 pieces 7.5cm x 11.8cm (there was a small piece left which I put in the compost bin).  The Basic White cardstock mats were cut at 8cm x 12.3cm.

All the card bases are Night of Navy and the ribbon is Sheer Silver & White Ribbon which I cut in half to get the smaller width for behind my sentiment. To finish the cards I added some Opal Rounds Assortment which match perfectly.  I love this colour combination of the Blue, Orange and Yellow.

I hope you enjoyed this week's 'Stash Buster".

If you live in Australia

    you can get all the supplies you need 
for this project from me.

You can place an order online or Contact Me and place an order. 


Thank you for visiting.
Carolyn

Sunday, 7 July 2024

JDRF Fundraiser - Project 3

Hi everyone, sharing Project 3 from my recent JDRF Fundraiser.


I have used the Split Coastampers sketch #SC289 for the design of this card.

The stamp set and dies are from the Citrus Blooms Bundle and the Designer Series Paper is the Mediterranean Blooms 12" x 12" Designer Series Paper.  These products are all part of the Mediterranean Blooms Suite Collection.

I hope you enjoyed this project.

If you live in Australia

    you can get all the supplies you need 
for this project from me.

You can place an order online or Contact Me and place an order. 


Thank you for visiting.
Carolyn

Saturday, 22 June 2024

Stash Busting Saturday - Mediterranean Blooms 12" x 12" Designer Series Paper

Hi everyone, it is time for another 'Stash Busting' show and tell.

For this week's 'Stash Buster' I have used the Mediterranean Blooms 12" x 12" Designer Series Paper along with the Citrus Blooms stamp set.


I had 5 of these Lemon images from the Designer Series Paper left over from a class card project I have designed for my June Card Class.  This involved a bit of fussy cutting but the I think the end result is worth it.

The card sketch I used is from i {heart} sketches #140.  I just added some extra matting layers.


I hope you enjoyed this week's 'Stash Buster'.

If you live in Australia

    you can get all the supplies you need 
for this project from me.

You can place an order online or Contact Me and place an order. 


Thank you for visiting.
Carolyn