Showing posts with label Lovely & Lasting. Show all posts

Tuesday, 21 March 2023

Perfectly Penciled One Sheet Wonder

Hi everyone, as promised I am sharing the One Sheet Wonder I created using the Perfectly Penciled Designer Series Paper and some more of the flowers that I coloured using Light and Dark Daffodil Delight and Old Olive Stampin' Blends.

This One Sheet Wonder was created using a non directional pattern on the Designer Series Paper.


I did add a few extra pieces of cardstock on some of the cards to finish the card design.

Card 1


For this card you need 4 pieces of Designer Series Paper cut at 7.6cm x 2.5cm.  The Basic Black Cardstock mats are cut at 7.9cm x 2.8cm.

Card 2


For this card you need 1 piece of Designer Series Paper cut at 7.6cm x 5.3cm and 2 pieces cut at 7.6cm x 2.5cm.  The Basic Black Cardstock mats are cut at 7.9cm x 5.6cm and 7.9cm x 2.8cm.

Card 3


For this card you need 2 pieces of Designer Series Paper cut a 3.8cm x 10.2cm.  The Basic Black Cardstock mats are cut at 4.1cm x 10.5cm.  A piece of Basic Black Cardstock was also added across he card, cut at 10.5cm x 3.8cm.

Card 4


For this card you need one piece of Designer Series Paper cut at 7.6cm x 5.1cm.  The Basic Black Cardstock mat is 8.1cm x 5.6cm, the Basic White Cardstock mat is 9.6cm x 7.4cm and the Basic Black Cardstock mat is 10.1cm x 7.6cm.  

Card 5


For this card you need 4 pieces of Designer Series Paper cut at 3.5cm x 5.6cm with the Basic Black Cardstock mats cut at 3.8cm x 5.9cm.

Card 6


For this card you need one piece of Designer Series Paper cut at 7.6cm x 5.1cm.  The Basic Black mat is cut at 8.1cm x 5.6cm.

Card 7


For this card you 1 piece of Designer Series Paper cut at 7cm x 6.4cm and 1 piece cut at 7cm x 2.7cm.  The Basic Black Cardstock mat is cut at 11.8cm x 7.3cm. 

Card 8


For this card you need 2 pieces Designer Serie Paper cut at 3.8cm x 6.7cm and 2 pieces cut at 3.8cm x 3.5cm.  The 2 Basic Black Cardstock mats are cut at 13.3cm x 4.3cm.

Card 9


For this card you need 3 pieces of Designer Series Paper cut at 7.6cm x 3.4cm with the Basic Black Cardstock mats cut at 7.9cm x 3.8cm.

Card 10


For this card you need 1 piece of Designer Series Paper cut at 5.1cm x 12.3cm and 1 piece cut at 2.5cm x 12.3cm.  The Basic Black Cardstock mats are cut at 5.4cm x 12.6cm and 2.8cm x 12.6cm.

Card 11


For this card you need 1 piece of Designer Series Paper cut at 4cm x 11.8cm and a piece of embossed Daffodil Delight Cardstock 3.5cm x 11.8cm.  The Basic Black Cardstock mat is cut at 8cm x 12.3cm.

Card 12

For this card you need 2 pieces of Designer Series Paper cut a 7.6cm x 4cm and 1 piece of embossed Daffodil Delight Cardstock cut at 7.6cm x 3.5cm.  The Basic Black Cardstock mat is cut at 8cm x 12.3cm.

Card 13


For this card you need 2 pieces of Designer Series Paper cut at 4.3cm x 3cm and 2 pieces cut at 4.3cm x 2.9cm.  The 2 Basic Black Cardstock mats are cut at 4.8cm x 8cm.

Card 14


For this card you need 3 pieces of Designer Series Paper cut at 2.1cm x 8.5cm and 1 piece cut at 2cm x 8cm. The Basic Black Cardstock mats are cut at 2.5cm x 8.9cm.

I hope you enjoyed these 14 cards made using the One Sheet Wonder template.

If you live in Australia


you can get all the supplies you need
for this project from me.

You can place an order online or Contact Me and place an order. 


Thank you for visiting
Carolyn

Sunday, 19 March 2023

Perfectly Penciled Flowers

Hi everyone, I sharing some cards I made using the Perfectly Penciled Designer Series Paper.  I decided to colour and fussy cut the flowers from one of the sheets of patterned paper in the Perfectly Penciled Designer Series Paper pack.  At the end of this process I have all these coloured flower and leaf images, and let me tell you there are a lot of them, lol.

What to do with them now.  I started by making a set of 3 cards which uses up some small scrap pieces of patterned paper I had in the paper pack and also some small scraps of cardstock. I have used a colour scheme of Basic White, Basic Black, Old Olive and Daffodil Delight.  There is just something about this colour scheme that catches my eye.  The flowers were coloured using Light and Dark Old Olive and Daffodil Delight Stampin' Blends.


I have also used the Black & White Gingham Ribbon and the Glossy Dots Assortment.


Did you notice the embossed backgrounds?  I have used one of the embossing folders from the new Basics 3D Embossing Folders.  I just love the texture of this embossing folder.

The sentiment is from the Lovely & Lasting stamp set.

I hope you enjoyed these projects.

I am working on a One Sheet Wonder using the Perfectly Penciled Desinger Series Paper and some more of the coloured flowers.  I will post this on Tuesday so stay tuned.

If you live in Australia

you can get all the supplies you need
for this project from me.

You can place an order online or Contact Me and place an order. 


Thank you for visiting.
Carolyn

Sunday, 19 February 2023

Abstract Beauty Designer Series Paper

Hi everyone, I have been using up my stash of Designer Series Paper making cards for the Nursing Home that took such good care of my Mum and also for the cards I sell at work with the proceeds going to the Council Council of WA.

I have used up my stash of Abstract Beauty Designer Series Paper.  This is currently available on the clearance rack for $10.40 AUD.  I had two partially used packs and ended up making 125 cards over a two week period.


This is just some of the cards I made, I made multiples of the same design.  The paper scraps were kept to a minimum, I managed to use up most the off cuts and small strips, there were a few small pieces left but these were too small to use.  I used some of the small strips to decorate the inside of the cards.


This card design I cased from Call Me Crafty Al's January 2023 Sheetload of Cards.  Alisha's card design is for a Mini Slimline, I just adjusted the measurements for a normal sized card.


This card design is one that I have used a lot as it uses the 2.5cm x 10.2cm strips which a quite often left from projects.  The sketch is 'As You See It Challenge' sketch #254.


This card sketch is from Try Stampin' On Tuesday, it is sketch number #305.  This card is one of my favourites.


This sketch from My Favouorite Things is great for using small pieces of Designer Series Paper as the centre strip covers any gaps that are created by adhering the 2.5cm x 5.1cm pieces to the cardstock mats which are cut at 8cm x 5.1cm.  The centre strip mat is cut at 13.5cm x 3.3cm and the small pieces of Designer Series Paper cut at 5.1cm x 2.9cm.  I made 3 of these cards using all the small off cuts and strips.


This card design is based on Call Me Crafty Al's February 2022 Sheetload of cards template.  I individually matted the strips instead of adhering the strips onto a larger piece of cardstock.


I have used the Mojo Monday Sketch #444 for this card. I love using card sketches as it makes card making a lot easier.


This another card design using the Call Me Crafty Al's February 2022 Sheetload of cards template.  This sketch is great for using strips of Designer Series Paper.  It is also a great sketch to use for the larger sentiments on your cards


This is a real scrappy card, using all the small left over strips.  I do not know where this idea originated as I have seen a lot of these cards on Pinterest.


This card uses Mojo Monday Sketch #323.  The Designer Series Paper was cut at 7cm x 12.7cm, the mat was cut at 7.4cm x 13.1cm, the sentiment is a 4cm x 3cm rectangle die cut using the Rectangle Stitched Framelits Dies and the circle is 5cm cut using the Stylish Shapes Dies.  I used the 3.2cm x 15.2cm strip on the next card.


For this card cut the 3.2cm x 15.2cm strips (I used 6 strips which made 4 cards)  into 3.2cm x 7.6cm pieces and adhere these onto mats cut at 3.6cm x 8cm.  Cut the Designer Series Paper strip for the centre at 7cm x 2.5cm and 5.5cm x 2.5cm (I used 8 pieces of 2.5cm x 10.2cm), and the mat at 3cm x 13cm.   There were some small strips left which I used to decorate the inside of the cards.


This card sketch is from Jess Crafts. Jess has some great sketches and cutting guides to get the most out of your Desinger Series Paper. I changed the measurements so you could get two cards from one piece of 10.2cn x 15.2cm (6" x 4") piece of Designer Series Paper.  I cut the piece in half on the 15.2cm edge so you end up with two pieces 7.6cm x 10.2cm (3" x 4").  Cut this piece into 3 pieces one at 7.6cm x 6cm and 2 pieces 7.6cm x 2.1cm.


These cards were made using another sketch from Jess Crafts.  It is Jess Crafts 6" x 6" Paper Buster #4.


I made 16 cards using this sketch, 8 of each colour way.  The tag was created using the Celebrate With Tags stamp set and the Celebrations Tag Dies.


The card is based on the January 2023 Mini Slimline template from Call Me Crafty Al.  I have adjusted the sizing to create normal sized cards.


I made 6 of these cards, 3 in each colour way using the left over pieces from the previous project.


I made 6 of these cards using the Mojo Monday Sketch #323.  Instead of a sold piece of Designer Series Paper I used the smaller left over pieces from the previous projects. 


This card sketch is from Try Stampin' On Tuesday, it is sketch number #305.  I just moved where the sentiment was situated on the card design.


This is totally a scrap design using the left over strips.  I made 8 of these cards.

I have no idea if this is a card sketch I created or adapted from another sketch, however if is I have not been able to find where it came from.  It is great for using 10.2cm x 15.2cm (4" x 6") Desinger Series Paper Packs.

Cut the Designer series paper at 9.3cm x 5.1cm and the cardsock mat at 9.6cm x 5.4cm, the next layer you can use Desinger Series Paper or cardstock cut at 11.3cm x 7.1cm and the cardstock mat at 11.6cm x 7.4cm

Hope you enjoyed these projects using the Abstract Beauty Designer Series Paper.

If you live in Australia

you can get all the supplies you need
for this project from me.

You can place an order online or Contact Me and place an order. 


Thank you for visiting.
Carolyn

Sunday, 22 January 2023

Watercolor Shapes Background

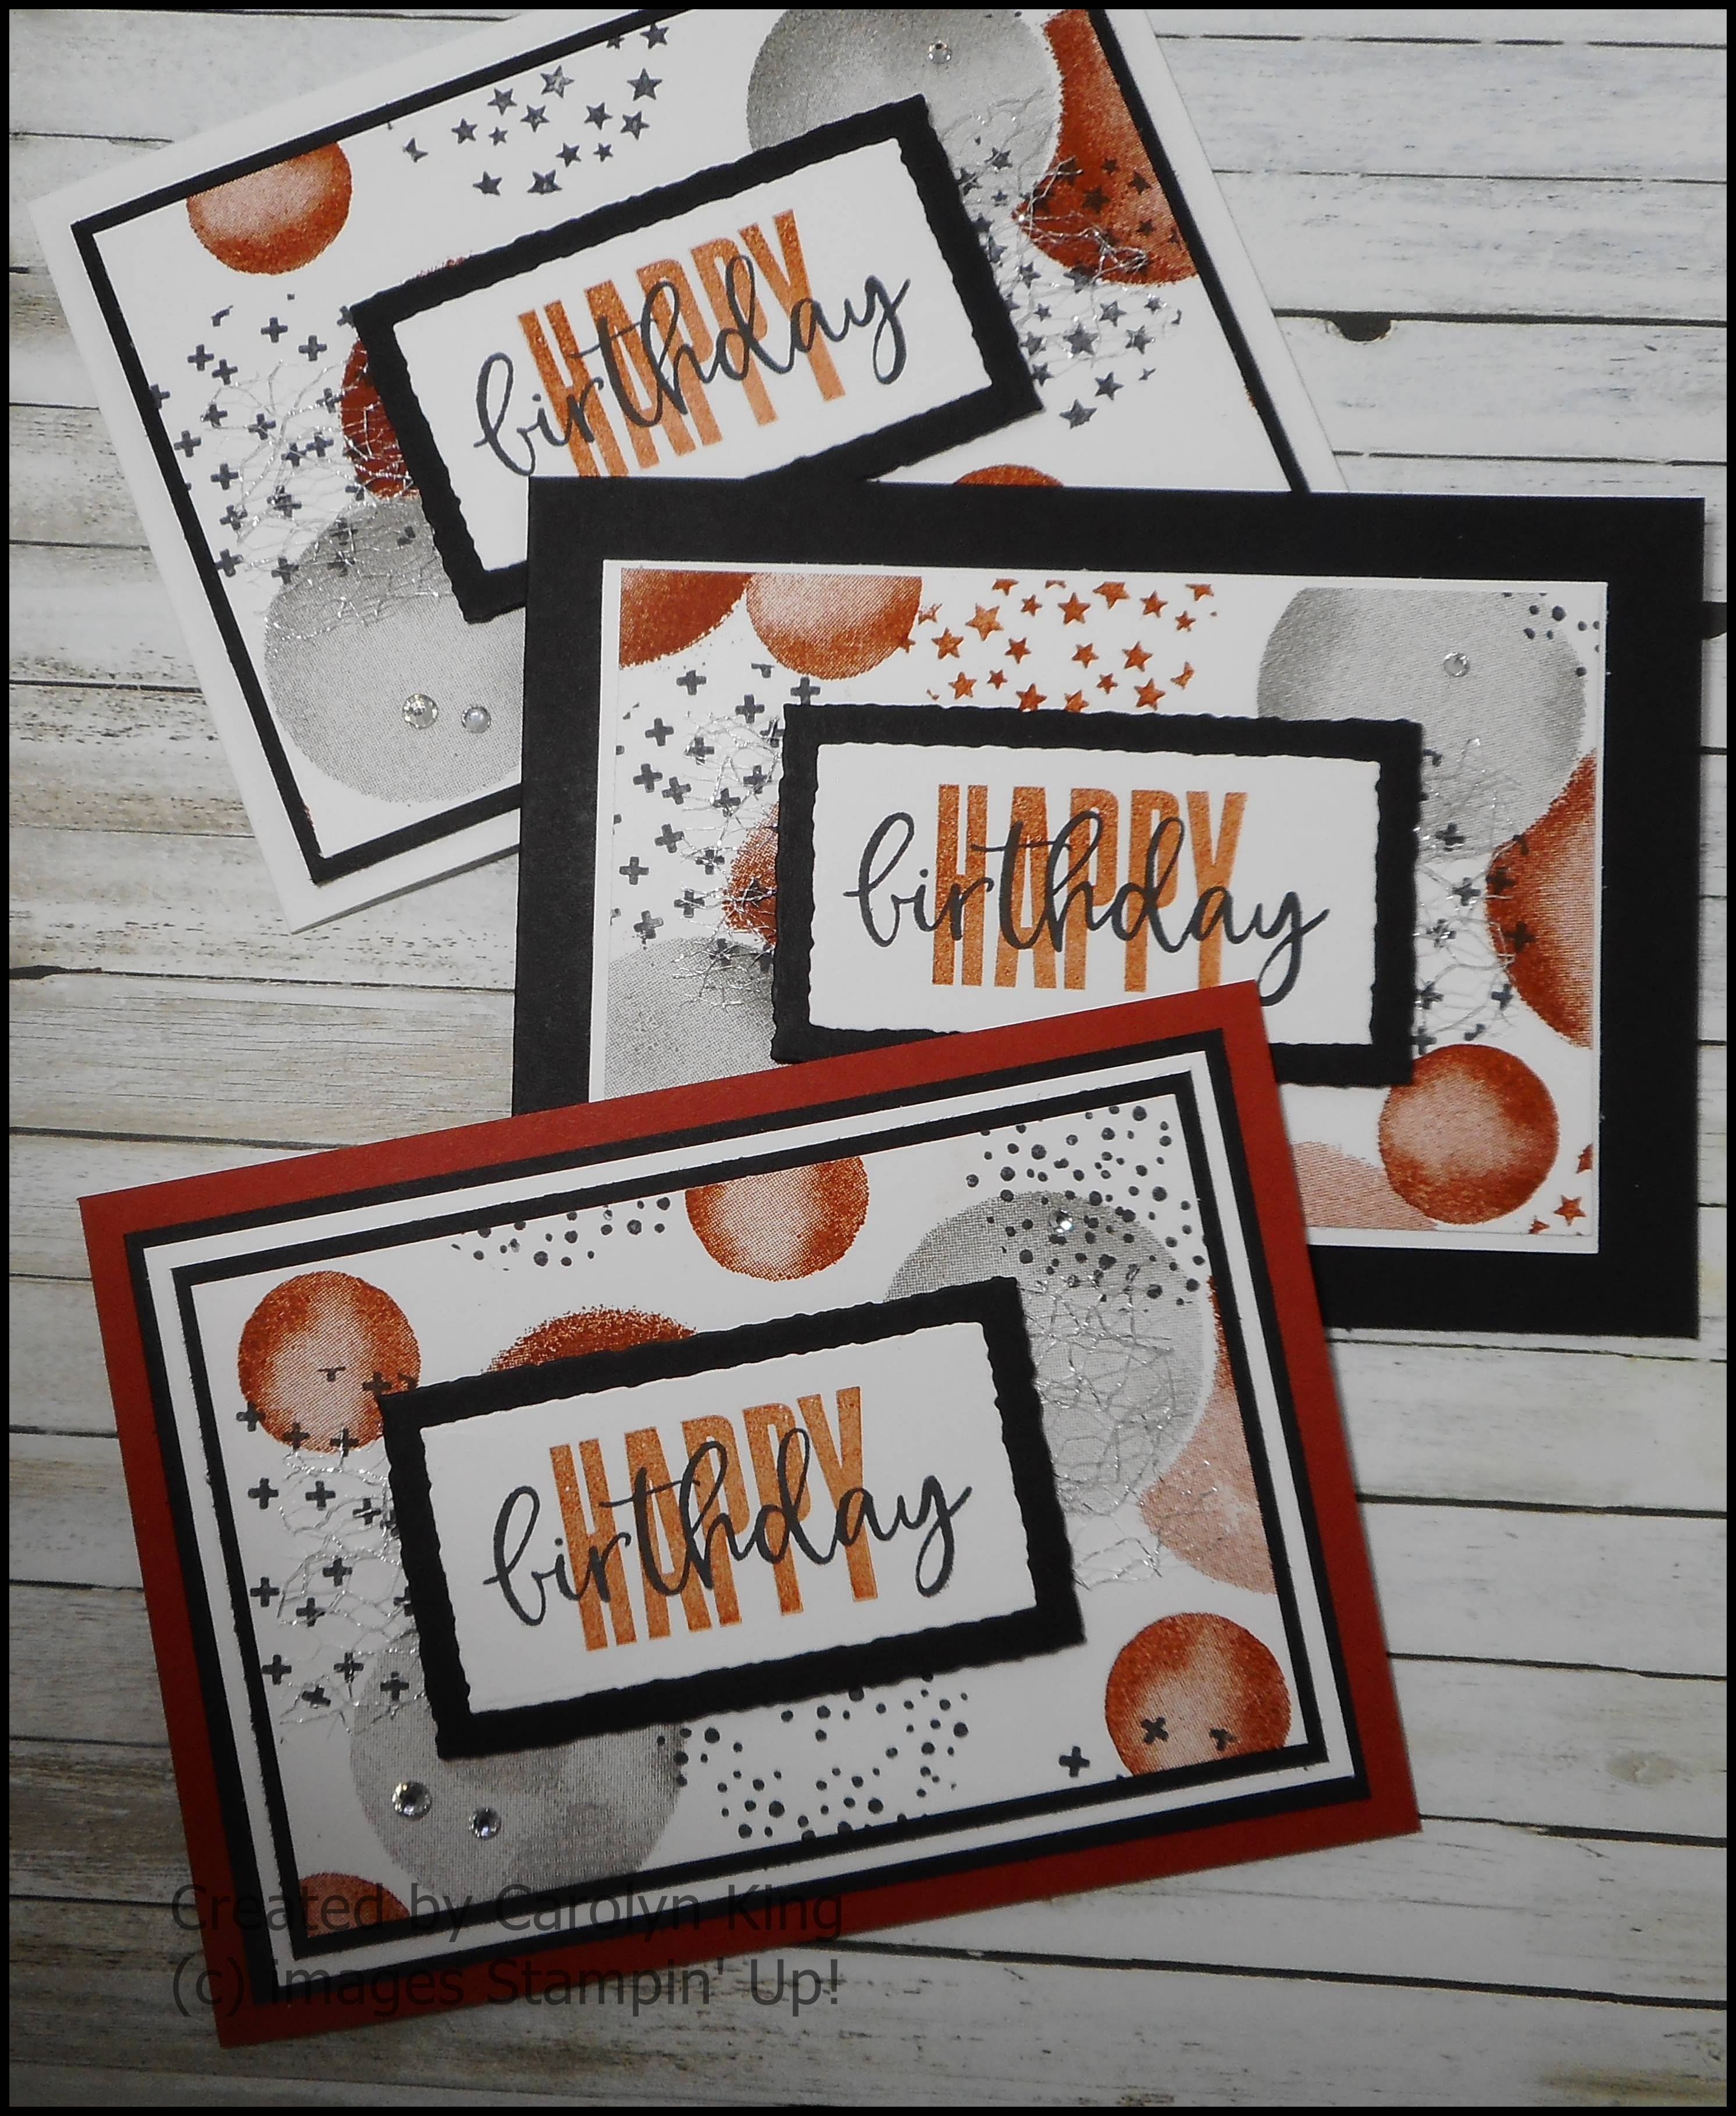
Hi everyone, sharing some cards I made using the Watercolor Shapes stamp set.  I got the inspiration for this background from a shirt that I recently purchased.  The shirt had a lot of freehand doodling on it which was a complete disaster when I tried to replicate it, so I ended up using some images from the Biggest Wish and the Lovely & Lasting stamp sets.


The large circle image in the Watercolor Shapes stamp set was a lot larger than I wanted, so I die cut some Post-it Notes with a circle and stamped the image on top of these.  This had the result of reducing the size of the stamped circle.  I also masked some of the large solid color circles.  

For the non solid circles I stamped the images using the Post-it Note circles, this created circle shape that I was trying to create.


I could not decide on the base color card so played around a little.  The Cajun Craze card base is my favourite.


The sentiment panel was made using the Biggest Wish stamp set and the Deckled Rectangles.

I added a piece of Metallic Mesh Ribbon behind the sentimen rectangle and added some Rhinestones to finish the cards.


I hope you enjoyed these projects.

If you live in Australia

you can get all the supplies you need
for this project from me.

You can place an order online or Contact Me and place an order. 


Thank you for visiting.
Carolyn

Friday, 1 July 2022

JDRF Fundraiser - Project 4

Hi everyone, sharing Project 4 from the Juvenile Diabetes Research Foundation Fundraiser that I held last weekend.


This card uses products from the Lovely In Linen Suite.

The Lovely In Linen Designer Series Paper is cut at:

4.8cm x 10.5cm
4.8cm x 10.5cm
3cm x 10.5cm

Stamp the leaf and flower image on a piece of Basic White Cardstock cut at 8cm x 10cm using Evening Evergreen ink.  Stamp the same image again on a piece of scrap Basic White Cardstock using Sweet Sorbet ink.  Fussy cut the flowers and adhere on top of the Evening Evergreen stamped image using Dimensionals.  Stamp the small dot image using Pale Papaya ink.  Adhere this to the card front using Dimensionals.

Stamp the 'Happy Birthday" using Black Memento Ink onto a piece of Pale Papaya Cardstock cut at 4.5cm x 2cm.  Adhere this to the card front using Dimensionals.

Add some Rhinestones to the flower centres.

If you live in Australia

you can get all the supplies you need
for this project from me.

You can place an order online or Contact Me and place an order. 


Thank you for visiting.
Carolyn