Tuesday, 31 August 2021

Art Gallery Best Wishes

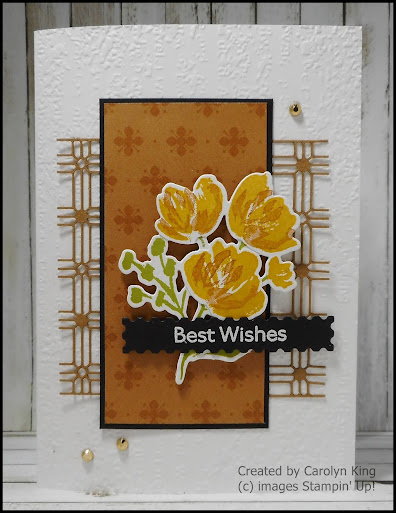
Hi everyone, sharing another card I made using Cinnamon Cider Designer Series Paper from the 2020-2022 Designer Series Paper Assortment.  This time I have teamed it with the Art Gallery stamp set and the coordinating Floral Gallery Dies.


I stamped the stem image using Old Olive ink and the flowers with Bumblebee ink and the infill with Cinnamon Cider ink stamped off once.

The Paper Lattice pieces behind the centre panel were two left over end pieces form when I cut down one of the large pieces for another project.  I had these two small end pieces left and they fit perfectly behind the centre panel.  

The card front was embossed using the Timeworn Type 3D Embossing Folder.

Some Gilded Gems were added to finish the card.

I cut the Designer Series Paper into 10.1cm x 5cm pieces (or 4" x 2") you get four cards from the one piece of Designer Series Paper.  Keep the small square left as this can be used on another card, I am working on a card to use these small pieces.
If you live in Australia

you can get all the supplies you need
for this project from me.

You can place an order online or Contact Me and place an order. 


Thank you for visiting.

Carolyn

Monday, 30 August 2021

Whiskey Business

Hi everyone, sharing a set of cards I made using the Whiskey Business stamp set and Cinnamon Cider Designer Series Paper from the 2020-2022 In Color Paper Assortment.


For these two cards I cut the Designer Series Paper at 15.2cm x 10.5cm, measured in 6cm from the top left corner and 6cm in from the bottom right corner and cut it on the diagonal.  You get two pieces exactly the same, the strip left over I used to decorate the inside of the cards.


The Whiskey decanter and the glasses were coloured using Light Cinnamon Cider, Dark and Light Mango Melody Stampin' Blends.


The designer series paper was cut at 10.5cm x 5cm.  You get 3 cards from the one piece of 15.2cm x 15.2cm piece of designer series paper.  The strip left is used to decorate the inside of the card.


The cutting layout for this card is the same as the first two cards, it is just the orientation of the card that has changed giving the card a slightly different look.

Hope you enjoyed this set of cards.

If you live in Australia

you can get all the supplies you need
for this project from me.

You can place an order online or Contact Me and place an order. 


Thank you for visiting.

Carolyn

Sunday, 29 August 2021

Have a Holly Jolly Christmas

Hi everyone, sharing one of the projects from today's class using products from the Painted Christmas Suite.


To make this card you will need:

Measurements

Cherry Cobbler Cardstock Card Base
Basic White Cardstock 10cm x 14.3cm (for card inside)
Evening Evergreen Cardstock 9.5cm x 13.8cm
Basic White Cardstock 9cm x 13.3cm
Evening Evergreen 8cm x 12.3cm
Designer Series Paper 7.5cm x 11.8cm
Cherry Cobbler and Basic White Cardstock for sentiment panels

Technique

1.    Fold card base in half.

2.    Adhere the layers of the cardstock and Designer Series Paper together and adhere to the card front.

3.    Adhere the ribbon in place.

4.    Stamp the sentiment using Black Memento ink on Basic White Cardstock and die cut.

5.    Die cut the sentiment mat from Cherry Cobbler cardstock, emboss using the Tasteful Textile 3D Embossing Folder.

6.    Adhere the sentiment panel to the sentiment panel mat using dimensionals.  Adhere to the card front on top of the ribbon using dimensionals.

7.    Add the Gold Holly Leaves to the sentiment panel using glue dots.  Add 3 Cherry Cobbler Matte Decorative Dots.

8.    For the card inside stamp the stem image using Evening Evergreen ink and then stamp the berries  using Cherry Cobbler ink on the bottom right corner of the Basic White piece for the card inside.  Adhere to the card inside. 

If you live in Australia

you can get all the supplies you need
for this project from me.

You can place an order online or Contact Me and place an order. 


Thank you for visiting.

Carolyn

Thursday, 12 August 2021

Birthday Peach

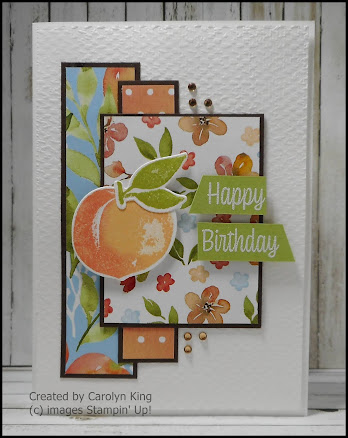
Hi everyone, sharing another card using products from You're a Peach.


Sometimes I find some of the pattern paper a bit overwhelming and have difficulty using a large piece of it on a project.  To overcome this I have found if I use a small piece of it and other coordinating patterns in the pack that I get a result that is more pleasing to my eye. 

I find card sketches are a great resource to help design your cards, this card sketch is Mojo#552 design by Julie Tilman.

Another bonus of using your patterned paper like this is that you get more cards out of your paper.

If you live in Australia

you can get all the supplies you need
for this project from me.

You can place an order online or Contact Me and place an order. 


Thank you for visiting.

Carolyn

Wednesday, 11 August 2021

With Deepest Sympathy

Hi everyone, sharing a Sympathy card I made using the Simply Elegant Specialty Designer Series Paper.  

I cut the 30.5cm x 30.5 cm (12" x 12") piece of patterned paper into two horizontal strips 11.3cm x 30.5cm.  I then cut these into 7.5cm x 11.3cm pieces, you will have 8 pieces.  The 6.1cm x 30.5cm strip left over was cut into 8 pieces, 10cm x 1.5cm which I used to decorate the inside of the card.


The card base is Basic Gray with the mats being cut at:
  • Basic Black mat 9.5cm x 13.3cm
  • Very Vanilla mat 9cm x 12.8cm
  • Basic Black mat 8cm x 11.8cm (the designer series paper is adhered to this piece)
This is a very simply card to make.  I have used the Peaceful Moments stamp set again with  the sentiment panel being die cut using the Pierced Blooms dies. I added some Smoky Slate and Vellum die cut leaves also made using the Pierced Blooms dies.

A few pearls were added to the sentiment panel to finish.

If you live in Australia

you can get all the supplies you need
for this project from me.

You can place an order online or Contact Me and place an order. 


Thank you for visiting.

Carolyn

Tuesday, 10 August 2021

Sweet As A Peach Birthday

Hi everyone, sharing a card made using products from You're A Peach bundle.  I have been keeping to my New Year's promise to myself to use my stash of Patterned Paper and stop hoarding it.

The You're a Peach Designer Series Paper is just gorgeous and of course it matches perfectly with the Sweet as a Peach stamp set and the matching Peach Dies.


I have used a Crumb Cake card base and also white heat embossed the sentiment on a piece of Crumb Cake.  I like this contrast with the colours in the You're a Peach Designer Series Paper.

Hope you enjoyed this project.

If you live in Australia

you can get all the supplies you need
for this project from me.

You can place an order online or Contact Me and place an order. 


Thank you for visiting.

Carolyn

Monday, 9 August 2021

Hand-Penned Memories & More Card Pack - Card 6

Hi everyone, I have been having another little play making cards using the Hand-Penned Memories & More Card Pack, this is a continuation of the cards I posted in early July.

The Memories & More Card Packs are perfect for memory keeping but they are also perfect for card making.


This card is made from one of the 6" x 4" cards which I cut in half, used one half on my card and fussy cut the flower from the other piece.

The sentiment is from the Art Gallery stamp set and die cut using the matching Floral Gallery Dies.

If you live in Australia

you can get all the supplies you need
for this project from me.

You can place an order online or Contact Me and place an order. 


Thank you for visiting.

Carolyn

Sunday, 8 August 2021

Elegant Birthday

Hi everyone, sharing one of the cards from my July card class.  This project uses the Simply Elegant Specialty Designer Series Paper, I love this paper pack with all metallic finish in the designs on one side and the coordinating patterned paper on the other side.

The sentiment is from the Peaceful Moments stamp set, this is one of my favourite go to stamp sets for sentiments. 


The butterflies were die cut from Copper Foil Sheet, this picked up the copper in the flower design on the Designer Series Paper.  You could also change this to pick up the gold or silver in the design on the Designer Series Paper.

The sentiment circle was cut using the Layering Circle Dies and some Champagne Rhinestones were added to finish the sentiment circle.

If you live in Australia

you can get all the supplies you need
for this project from me.

You can place an order online or Contact Me and place an order. 


Thank you for visiting.

Carolyn