Thursday 31 March 2016

Cards for the boys!!

Do you have trouble making cards for the men and boys in your life?   I must admit I tend to go for the flowers, lace and bling first when I start to design a card.   At our Stamperoo's meeting tonight we had to make a masculine card for our swap.


I used the Going Wild Designer Series Paper as I seemed to have collected 4 of these paper pads along the way, I purchased one, got given one by Stampin' Up at the On Stage Local last November and I won two in raffles.  As I had to make 16 cards and the design used a lot of patterned paper I worked out that by making the same card but using different combinations of papers I could get my 16 cards that I needed. 


The neutral colours of Tip Top Taupe, Basic Black and Whisper White are a perfect match for the vintage car from the Guy Greetings stamp set.


Thank you for visiting.

Carolyn

Tuesday 29 March 2016

Don't Miss Out on Sale-A-Bration and earn free products

Sale-A-Bration ends on 31 March 2016, so don't miss out.


Would you like to earn Free products? During Sale-A-Bration you have the chance to earn Free products three ways:

Now is the perfect time to get those things on your Wish List as you’ll earn 1 FREE Sale-A-Bration item for every $90 you order – so the more you spend the more you’ll get free! There are amazing products to choose from – stamp sets, paper packs and Project Life Cards (these are perfect for keeping your special memories)! 


Sale-a-Bration is the perfect time to Host a Party so get your friends together and have a fun time stamping, shopping and chatting.  As Host you earn bonus Stampin' Rewards when you place a group or individual order of $250 or more.   If you place an order of $400 then you get even more Stampin' Rewards, $40 for the Stampin' Rewards 10% plus another $40 during Sale-A-Bration, that is $80 free product!


What a great time of the year to join Stampin' Up!. You get the Demonstrator Starter Kit where you get to choose $235.00 of product for just $169,00 plus you get to choose $60.00 in products for free. That's $295 of product for only $169.00.  You also get a business supply pack valued at $80.00, that is a total value of $375.00.

Contact me today to request a Catalogue, place an order, book a party or to ask any questions you might have about joining.

Thank you for visiting.

Carolyn.

Monday 28 March 2016

Come and Join in the Fun as a Demonstrator during Sale-A-Bration


What a great time of the year to join Stampin' Up!.  You get the Demonstrator Starter Kit where you get to choose $235.00 of product for just $169,00 plus you get to choose $60.00 in products for free. That's $295 of product for only $169.00.  You also get a business supply pack valued at $80.00, that is a total value of $375.00.


Interested in Joining?


Please make sure that you select me as your Demonstrator.

English Garden

Hi everyone, hope you had a Happy Easter.

I have been playing today making some quick and easy cards using the English Garden Designer Series Paper.   I have been toying with the idea of doing these cards as a beginners class for those that have never done card making before or as a Stamp-a-Stack get together to raise funds for a charity of choice.  


My first card is sketch and design I cased from Mary Fish.  I love the colours in this piece of Designer Series Paper.  I went with the Night of Navy as the card base but it would look just as pretty using any of the other colours that match the paper.


For my second card I Silver embossed the leaves from the Vintage Leaves stamp set and watercolour washed them with Mossy Meadow.  The leaves were layered together and a Silver Metallic Button with a Linen Thread bow added to finish.


The third card is using a colour scheme of Hello Honey and Soft Suede which matches the piece of Designer Series Paper.


My last card is a pretty pink creation.  I added some Blushing Bride dotted paper from the Subtles Designer Series Paper Stack to match the piece of pattern paper from the English Garden Paper Pack.

You can get all the supplies you need for this project
 by shopping with me.
  You can place an order online and join in 
the fun with the On-line Club or Contact Me and place an order.


Thank you for visiting.

Carolyn

Saturday 19 March 2016

Just Add "E"

Hi everyone, I am playing along with this week's challenge at Just Add Ink,  Just Add "E". 

As I have been buying all these cute little bunnies (I just cannot seem to stop) with the idea of packaging them up for Easter I am going with "Easter" for my "E".


The Designer Series Paper is from the "Farmers Market" paper pack.  I made the little bag using the Gift Bag Punch Board and a piece of pattern paper 12" x 8" and used the Large Bag size.   The window frame was made using the Deco Labels Framelits (I used the second largest framelit in the set) and a piece of Window Sheet which was adhere to the inside of the bag.

The finishing touches were made using stamp set "Circle of Spring", Gold Foil Sheet, Gold Fancy Foil Vellum, small Gold Metallic Doily, Gold Sequin Trim, Gold Metallic Bakers Twine, Linen Thread, mini Gold Metallic Peg and Pearls.  The punches used were the 1/8" Handheld Circle, Bird Builder, small flower from the Itty Bitty Accents Punch Pack along with the Tags and Labels Framelits.

Thank you for visiting.

Carolyn

Thursday 17 March 2016

Memory Keeping Story Cards...

Hi everyone, I have been making story cards for inclusion in my Project Life pages I have been doing on my Great Niece.  I am using the It's My Party Designer Series Paper in my pages, so I designed some story cards to match.


I have used Whisper White cardstock 4" x 3" on three of the story cards and the Project Life 4" x 3" Grid Cards on the other three story cards.  These Grid Cards are great value at only $6.25 (plus postage & handling) for a pack of 50 cards.

I used the stamp sets "Work of Art", "Happy Times", "Watercolor Wishes", "Remember This" and "Moments Like These" stamped with Melon Mambo and Basic Black Archival ink.

The embellishments used are the It's My Party Baker's Twine Combo Pack, It's My Party Enamel Dots and It's My Party Designer Washi Tape.   Various punches and thinlits were used to create some of the frames and edgings.

You can get all the supplies you need for this project
 by shopping with me.
  You can place an order online and join in 
the fun with the On-line Club or Contact Me and place an order.


Thank you for visiting.

Carolyn

Monday 14 March 2016

Host Rewards Club

Don't forget the great opportunity to earn Host Reward Gifts.

For any of my Online Customers here in Australia, who place an order 'over' $50 and 'under' $250 I have a special reward for you.  A new Host Code will be issued every month with the opportunity of receiving current product.

Host Code

The Host Reward Gifts will be evenly allocated at the end of the month based on the Host Rewards accumulated. The rewards will depend on how many people have ordered and how much was ordered using the Host Code. 

So what will you receive? 
  • The Rewards will vary from month to month depending upon the total rewards accrued for the month. It could be Patterned Paper, Ribbons, Embellishments or Stamp Sets. 
  • All rewards will be from the current Catalogues. 
  • Your Host Rewards Gifts will be posted to you at no extra cost.
Interested?   Find out more here


Happy Stamping.

Carolyn

Sunday 13 March 2016

Easter Bunnies!

How cute are these little Lindt bunnies.  When I first saw these little bunnies my first thought was "Now how can I make something to package these to give away at Easter".  This is what I came up with.


To make this project you will need a piece of Early Espresso cardstock 8" x 2", scored at 3 1/2" x 4 1/2".  Punch each end of this piece using the Scalloped Tag Topper Punch.   Burnish all score lines.  Create a template using the 1 3/8" Circle punch and adhere this into position on the front, leaving enough room from the bottom for the sentiment.  Punch out using the 1 3/8" Circle punch. Punch a 1 3/8" circle from Gold Foil Sheet and then using the 1 3/4" Scalloped Circle punch punch around this circle to create the gold frame.  Adhere to the front. You have now created the outside wrap for the little box.

For the little box inside you need a piece of Early Espresso cardstock 3" x 2", scored at 1/2" on all sides.  Snip all 4 corners on the short side to the first score line.  Fold and burnish all score lines.  Make this into a box.  Wrap the outside piece around the box and adhere in place, making sure that the open side of the box is face down.  Place some Stick and Tear Tape on the bottom of the Lindt bunny and position in place.

Add a piece of Gold Satin ribbon and Gold Metallic Bakers Twine to keep the holder closed.  Add some little gold flowers and the "Happy Easter" to finish.

You can get all the supplies you need for this project
 by shopping with me.
  You can place an order online and join in 
the fun with the On-line Club or Contact Me and place an order.


Thank you for visiting.

Carolyn

Saturday 12 March 2016

Pretty Quartet ...

Hi everyone, sharing a pretty quartet of cards.  I have been playing this afternoon with the Hello You Thinlits.  I started off by just making one card and as I was stamping, sponging and sticking I had the idea to use the same card layout but change the words to use each of the thinlits, and before I knew it I had four cards.


Cardstock used is Crumb Cake, Pink Pirouette, Watermelon Wonder and Old Olive.  The background was made by inking the Brick Wall embossing folder with Whisper White Craft ink and embossing a piece of Crumb Cake cardstock.   


The stamp sets used are Crazy About You, Bloomin' Love and Botanical Blooms.  The sentiments were stamped with Crumb Cake ink onto banners that were made by cutting strips of Crumb Cake cardstock 1.5cm and making the flag ends using the Banner Punch. The tag was made using the Scalloped Tag Topper Punch with Very Vanilla Thick Bakers Twine added to the top of each tag. The flowers were made using the Botanical Builder Framelits, with the Old Olive leaf stamped with the matching image in the Botanical Blooms stamp set.  All pieces were inked on the edges with Whisper White Craft ink, including the flowers, leaves and flower centres.

You can get all the supplies you need for this project
 by shopping with me.
  You can place an order online and join in 
the fun with the On-line Club or Contact Me and place an order.


Thank you for visiting.

Carolyn

Friday 11 March 2016

What a great time to join Stampin' Up!


What a great time of the year to join Stampin' Up!.  You get the Demonstrator Starter Kit where you get to choose $235.00 of product for just $169,00 plus you get to choose $60.00 in products for free. That's $295 of product for only $169.00.  You also get a business supply pack valued at $80.00, that is a total value of $375.00.


Interested in Joining?
Please make sure that you select me as your Demonstrator.

Thursday 10 March 2016

#imbringingbirthdaysback

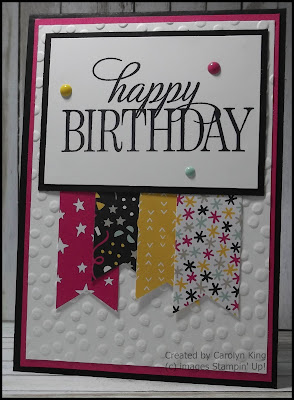
Hi everyone, my cards today are part of my stash I have been making for birthdays.  Our Stampin' Up! team are joining in the fun #imbringingbirthdaysback, so I have been busy getting my stash together so I am ready for the big days when they arrive. 

Shannon West, Stampin' Up!'s training manager, is bringing birthdays back with her own #imbringingbirthdaysback movement. Read her story on the Stampin' Up! blog.


I have used the It's My Party Designer Series Paper Stack, It's My Party Enamel Dots with a colour scheme of Basic Black, Melon Mambo and Whisper White. The banners were made using the Triple Banner Punch. The stamp set I have used is a Hostess set "Happy Birthday, Everyone", you can get this with a qualifying order by shopping with me here


The design layout for this card I cased from a similar card in the Australian Simply Cards magazine.  I really liked the sketch and it is a perfect way to use the vibrant colours in the It's My Party Designer Series Paper Stack.


This card is a quick and easy to make with the Whisper White background embossed using the Decorative Dots embossing folder and some banners added to the bottom of the sentiment panel. Finished off with a few It's My Party Enamel Dots.


This card is the same layout as the previous card, just with a different orientation and longer banners.


You can get all the supplies you need for this project by shopping with me.
  You can place an order online and join in 
the fun with the On-line Club or Contact Me and place an order.


Thank you for visiting.

Carolyn

Sunday 6 March 2016

It is nearly Easter..

Hi everyone, sharing my finished Easter Egg gift bags that I made for my colleagues at work.  Easter is nearly here and I thought that I had better get these finished as I had to make 28 of these little bunnies for everyone.  The boys get the dots and the girls get the flowers.


I used Chocolate Chip as the base colour for my bags as the Easter Eggs are chocolate (logical I thought) and it also coordinated with the Blushing Bride in the ears of the bunnies.   I used the Gift Bag Punch Board to make the bags and the Chocolate Chip Designer Series Paper is from the Neutrals Paper Stack.

The bunnies were made using the Friends & Flowers stamp set and the matching Festive Flower Builder Punch and the 1 3/8" circle punch.

The "Happy Easter" tag was made using the Tags and Labels Framelits, Gold Foil Sheet, Whisper White cardstock and the stamp set Crazy About You.

A bit of gold was added by way of Gold Sequin Trim, Mini Gold Metallic Peg and the new Gold Glitter Tape which you can get free as part of Sale-A-Bration.   All you have to do is put in a qualifying order of $90 and you can get it free.

You can get all the supplies you need by shopping with me.
  You can place an order online and join in 
the fun with the On-line Club or Contact Me and place an order.


Thank you for visiting.

Carolyn

Thursday 3 March 2016

Just a few little flowers ...

Just a quick post today, sharing a card I made using the Botanical Builder Framelits (I have not quite worn them out yet).


I was in a bit of a floral mood when I was designing some cards for fund raising at work and this is one of my creations.  I have used the Botanical Gardens Designer Series Paper, a Tea Lace Doily, sequins and the Rose Wonder stamp set.  I love the font on the sentiments in this stamp set.

Thank you for visiting.

Carolyn

Tuesday 1 March 2016

Botanical Birthday

Hi everyone, sharing a little more information on the card that I made for my Stampin' Up! entry for the opportunity to stamp projects for the OnStage display boards for the April Event.


I started with a Watermelon Wonder A2 card and cut off 4.5cm from the front.  I then added a Whisper White mat 5.5cm x 14.3cm to which a piece of Birthday Bouquet Designer Series Paper 5cm x 13.8cm was added. 

Using the second largest framelit I cut 2 Watermelon Wonder Deco Label pieces (one for the inside). The one for the card front I adhered with double sided tape, lining up the points on the centre top and bottom of the Deco Label with the edge of the card front.

Using the second smallest framelit I cut 2 Whisper White Deco Label pieces (one for the inside).  This was embossed using the Decorative Dots Textured Impressions Embossing Folder and adhere to the larger Watermelon Wonder Deco Label.

I then stamped "Happy Birthday" from the Rose Wonder stamp set using Archival Black Ink on a piece of Whisper White cardstock 3cm x 8cm.  I adhered this to a Watermelon Wonder cardstock mat 3.5cm x 8.5cm and then adhered it to the card front centred across the Deco Label, making sure that the edge of the sentiment panel was lined up with the edge of the inside of the card (hope this makes sense but just look at the picture and you will see what I mean).

I cut my flower from Blushing Bride cardstock and the leaves from Mossy Meadow and Old Olive cardstock using the Botanical Builder Framelits.  I sponged Watermelon Wonder on the flower centre and then added a Watermelon Wonder stamen piece, an Iced Rhinestone was added to finish the flower. The Old Olive leaves were stamped with Old Olive ink using the Botanical Blooms stamp set.  The leaves and flowers were arranged on the side of the Deco Label piece, a Dazzling Diamond Glimmer Paper butterfly was add along with some Blushing Bride enamel glitter dots from the Love Blossoms Embellishment Kit.


For the inside cover of the card I added a Whisper White cardstock mat 5.5cm x 14.3cm to which a piece of Birthday Bouquet Designer Series Paper 5cm x 13.8cm was added.  For the inside back of the card I added a Whisper White cardstock mat 14.3cm x 10cm and a piece of Birthday Bouquet Designer Series Paper 13.8cm x 9.5cm.  The Deco Labels were adhered to finish the card.

Thank you for visiting.

Carolyn