I have seen several of these little gift boxes on Pinterest but I am not sure who first designed it, so whomever did you thank you very much. The one that I found was made from a piece of 4 1/2 by 6" piece of Designer Series Paper with the finished box being quite small.
I re-designed the box making it larger so that base of the box is 2 1/4" with the height being 2". It fits 5 small round soaps perfectly or you can put in 6 wrapped toffees, or a piece of jewellery or money.
Score on the 8” edge at
1 ¼”, 2 ½”, 3 ¾”, 5”, 6 ¼” & 7 ½”
Score on the 5” edge at
1 ½” & 3 ½”
Measure 5/8” between
each 1 ¼” panel (this is the centre point) and score from this point on the
diagonal to where the first horizontal score line meets the vertical score
lines (see picture below).
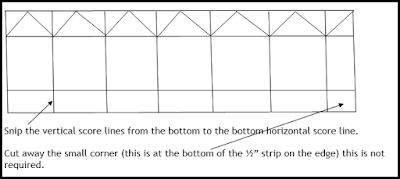
Snip the vertical score
lines from the bottom to the bottom horizontal score line (see picture).
Cut away the small
corner (this is at the bottom of the ½” strip on the edge) this is not
required (see picture).
Fold and burnish all
the score lines.
Cut 6 pieces of 1 1/8”
x 1 7/8” DSP and adhere these to the box sides.
Join the sides of the
box together and make sure that the diagonal folds on the top are burnished.
Punch a hole in each
diagonal flap using the 1/8" handheld circle punch. This is for the Baker's Twine.
Join the bottom of the
box together.
Cut two pieces of Baker's Twine, one Cherry Cobbler an one Very Vanilla, about 18" long. Thread the Baker's Twine through the holes, add your soap or toffees and close the top of the box with a bow. Tie a knot in each end of the Baker's Twine.
To decorate die cut the Fern using Mossy Meadow cardstock, the Leaves using Old Olive cardstock and the small foliage using Gold Glimmer Paper.
Stamp the "May the Simple Joys of the Season Be Yours" on a piece of Basic Black cardstock using Versamark ink, add White Embossing Powder and heat set. Cut out using the 2nd smallest Oval in the Stitched Shaped Framelits.
Layer the leaves and foliage on the box front before placing the sentiment oval on top.
If you live in Australia
you can get all the supplies you need
for this project from me.
You can place an order online or Contact Me and place an order.
Thank you for visiting.
Carolyn


No comments:
Post a Comment